
Tasks & Projects
Task Management
Support Guide
-
Overview
Task Management is used for tracking any service you provide as a company, whether internally for your Employees or externally for your Customers. By utilizing Task Management in Striven, your Company can track Employee workloads, Service Metrics, and build custom reports to show Task data within your system. Striven also has the capability to allow Customers to see Tasks associated with them and allow Vendors to see Tasks assigned to them through the Customer/Vendor Portal. This Task Management User Guide will explore how to set up Task Types, Pools, Dispatch, and much more to enable you to start utilizing Task Management in Striven.
Read this guide if you are trying to:
✔ Configure and Setup Task Types.
✔ Utilize the Task List to keep track of work and to-dos.
✔ Report on Workload for Team Members.
Task Types
-
Setting Up Your Task Types
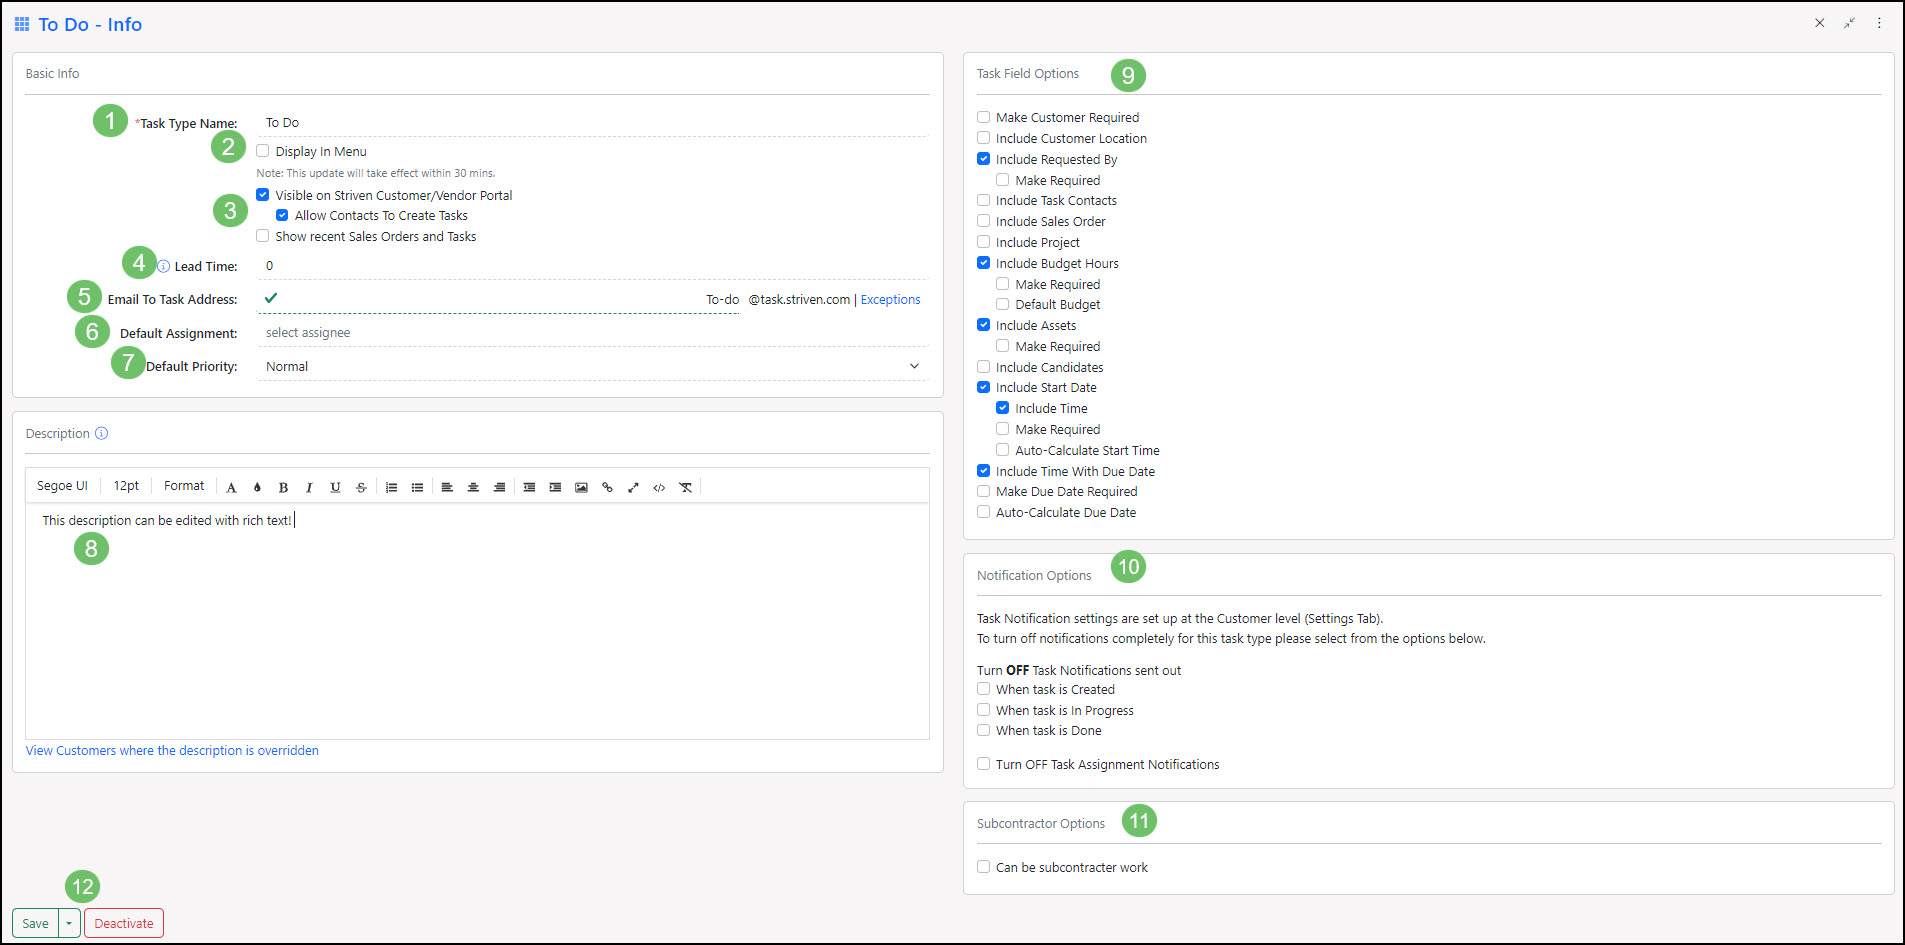
If you complete many different types of work, you will want to set up Task Types before utilizing Tasks in Striven. Creating Task Types will ensure that certain information is associated with different types of work. There are many options within Types, such as having your Tasks visible within the Striven Customer/Vendor Portal, allowing Contacts to create Tasks themselves, allowing for Subcontractor use, and much more. When on the Task Types List, you can add a new Task Type simply by clicking the Add button. Below is a screenshot displaying how adding a Task Type appears and a list describing what you can accomplish here. To view Task Types, use the following steps below:
Company → Settings → Tasks → Tasks Setup → Task Types
- Type Name: The name of the Task Type being added. This name will appear in drop-down menus when selecting a Task Type.
- Display in Menu: Adds the Task Type to the Tasks tab menu for users to choose to add.
- Note: The Task Type will appear in the menu approximately 30 minutes after creation.
- Visible on Portal: Notes whether the Task Type will be visible on the Customer/Vendor Portal. If this is selected, another option will appear to either allow or deny Portal users to create Tasks of this type from the Portal using the Submit Request feature.
- Lead Time: Notes how far in advance recurring Tasks are to be created.
- Email to Task: When a Customer sends an email to the selected handle, it will then generate a Task within Striven. The subject of the email will become the title of the Task and the body of the email will populate the Task Description. Attachments will remain attached as well.
- Default Assignment: The Default Assignment for this Task Type. If you have a Task Type that gets assigned to the same Employee/Pool/Team on a regular basis, you can set them as the Default Assignment.
- Default Priority: The default Priority for this Task Type. If you have a Task Type that is on average more urgent than others, you may want to note that here by having the default set to a higher Priority.
- Note: Priorities in Striven are customizable and configurable to fit each Company’s needs.
- Description: Displays on any Task that is created relating to the particular Task Type. This feature can be useful in describing anything you want to be included or to be known in a Task of this type, including information with specific details or formatting requirements. This option is explained in further detail in a separate section below.
- Task Field Options: These settings are explained in further detail in a separate section below.
- Notifications: Enables you to choose to turn off Task notifications sent to Assignees and Contacts when Tasks are created, set to In Progress, or set to Done. You can also turn off all notifications here if desired.
- Note: A Task is considered In Progress once the Assigned To person has viewed the Task.
- Subcontracted: By choosing Can Be Subcontracted Work, the section will expand with more available options, which are discussed further below:
- Default as Subcontracted: Provides the option to make this Task Type Subcontracted by default.
- Display Customer Information Before Acceptance: Enables the Vendor to review the Customer Information before deciding to accept the Task.
- Make Attachments Uploaded by Subcontractor Visible to Customer: Allows Customers on a Task to view any attachments the Vendor uploads to the Task.
- Default PO Template: Determines the default PO Template to be used for Tasks of this type.
- Default PO Type: Determines the default PO Type to be used for Tasks of this type.
- Saving Options: Provides the options to Save & Close, Save, or Close the Task Type.
Example of Creating a New Task Type

-
Task Type Descriptions
Striven has the ability to display a Task Type Description within a Task. Different from the familiar Task Description which displays in the middle of a Task describing what the Task is about; the Task Type Description will display towards the top of the Task as an non-editable text box.
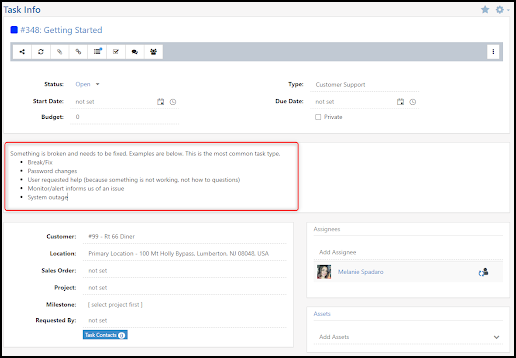
Example of Task Type Description Displayed in Task
The Task Type Description will automatically change based on what Task Type is selected when creating the Task. This will be helpful in making sure each description can be Task Type-specific.
- Note: The Task Type Description is visible when an Employee views or edits a Task of that type, but will not appear in the Customer/Vendor Portal.
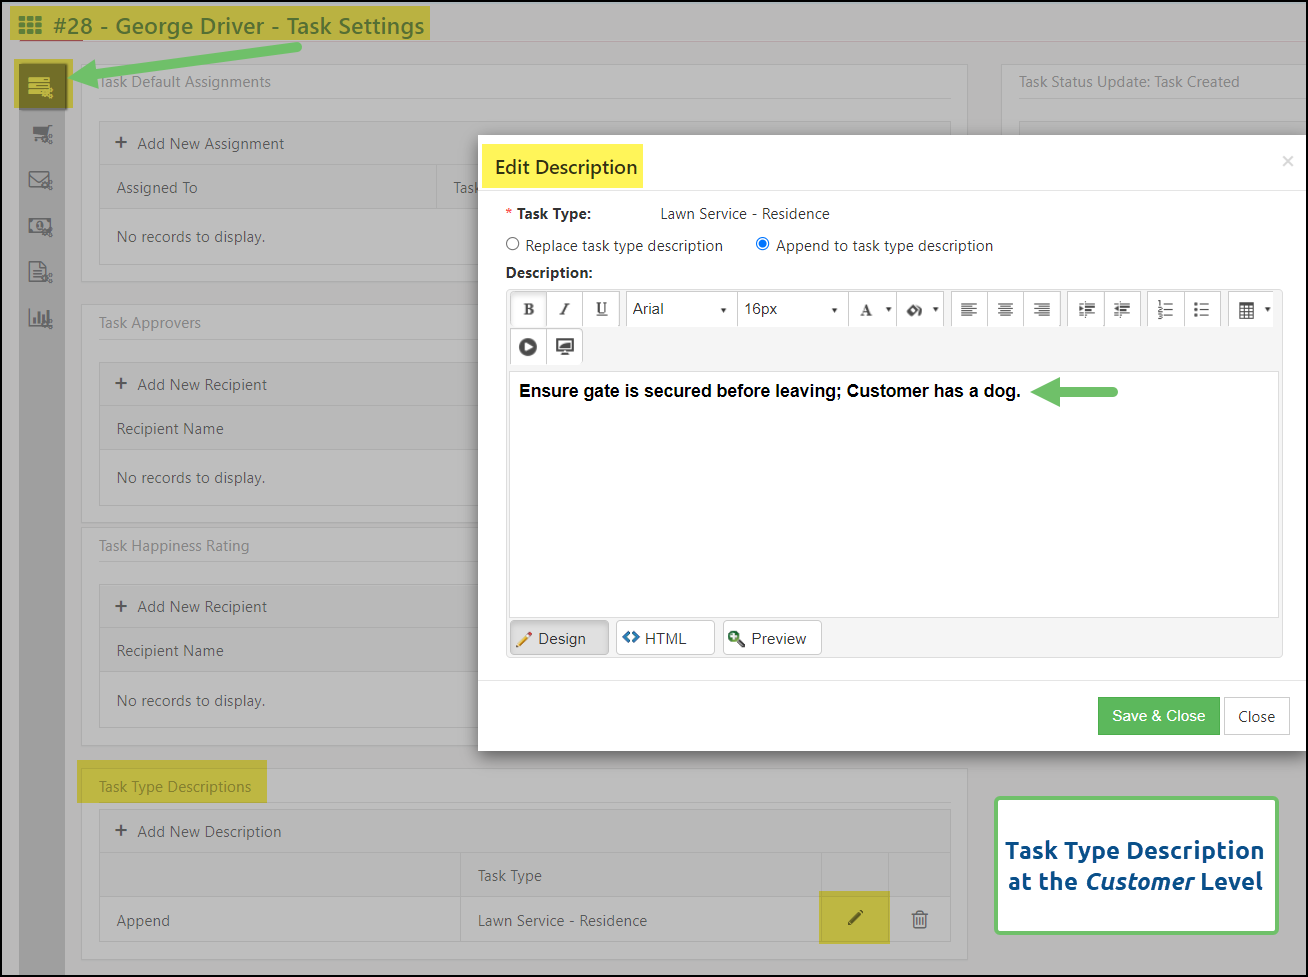
Customer Level Task Type Descriptions
In addition to the Task Type Description at the Task Type level, you can also customize your Task Type Descriptions at the Customer level. This is useful when you need to include additional or alternative details in the Task Type Description when working on a Task of this type for a Customer.
A good example of this would be if you have a Task Type that is used for a recurring service for your Customers, such as lawn care. The Task Type Description at the Task Type level can include the general details pertaining to how to complete a Task of this type, what the purpose of this Task Type is, or important steps that must be followed in order to complete the Task.

Example of a Task Type Description at the Task Type Level
Now consider that you have a Customer whose service involves further instructions or details, such as “Ensure gate is secured before leaving; Customer has a dog.” This important information can be saved at the Customer level to append to the Task Type Description and display accordingly on the Task.
Example of a Task Type Description at the Customer Level
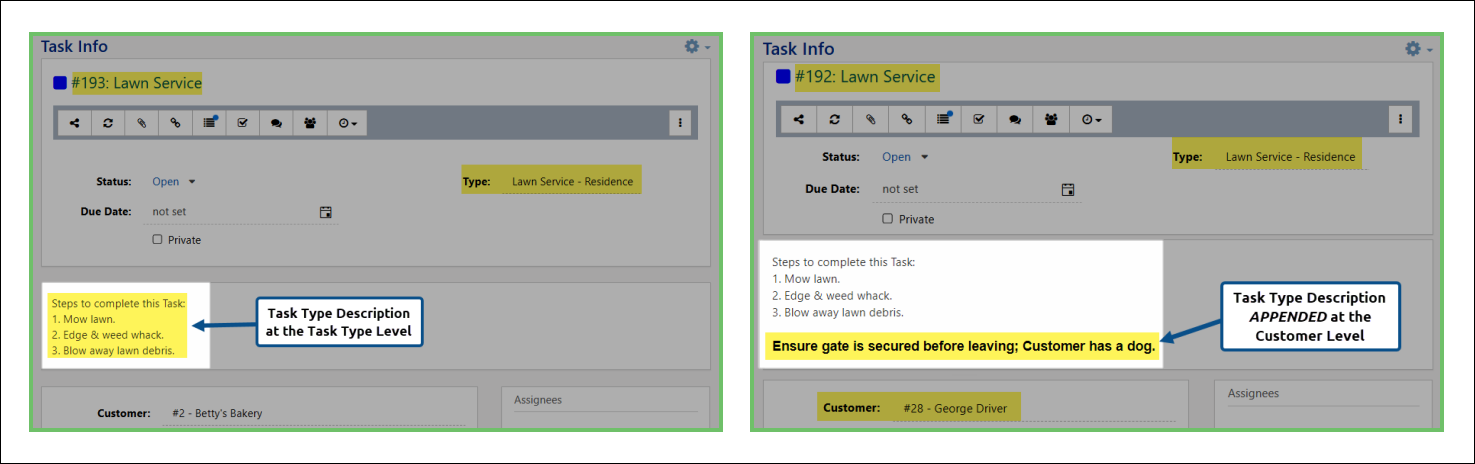
Examples of Tasks with Task Type Descriptions at the Task Type Level & the Customer Level
This Customer level Task Type Description can also be set to replace the Task Type Description at the Task Type level if necessary, based on the Customer.
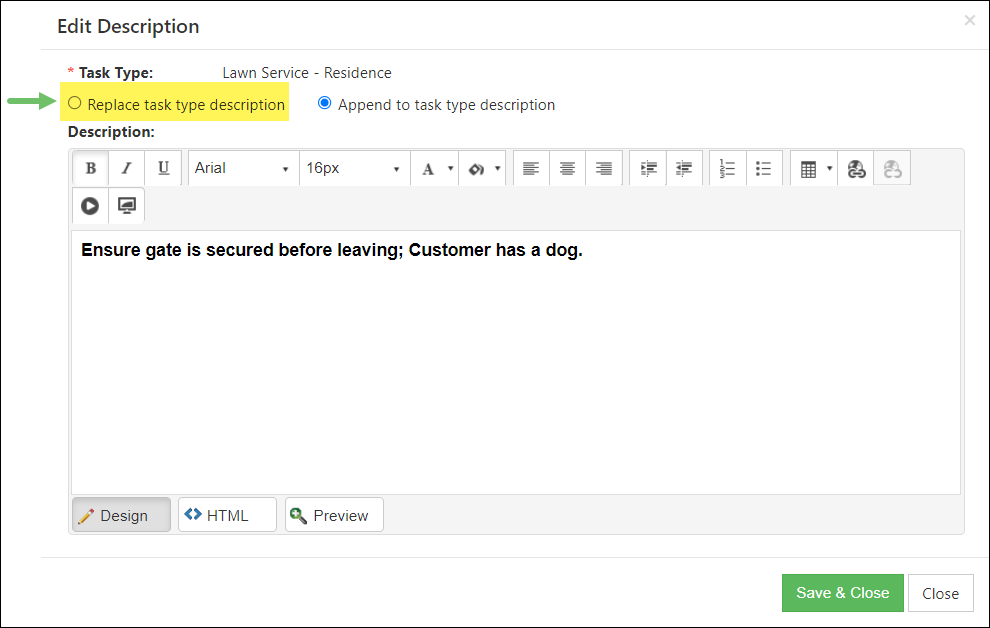
Example of Customer Level Task Type Description Settings
View Customers where Description is Overridden
Another handy feature with the Task Type Description is the option to view all Customers who have a Task Type Description saved at the Customer Level. This feature provides a list of the Customers with Task Type Descriptions at the Customer Level with a link to view their Customer Dashboard, or button options to edit or delete their Customer level Task Type Description, all from one screen.
Example of View Customers
-
Task Type Field Options
There are also display fields that can be enabled using the checkboxes on the right-hand side of the Task Type page. Below is a screenshot showcasing how adding Task Types appears and a list describing what you can accomplish here.
- Customer Info: There are checkboxes here related to the Customer information which are described further below:
- Make Customer Required: If this is required, users will have to associate a Customer, either before the Task is created or before it is marked Done (if the Type was altered after the Task was created).
- Include Customer Location: Allows users to choose the Customer Location from a drop-down menu on the Task.
- Make Required: If this is required, users will have to associate a Customer Location, either before the Task is created or before it is marked Done (if the Type was altered after the Task was created).
- Requested By: There are checkboxes here related to the Customer or Employee information which are described further below:
- Include Requested By: Allows you to associate the person (Customer Contact or Employee) who has requested the Task to be worked on. If selected, you can make this field required as described below.
- Make Required: If this is required, users will have to associate a Customer Contact or Employee, either before the Task is created or before it is marked Done (if the Type was altered after the Task was created).
- Include Order: Allows you to associate a Sales Order related to the Task. After choosing this option, the following options will appear:
- Make Required: Makes associating a Sales Order on this Task Type required before the Task can be marked Done.
- Can create new Order from Task: Allows you to create new Sales Orders from this Task Type. If this is enabled, there will be a quick-add that pops up when hovering over the Order field on the Task.
- Note: The Do Not Show section will hide any Orders that meet the following parameters: Change Orders for one-time Orders, completed Orders for one-time Orders, completed Orders for recurring Orders, Orders that are incomplete, or Orders that are Quoted/Pending Approval. These will not appear in the Order drop-down menu to relate to the Task if selected.
- Include Project: Allows you to associate a Project related to the Task. The following options are available:
- Include Milestone: Allows you to select a Milestone for the Project selected on the Task. This is convenient to quickly associate your Tasks to the Project and Milestone without needing to leave the Task page.
- Include Budget Hours: Allows you to enter Budget Hours or the amount of time needed to complete the Task. If selected, three other options will appear which are described further below:
- Make Required: Makes entering a Default Budget required before marking the Task Done. You can enter a numeric value to note the Budget Hours on the Task.
- Default Budget: Allows for a number to populate in this field automatically upon creating a Task of this type.
- Note: If Default Budget is selected, a space appears to enter the Default Budget amount.
- Include Assets: Allows you to select Assets needed to complete the Task. If selected, the option to make an Asset required will appear.
- Include Start Date: Allows you to select a Start Date for Tasks of this type. If selected, three other options will appear which include:
- Include Time: Allows you to select what time the Task should start.
- Make Required: Requires a Start Time to be entered before a Task can be marked Done.
- Auto-Calculate Start Time: Auto-calculates the Start Time when a Task is created, based on the numeric value entered here. The Start Time will be calculated off of the Created Date and time.
- Note: If Auto-Calculate Start Time is toggled on, a blank space appears to enter the number of hours from the Task’s creation that will be the start time. In other words, if you enter a 4 in the space, you’re allowing 4 hours from the time the Task is created to start the Task in order for the Task to be considered started on time.
- Due Date: There are three checkboxes revolving around the Task’s Due Date:
- Include Time: Allows you to select what time the Task should be due.
- Make Required: Requires a specific time to be entered along with the Due Date.
- Auto-Calculate Due Date: Auto-calculates the Due Date and time when a Task is created, based on the numeric value entered here. The Due Date will be calculated off of the Created Date and time.
- Note: If Auto-Calculate Due Date is toggled on, a blank space appears to enter the number of hours from the Task’s creation that will be the Due Date time. In other words, if you enter an 8 in the space, you’re allowing 8 hours from the Task’s creation to mark the Task Done in order to be considered completed on time.
Include Candidates: This checkbox allows you to dictate whether Candidates can be associated with created Tasks of this Type. 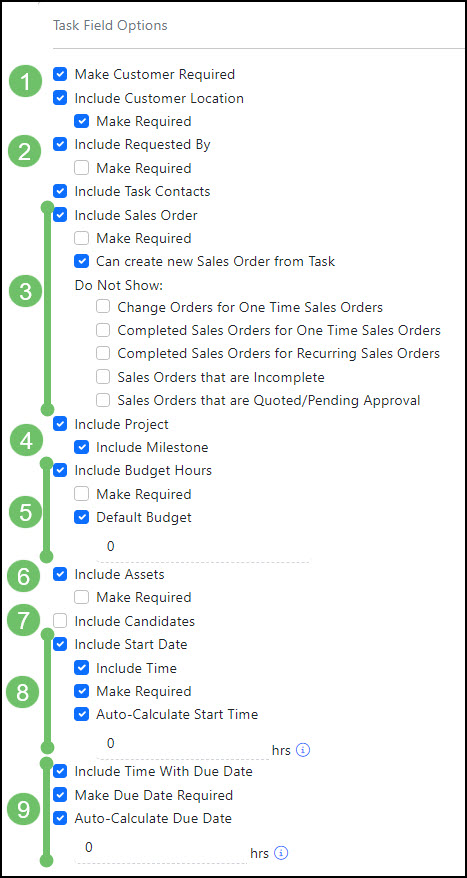
Example of Add Task Type Field Options
- Customer Info: There are checkboxes here related to the Customer information which are described further below:
-
Task Priorities
Task Priorities are used to determine the importance of a Task, which will allow you to see at-a-glance from your Task List which Task should be worked on first. When adding Task Priorities, you can note how long the response time should be for Assignees, whether the Priority is the default for Tasks, and a color icon to differentiate Task Priorities on the Task List. Establishing your Task Priorities with their response times will play a large role in calculating your Task Service Metrics, as well. Below is a screenshot displaying how adding Task Priorities appear.
Company → Settings → Tasks → Tasks Setup → Task Priorities
- Name: The name of the Priority, which will show up to be selected.
- Color: Enables users to select a color from the drop-down menu to differentiate Priorities. This will show on the Task List, Projects, and Reports.
- Response Time: Allows you to note how quickly Tasks of this Priority should be responded to in hours. This will determine if a Task has been started on time, which is displayed on the Team Efficiency Report.
- Is Default: Notes if the Priority is the default for Task creation.
- Description: Allows you to enter a description for the Priority.

Example of Configured Task Priorities
-
Task Pools
How to Create Task Pools in Striven
Tasks can be assigned to either a single Employee or a group of Employees called a Pool. Pools are one or more Employees in a group who can be assigned Tasks. When a Pool is assigned, each Pool member will receive a notification (unless notifications are turned off) from which they can add or re-assign themselves as the Task Assignee on a first-come-first-served basis. Once a Pool member assigns themselves the Task, it will be worked on by that Employee. There are default Pools in your settings that can be edited, and you can also create Pools from the Pool List. Below is a screenshot illustrating how adding Pools appears and a list of what you can configure here.
Company → Settings → Tasks → Pools Setup → Pools
- Name: The name of the Pool and will be visible in Task Assignee drop-down menus for you to choose from.
- Default Pool: Allows you to choose if this Pool will be the Default for created Tasks that are Unassigned.
- Description: You can add a brief Description of this Pool’s function or purpose.
- Custom Fields: If any Global Custom Fields have been saved for Pools, there will be additional fields to fill in when creating Pools in Striven.
- Pool Managers: Allows you to choose Employees who will be the Managers of the Pool being created.
- Note: Pool Managers can assign any Task from the Pool to anyone, as well as assign any Task to the Pool.
- Notification Recipients: Members of the Pool who will receive an email when a Pool is assigned to a Task. You can add emails, Employees, or Job Titles to receive notifications for the selected Pool.

Example of Configured Task Pools
-
Checklist Items Library
How to Use Tasks Checklists in Striven
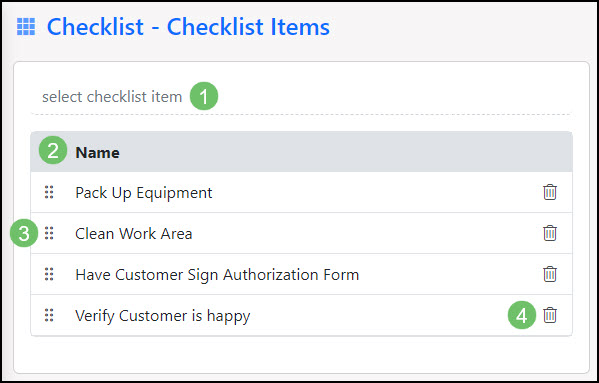
Checklist Items are steps or actions that will need to be completed before a Task can be marked Done. You can add Checklist Items to individual Tasks (see Task Actions below), but you can also add them in the global settings to Task Types in the Checklist Items subsection. By adding Checklist Items to Task Types, they will appear on Tasks created using those particular Task Types to be checked off by Assignees as they complete the work. You can also print the Checklists from the Task’s Checklist section if desired. Below is a screenshot representing how the Checklist Items appear in the settings. To view Checklist Items, use the following steps below:
Company → Settings → Tasks → Tasks Setup → Checklist Items
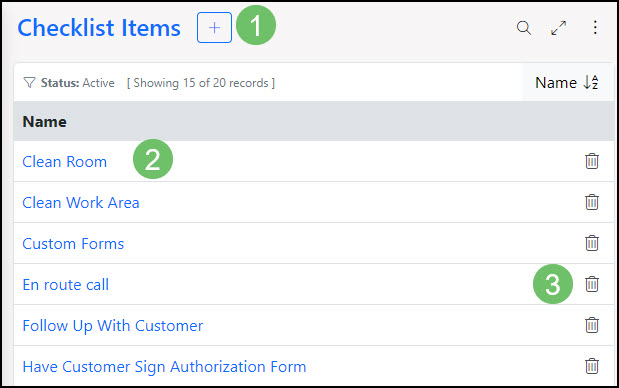
Example of Checklist Library List
- Add: Allows you to add new Checklist Items. Once added, these can be added to Task Types.
- Name: Lists Checklist Items that have been created within the library.
- Deactivate The Trashcan icon allows you to deactivate a Checklist Item.
-
Add Checklist Items to Task Type
Once the Checklist Library has been set up, you can now have them saved per Task Type. Adding Checklist Items into the Task Types will essentially allow the checklist to be populated each time a Task of that type is created.
To add a checklist to a Task Type, use the following steps:
Company → Settings → Tasks → Tasks Setup → Task Types → Select Task Type from List → Checklist Items located under the Waffle menu → Add
- Checklist Item Name: Allows you to search your Checklist Items by name and select them from a drop-down list.
- Name: Displays the Names of the Checklist items added to the Task Type
- Move: You can click and drag the Checklist items to the order in which you would like them to display.
- Deactivate: Allows you to remove and deactivate a Checklist item directly from this list.
Example of Add Checklist Items to Task Type
Task Management
-
Tasks Dashboard
The Tasks Dashboard is a fully-customizable page that allows you to add, track, manage, and report on Tasks within Striven. Widgets can be added, removed, and reconfigured using the Manage Widgets popup on the right-hand side of the Dashboard page. Below are some of the available widgets on the Tasks Dashboard page.
- Note: Any widgets available on the Tasks Dashboard page will also be available on the My Dashboard page. Also, all widgets can be renamed.
To access the Tasks Dashboard, the path is as follows:
Tasks → Dashboard
- Add Tasks: Use this widget for quick links to the Task queue, Tasks Dispatch, Workload Management, and Task Import.
- Efficiency: Shows a visual representation of Tasks started on time and/or Tasks not started on time along with average response time and resolution time. The Tasks can be filtered to show certain Task Types, Tasks for certain Customers, Tasks of a certain Priority, and Tasks assigned to particular Employees, Teams, and/or Pools. Date filters can also be used to narrow down which Tasks are used in the calculations. Response time is calculated based on the time between Task creation and when it was viewed by the first Employee or Team member it gets assigned to. Resolution time also takes business hours into account.
- Available Filters : Date periods, Task Types, Customers, Assigned to, Team, Priority, Pool
- My Tasks: Shows Tasks assigned to you and sorted by Due Date. Each Task listed is hyperlinked and will bring up that Task in another tab.
- Recent Tasks: Shows Tasks you’ve recently viewed. This includes Tasks not assigned to you.
- Tasks by Customer: Shows a filtered or unfiltered view of Open Tasks.
- Available Filters : Date periods, Task Types, Customers, Customer Assignment Category
- Tasks by Type: Displays a filtered or unfiltered view of Open Tasks.
- Available Filters : Date periods, Task Types, Customers, Customer Assignment Category
- Tasks – Custom Report: Shows results from Custom Reports created using the Report Builder and using the Tasks Dataset.
- Tasks – Happiness Rating: Allows you to review the Happiness Rating responses for a filtered or non-filtered set of Tasks.
- Available Filters : Date periods, Task Types, Customers, Assigned to, Team, Priority.
- Note: Happiness Rating will need to be turned on in your Company Settings in order to use this widget effectively.
- Available Filters : Date periods, Task Types, Customers, Assigned to, Team, Priority.
- Team Summary – Completed Tasks: Displays a filtered or unfiltered view of completed Tasks in Striven. Selecting the bars in the bar graph will take you to a filtered view of Tasks matching the selected filters.
- Available Filters : Date periods, Task Types, Customers, Assigned to, Team, Pool
- Team Summary – Open Tasks: Enables you to view a filtered or unfiltered view of Open Tasks in Striven. Selecting the bars in the bar graph will take you to a filtered view of Tasks matching the selected filters.
- Available Filters : Date periods, Task Types, Customers, Assigned to, Team, Pool
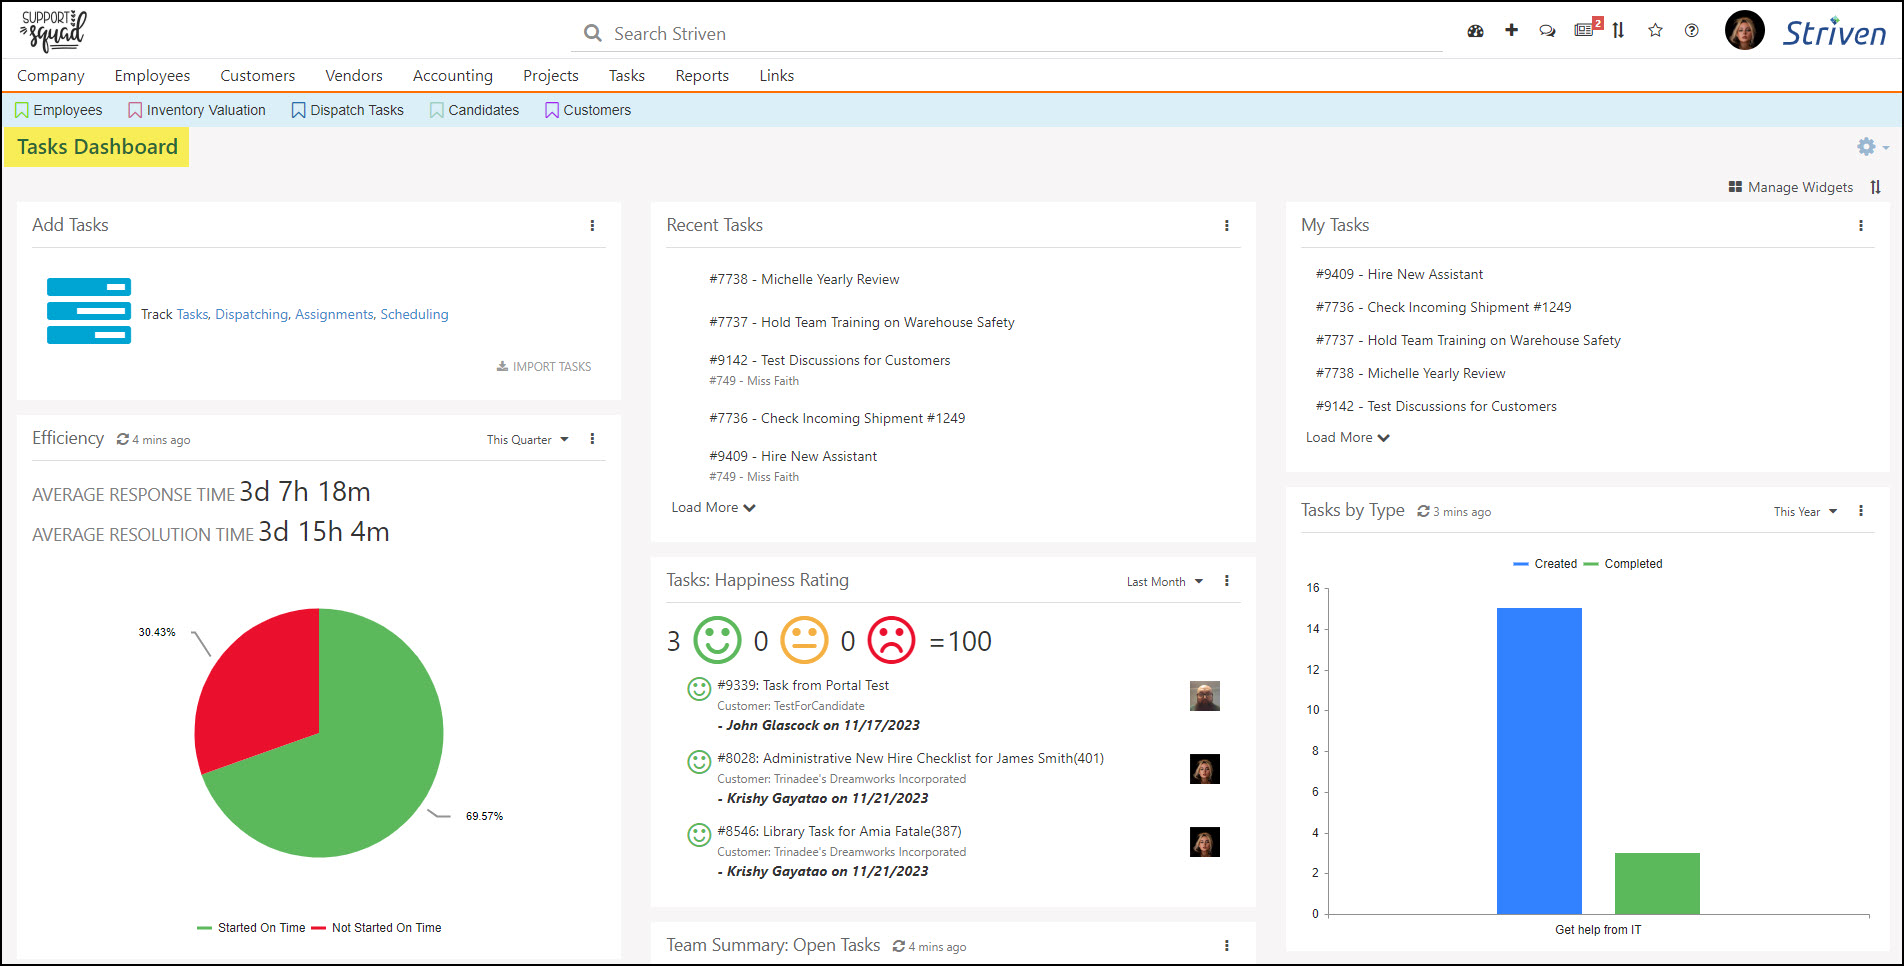
Example of a Configured Tasks Dashboard
-
Tasks List
How to View Tasks in Striven
When you are ready to start viewing or creating Tasks, you can utilize the Task List to begin organizing your work, assign Tasks to other Employees, and begin collaborating with your Customers as you complete requests for them. The Task List has a lot of functionality to allow users to search for Tasks, view Tasks due that day/week, create and assign Labels, and manage Tasks. You can also add new Tasks from the Task List. Below is a screenshot demonstrating how the Task List appears and a list describing what you can accomplish here. To view the Task List, use the following steps below:
Tasks → List
- Search: Allows you to search for specific Tasks. Search filters include: Due Date, Assignee, Customer, Task Type, and many more to narrow down the search results.
- Due Date: Displays Due Date buckets to toggle on and off to show Tasks that are due within the selected date. There are two default ranges, including Due Today and Due Tomorrow. Custom buckets can be added by typing in a number in the due within ___ days and clicking enter. Selecting a day on the calendar will add that specific date to the list as well.
- Note: Clicking on a date or range from this list will act as a filter and will display results in the list to the right. If Tasks are grouped by the Due Date (based on your Task Display Settings – Group Tasks by Due Date), buckets are separated on the Task List, as well as shown by the number 2 in the example image.
- Labels: Allows you to view and add Labels to be assigned to Tasks. Labels will appear on Tasks once the Label has been applied, as shown by the number 3 in the example image. Task Labels are discussed in further detail in the Task Labels section below.
- Add Task: The blue Plus ( + ) button will allow you to add new Tasks. Clicking the down arrow here will display the options to create Tasks from the library or import Tasks as well.
- Default Sort: Enables you to set the sorting order for Tasks in the Task List. Options include Task Priority, Start Date, Due Date, Created Date, Last Modified, and Last Modified by Me.
- Refresh List: Refreshes the Task List to show the most current data based on the filters selected. This is useful after changes are made to Tasks displayed in the List so you’re looking at current results.
- Settings: There are 2 settings areas on this popup:
- Task Settings: Allows you to set a Default Task Type, set the default task assignment to yourself, or mark tasks you create as private by default.
- Task List Settings: Enables you to Group Tasks by Due Date, as well as determine the Display Field options to show on the Task List. Display Field options include Task Number, Customer, Type, Start Date, Due Date, Created Date, and Last Modified Date.
- Task Info: After clicking on the Task, the Task Info will appear on the right side of the screen for you to manage Tasks more efficiently.
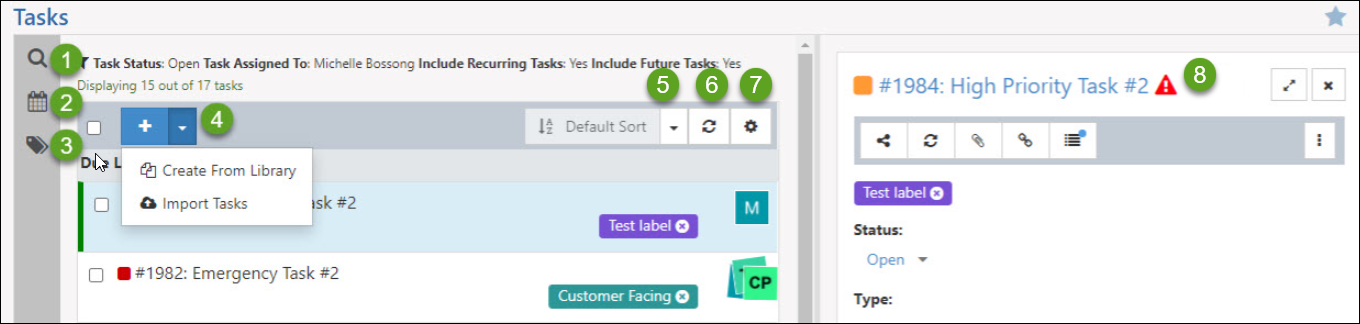
Example of Task List
-
Task Labels
Striven provides the ability to create and apply Task Labels to Tasks to allow for better organization of your Tasks, easy display of actions needed for a Task, and clearer identification of the type of work related to the Task.
For example, you can create Task Labels that identify if you’re waiting for clarification or a response from a customer or colleague before continuing work on a Task. If you use a process for completing a Task, you can create and use Labels to signal which step the Task is currently on and then switch to another Label when the step changes. You can even create Labels to more obviously identify details about the Task, such as the Customer or Employee assigned, a timeframe or deadline for the Task, or in order to group similar Tasks together.
Task Label Visibility Settings
There are multiple options when it comes to Task Label visibility, as demonstrated in the example image provided.
- Blue Globe icon: Identifies that the Label is visible on the Portal.
- Note: Only Public Labels can be made visible in the Portal.
- Gray Globe icon: Identifies that the Label is not visible on the Portal. You may make the Label visible on the Portal by clicking on the globe, which will turn it from gray to blue.
- Lock icon: Identifies the Label as Private. If there is no Lock, the Label is Public and can be used and viewed by other Employees or made visible on the Portal.
- New Label field: Enter a new Label name and click Save to create a new Task Label. You can also click on the colored block to select the desired color for your new Label.
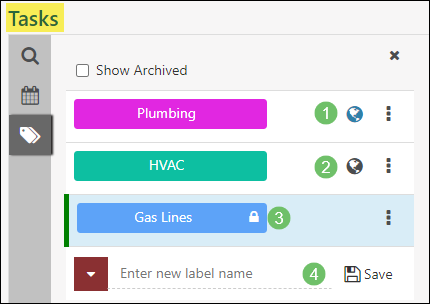
Example of Task Label Options
Public Labels vs. Private Labels
There are 2 kinds of Task Labels: Public Labels, which all Striven users in your system can see and utilize, and Private Labels, which only the Label creator can see, use, or edit and which cannot be set as visible in the Portal. Private Labels are identified with a Lock icon next to the Label name in the Task Label list on the Task List page.
When Task Labels are initially created they are Private and display with the Lock icon. To make a Task Label Public, you will need to have the “Public Task Labels – Add/Edit” permission included in your User Role. With that permission, you can click on the kebab menu on the Label from the Labels List and select the Make Public option.
- Note: Once a Label has been made Public, it cannot be switched back to Private.
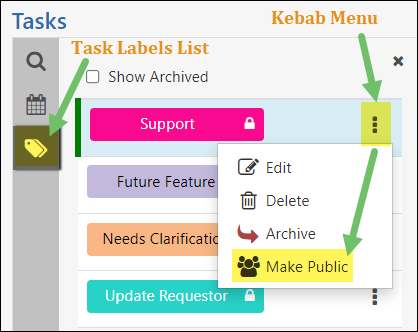
Example of Making a Task Label Public
Other kebab menu options for Task Labels include the following:
- Edit: Provides the opportunity to edit the Label Name or display color.
- Delete: Deletes unwanted Labels permanently.
- Archive: Hides the Label from the Label List and puts it to an Archived status in the event you wish to use the Label in the future. Clicking the Show Archived button will display a list of your archived Labels so you can reactivate them as desired.
- Note: Archived Labels will continue to display on Tasks they were applied to before they were archived, whereas Deleted Labels will disappear completely.
Applying Task Labels
Now that you know how to create your Task Labels, this guide will explain how to apply them. There are currently 2 methods for applying Labels to Tasks, which will be reviewed in detail below.
Drag/Drop Method
Navigate to the Task List and you will see the Left-side Menu Bar which includes the Task Search, Task Due Dates, and Task Labels options. From the Task Labels list, you will be able to apply Labels to Tasks by clicking on the desired Task and dragging/dropping it onto the Label you wish to apply to it. You can tell when to drop the Task as the Label will turn green as you hover over it with the Task. To apply multiple Labels to a Task, drag/drop the Task to each Label you want to be displayed on the Task.

Example of Drag/Drop Method for Applying Task Labels
Kebab Menu Method
Alternatively, you can apply a Task Label from the Task kebab menu found on the right side of the Task window. Selecting the Add Label option will trigger a popup window supplying the available Task Labels. Click on the desired Label to apply it to the Task. Repeat this process to add multiple Labels as needed.
Example of Selecting Task Labels From Kebab Menu
- Note: To remove Labels from Tasks, simply click on the X on the Label.
Filtering Tasks by Labels
Aside from the visual identification assistance Task Labels provide, you can also utilize them to filter your Task List. From your Task List, click on a Task Label to filter your list and display only Tasks with that Label applied to it. You can select multiple Label filters to narrow down your results more specifically or remove Label filters by clicking on the X next to the Label Filter on the top of the Task List.
Example of Filtering Tasks Using Labels
- Blue Globe icon: Identifies that the Label is visible on the Portal.
-
Task Actions
After you create a Task, you can configure what information is entered and who is assigned to work on the Task. By utilizing Task Types, you can unlock different functionality and associate different entities to accomplish your goals. Tasks can be added from the Task List, importing, Email-to-Task, or from within a Project. Below is a screenshot showing how a Task appears and a list describing what you can accomplish here.
- Share: Allows you to share the Task with other users. The link provided is an internal link and will require the user to log in to view the Task.
- Refresh: Refreshes the Task to load the most current version of the Task for users to work off of. This can be very useful if more than one person is working on a Task as they can be sure to have the most up-to-date version as they complete their work.
- Attachments: Initiates a popup that will display attachments and allow you to upload new attachments if desired. If your Task is visible in the Portal based on the type, these attachments will be available to the Customer as well.
- Linked To: Displays any entities that are linked to the Task you are viewing, such as recurring or duplicate Tasks.
- Audit Log: Initiates a popup that will display changes that have been made to the Task. Each change is audited to note who made the change and when.
- Check List: Initiates a popup (see Adding Checklist Items to a Task below) in which you can view, use, or add Checklist Items. If Checklist Items are present, they must be completed before marking the Task Done. Checklist Items may be printed as well.
- Discussions: Drops you down to the Discussions section of the Task towards the bottom of the page. Here you can take notes or start a Discussion to collaborate on the Task. There is also the option to tag someone not assigned to the Task to the Discussion for feedback or relevant information to the Task. This can be done by either adding them as a participant to a new Discussion thread, or by typing the “@” symbol before their name in the Discussion message window.
- Recent Orders & Tasks: If the Customer has had recent Orders and Tasks, these will be listed here. This will allow you to quickly view any recent work without having to navigate away from the Task Info page.
- View Log: Initiates a popup that displays the users who have viewed the Task. Both the most recently viewed and the most frequently viewed will both be available. Users will not see themselves represented in the View Log.
- Add Time: Allows you to create a Time Entry from the Task for hours worked to complete the Task. Information such as the Task, Customer, and more will populate automatically into the Time Entry for convenience. When in a Project, this setting may be located under the options menu in a Task.
- Options: Provides various settings selections which are described below:
- Duplicate Task: Copies the Task while carrying over the information into a new Task. Duplicate Tasks will be linked to each other to easily navigate to and from the copy and original.
- Set as Recurring: Sets a recurrence based on a daily, weekly, or monthly occurrence you set. Recurring Tasks will be linked to each other to easily navigate to and from the copy and original. Entering lead time will generate Tasks ahead of schedule to be created.
- Create Opportunity: Allows you to create an Opportunity from the Task. Opportunities created this way will link the Task and Opportunity to each other.
- Email Assignees: Allows you to send an email to the Assigned Employee(s).
- Follow/Unfollow Task: Displays whether or not you are currently following the Task. Toggle this option on (Follow) if you would like to receive Task Update emails, or off (Unfollow) to discontinue receiving Task Update emails. By default, Tasks assigned to you will send update emails.
- Add Label: Triggers a popup of the available Task Labels to choose from to assign to the Task.
- Task Label: Once a Task Label is assigned to a Task, it will appear on the Task and will also be visible on each Task it is assigned to in the Task List.
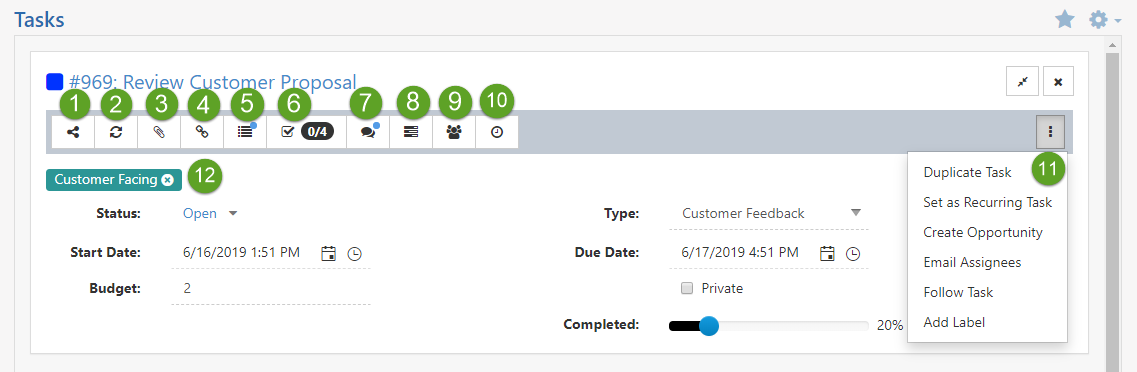
Example of Task Action Options
-
Task Fields
Users can also manage Task information including adding Assignees, associating Customers, changing Due Dates, and more. Below is a screenshot illustrating how the top section of a Task appears and a list describing what you can configure here.
Task Info
- Task Info: Displays information about the Task that has been enabled by the selected Task Type. Information here includes the following:
- Status: Displays where the Task stands. Statuses include Open, On Hold, Done, and Canceled.
- Start Date: Allows you to choose when the Task starts and can include time as well if enabled for the Task Type chosen.
- Budget: Allows you to enter how long the Task should take to complete.
- Due Date: Allows you to choose when the Task is due.
- Completed: Provides a visual estimation of how close to completion the Task is.
- Note: This option is available after a Budget is entered.
- Task Type: The type of Task, which you can select from the drop-down menu. Each Task Type will have its own functionality depending on what is configured, as discussed above in the Tasks Type section.
- Note: When changing a Task Type, a popup will appear if there have been default options set for the Task Type. You can choose to include those default values or disregard and change the Task Type.
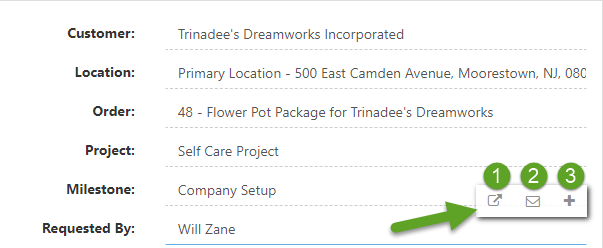
- Related Info: Allows you to associated entities to the Task including:
- Customer: The Customer for which the work is being done.
- Location: The Customer Location where the work is being done.
- Order: The Sales Order which the Task is associated with.
- Project: The Project the Task is associated with. Choosing a Project here will add the Task to the selected Project.
- Milestone: The Milestone the Task is associated with in the Project that has been selected.
- Requested By: The Contact who requested the work to be completed. This can be set to either an Employee or a Customer Contact.
- Assignees: Added here using the drop-down menu to select Employees, Customer Contacts, or Pools to complete work on a Task. The Assignee will have a Contact label denoting that they are a Customer Contact. If Teams are available for Task Assignments, you can assign Teams here as well. You can reassign using the Reassign Icon, which will unassign the original Assignee and assign a new Employee/Contact/Pool, or you can add an Assignee to work with other Assignee(s). If the Task Type is visible in the Portal, the Customer will be able to view the Task and participate in Discussions right from the Portal.
- Assets: Allows you to add a Customer’s Asset to be associated with the Task after associating a Customer to the Task. This is a very useful way to keep track of what equipment is being worked on if you track your Customer’s Assets.
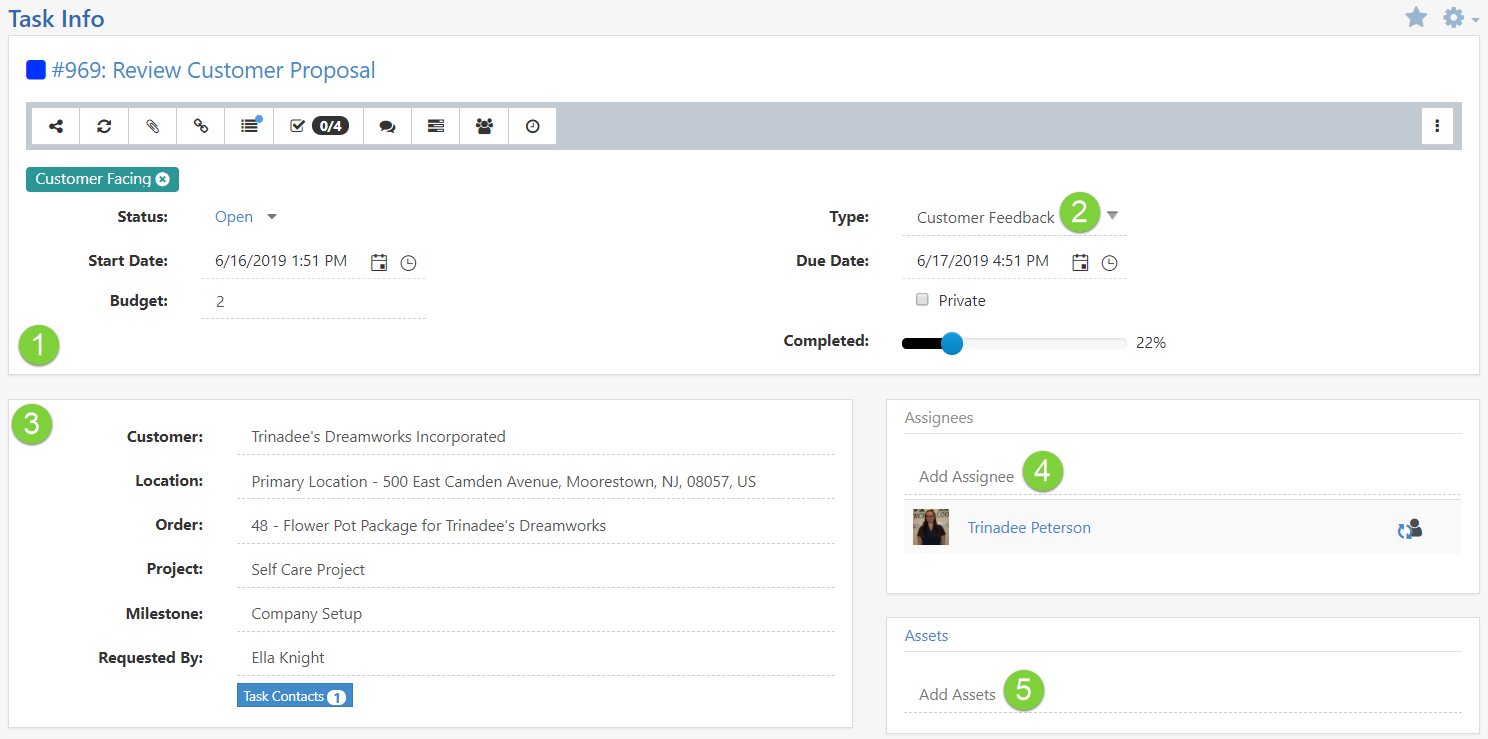
Example of Task Info Fields
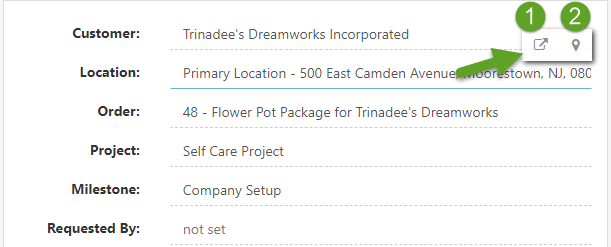
Customer Info
When hovering over certain fields in the Related Info section (#3 in the image above), you may see additional options within a popup. For example:
When you hover over the Customer Info, the following options popup:
- View Customer: Allows you to view the Customer’s Dashboard in a separate window.
- Assignments: Displays a popup with all Assignments related to that Customer.
- Quick-Add: Provides the option to swiftly add a Customer to your Striven system so you can designate it as the Customer the Task is related to.

Example of Customer Hover Options
Location Info
When hovering over the Location Info, you see the following options:
- View Location: Opens the Location Info for the Task in a new window.
- View in Google Maps: Opens the Location in Google Maps in another window.
Example of Location Hover Options
Order Info
When hovering over the Order Info, the following options appear:
- View Order: Opens the Order associated with the Task in a new window.
- Assignments: Opens related Customer Assignments.
- Create Order: Opens the Add Sales Order page in a new window, which will relate the Order to the Task.
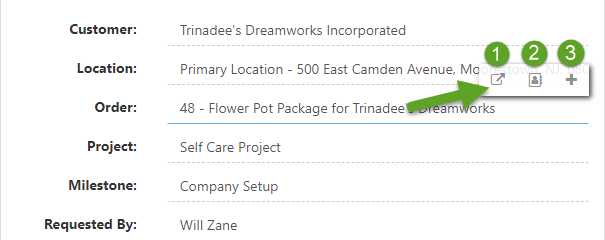
Example of Order Hover Options
Project Info
When hovering over the Project Info, the following options will appear:
- View Project: Opens the Project the Task is related to in a new window.
- Assignments: Opens a popup window displaying the participants assigned to work on the Task.
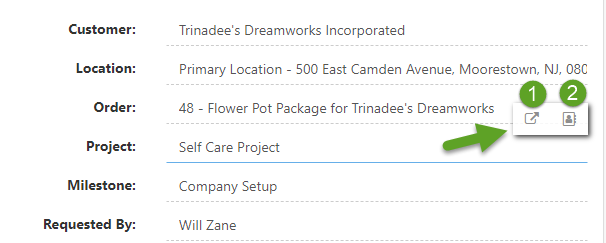
Example of Project Hover Options
Requested By Info
When you hover over the Requested By information, the following options will appear:
- View Requested By: Opens a new window displaying the Contact info for the person who requested the Task.
- Send Email: Opens an email message window to send to the Contact assigned as the Requested By Contact.
- Add Contact: Opens a Quick-Add window to add a Contact to the Task, or gives the option to associate to an existing Contact already in your Striven System.
Example of Requested By Hover Options
Task Description
Task Descriptions can contain links, attachments, and text related to the task you have created. The Description can continue to house information up to 1 MB.
If the Description size exceeds 1 MB for tasks created within Striven, a red Error Message will appear, advising you that the Description size exceeds the 1 MB limit.
Your description will not be saved when the limit is exceeded. This size restriction can also be found when completing Imports, creating Tasks using Public API, and when creating Tasks through the Customer/Vendor Portal.If the Task is created using the Email to Task feature and the Email Content exceeds 1 MB, the body of the Email which typically displays as the Description, will be transcribed into a PDF document. This Document is then automatically added to the Task Attachments to be reviewed.
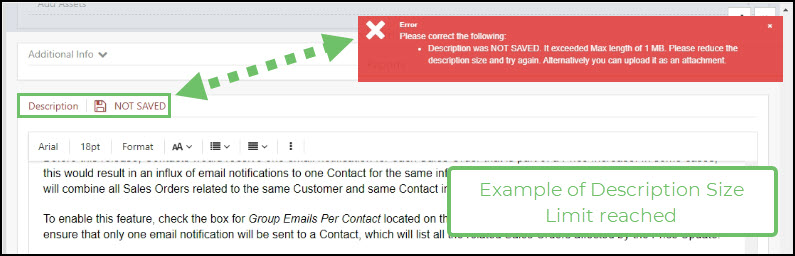
Example of the Task Description Size Limit Being Reached
- Task Info: Displays information about the Task that has been enabled by the selected Task Type. Information here includes the following:
-
Task Custom Fields
You can also manage Task information including completing Custom Fields, adding a description, and adding notes. Below is a screenshot displaying how this section of a Task may appear (based on the Task Type and requirements designated to the Task type) and a list describing what you can configure here.
- Custom Fields: If Custom Fields were added to the Task Type, they can be filled out here. If Custom Fields have been marked as required, they will be highlighted red if not filled out and will need to be completed before marking the Task as Done.
- Description: You can add a description for the Task in this section. Clicking this icon will populate an editor in which users can add images, content, videos, formatting, and much more. Contacts will be able to see information entered here in the Portal if you have the type visible to the Customer.
- Discussions: Allows you to add notes or collaborate with others within the Task.
- Tagging: Tagging occurs by typing either “@” or “+” followed by another user’s name or email address. This will initiate a drop-down menu to select a Employee or Contact to tag in a Discussion thread. Once the Discussion message is entered, the tagged user will receive an email with a hyperlink for them to view the Discussion in the Task.
- Note: Users can be tagged in both the description and the Discussions of a Task.
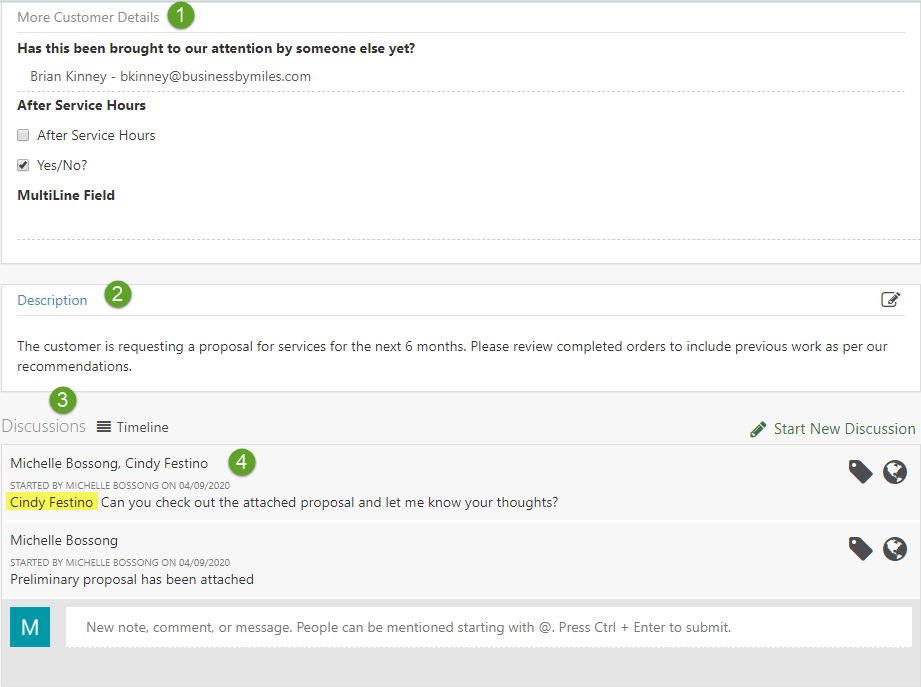
Example of Task Info Custom Fields, Description, and Discussions
-
Task Approval
Tasks can be configured to require approval by a Customer or Employee before the Task can be worked on. The designated Task Approvers are assigned at the Customer level within Task Settings. The Customer Contact or Employee you would like to approve Tasks must be added to the Task Approvers section of the Task Settings page in order to receive the Approval Needed notification email.
- Note: If you would like to add an Employee to the Task Approvers list of a Customer, they must be added as a Contact of the Customer’s account.
- Add New Recipient: Allows you to add a contact to receive the approval email.
- Recipient Name: Displays the name of the Task Approver, and a tag displaying that this recipient is a Contact of the Customer.
- Task Type: Lists the Task Types selected for this Task Approver. When adding a Task Approver, you can choose for Tasks of only a specific type or Tasks of any type to require approval from the selected Approver.
- Edit: Allows you to change the Contact chosen as the Task Approver, or change the Task Type(s) they are required to Approve.
- Delete: Allows you to remove a Task Approver.
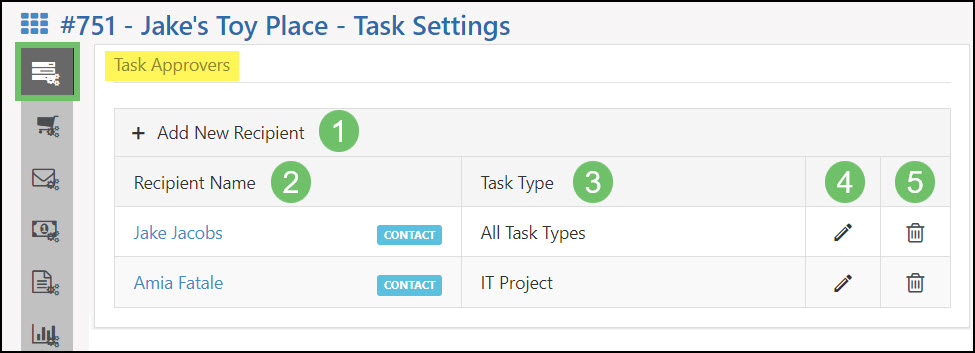
Example of the Task Approvers Settings
Approving a Task from Email
When a Contact is added to the Task Approvers list, they will receive an email containing a link to approve newly created Tasks. It is not required for the recipient of this email to access the Customer Portal to approve the Task. The content of these automated emails can be edited in the Notification & Portal Content for your company.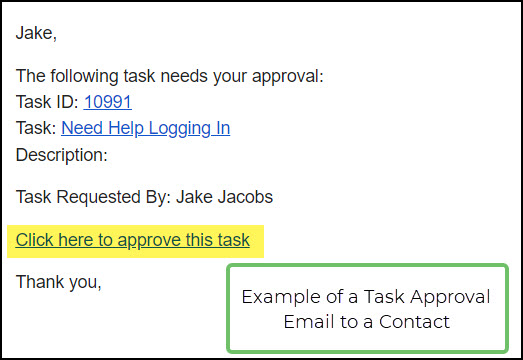
Example of the Task Approval Email
Approving a Task from within Striven
Tasks can also be approved by Employees directly from a Task. Attempting to view a Task that requires Customer approval prior to being approved will prompt a message box on the browser window which states that the Task cannot be worked on without approval. You can continue to view the Task by selecting “OK”.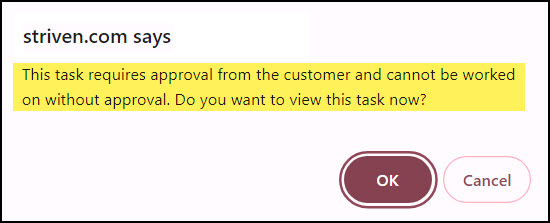
Example of the Notification Prompted by Viewing a Task Requiring Approval
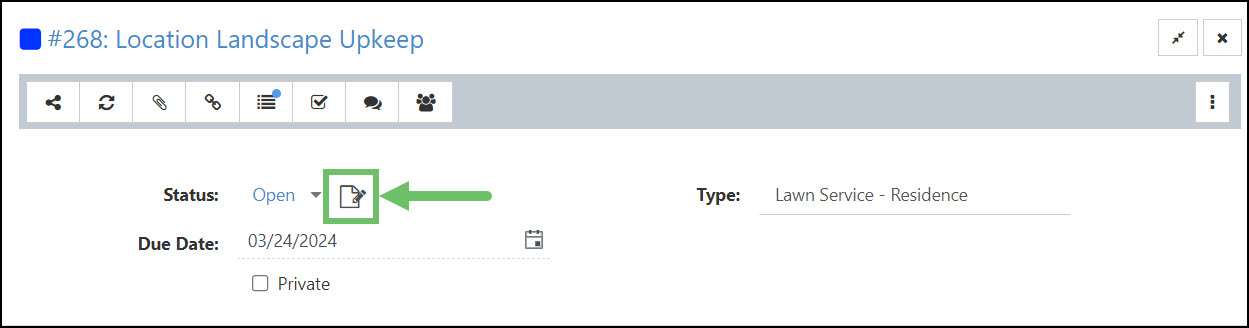
When viewing a Task requiring approval, a message highlighted in red will appear on the Task stating that the Task needs approval from the Customer, with an option to approve the Task.
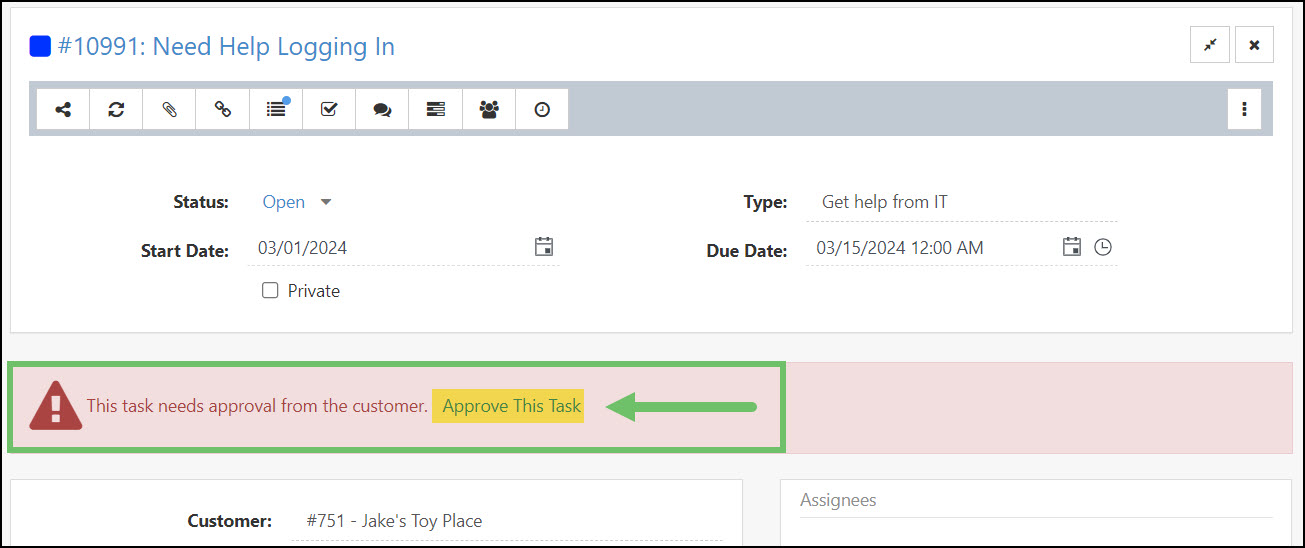
Example of the “Approve This Task” Option
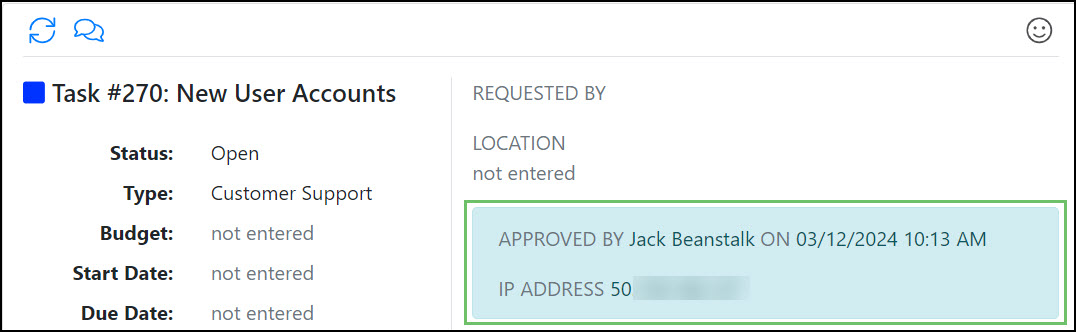
Clicking “Approve This Task” will mark the Task as Approved, and record the name of the logged in user who approved the Task, the date and time of approval, as well as the user’s IP Address.
- Note: The user approving the Task must have the permission “Tasks – Approve Manually That Need Customer Approval” added to their User Role to manually approve a Task on behalf of a Customer.
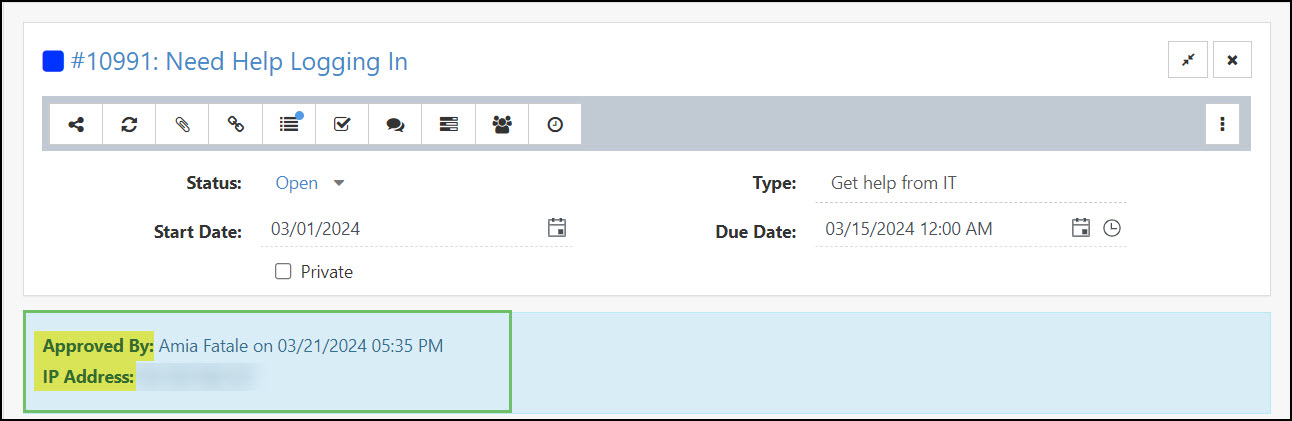
Example of the Task Approval Details
Approving a Task from within the Portal
Customers can approve Tasks through the Customer Portal within the Tasks List. Any Tasks requiring approval will display a green Approve button on the right side of the screen located under the Task Assignee’s icon.
Clicking the Approve button will display a popup message asking the Customer to confirm that they would like to approve the selected Task.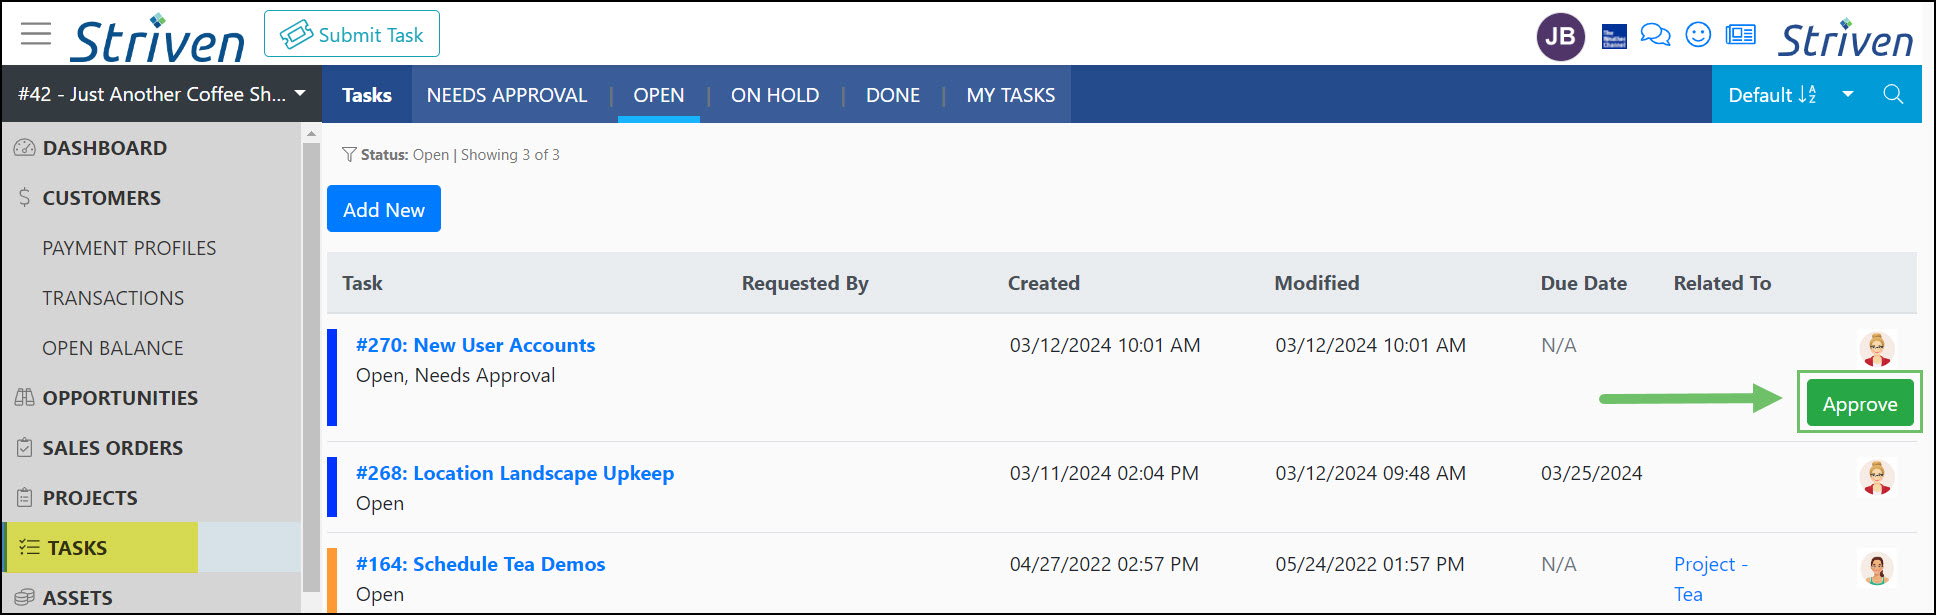
Example of the Approve Option on a Task in the Customer Portal
If “Yes” is selected, the Task will be marked as Approved and the Task Approver’s name, the date and time of approval, and the Approver’s IP Address will be captured and displayed on the Task.
Example of Task Approval Details in the Portal
-
Task Signatures
E-Signatures for a Task can be captured at the time of marking a Task as Done, or when an assigned Approver is marking a Task as Approved.
Permissions
To enable your Employees to capture electronic signatures (E-Signatures) for Tasks, you need to activate these two (2) user role permissions.
- “Tasks – Add E-Signature” : Allows the User to capture an E-Signature upon Task completion.
- “Tasks – Delete E-Signature” : Allows the User to delete an E-Signature upon Task completion, provided the Task has not been marked as Done.

Example of the User Role Permissions for E-Signatures
If you would like to enable the usage of Task Signatures for approval and completion within the Customer Portal, there is a Portal Role Permission associated with this function:
- “Tasks – Add E-Signature” : Allows a Contact to capture an E-Signature.

Example of the Portal Role Permission Needed for E-Signatures
Settings
Task Signatures can be enabled at the Task Type level. To configure a Task Type to capture E-Signatures, navigate to Company > Settings > Tasks > Tasks Setup > Task Types, and select the Task Type you would like to configure from the list.
When viewing the Task Type – Info page, you can select the following options regarding Task Signatures using the E-Signature section:
- Turn On E-Signature: Allows you to enable Task Signatures for this Task Type, but at least one requirement, On Approval or On Completion, must be chosen to begin capturing E-Signatures.
- Require on Approval: Requires a Task Signature to be captured at the time of Approval by the designated Task Approver. This will only apply to Tasks of this Type that have been configured to require approval at the Customer level. Task Approvers are set within the Task Settings section of the Customer’s Information.
- Require on Completion: Requires a Task Signature to be captured before the Task can be marked as Done. If Tasks are marked as Done en masse or by an API, this requirement will not apply.

Example of the E-Signature Settings in the Task Type
Using Task Signatures
Once the permissions and Task Type have been configured to capture E-Signatures they can be utilized in the following methods.
Task Signature Upon Approval
When requiring a Task Signature upon Approval, there are 3 ways that an E-Signature can be captured.Approval within Striven
- Clicking the Approve this Task option on a Task within Striven will prompt a Signature box to appear for the user to sign and approve the Task. This will capture the logged in user’s name, IP Address, and time and date of approval, in addition to the E-Signature.
Approval from Email
- When a designated Task Approver receives an email notification requesting Task Approval, clicking the link to approve the Task will prompt a window requiring an E-Signature to approve the Task. Once the Signature is completed, this will capture the Notification Recipient’s Name, Signature, Time and Date of Approval, and IP Address.
Approval from Customer Portal
- A Customer Contact will be able to sign to approve a Task by clicking the Approve option on a Task from the Tasks List within the Customer Portal. When clicking Approve, a popup window will appear to allow the Customer Contact to sign, and the E-Signature will be captured.
- Once the Task has been approved, the signature and the signer’s details will be displayed on the Task.
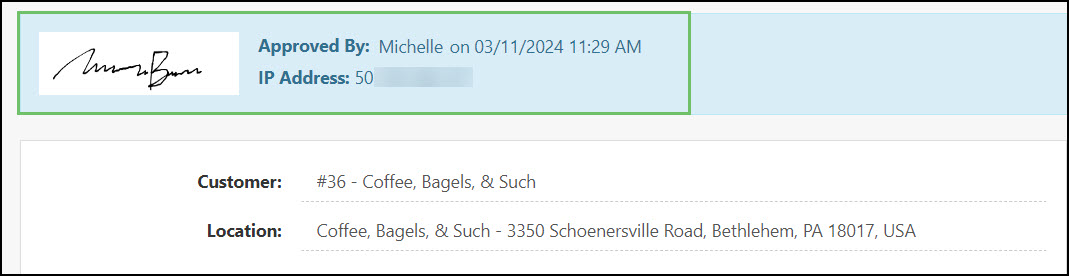
Example of the Approval Signature on a Task
Task Signature Upon Completion
Once Task Signatures are marked as Required on Completion, a Task cannot be marked as Done without a captured signature. Task Signatures can be captured through the Portal by a Contact or from within Striven by a user.Signing on Completion within Striven
- For Tasks which require a signature on completion, a Completion Signature icon will be displayed besides the Task Status. To capture a signature, a user with the permission “Tasks – Add E-Signature” can click the Completion Signature icon, which will prompt the Task E-Signature window where the User can then sign themselves, or assist the Customer with signing acknowledging that the work is complete via the user’s device.
Example of the Completion Signature Icon on a Task
The Task E-Signature window contains the following options when capturing a Signature:
- Name: Allows you to enter the name of the person providing the Completion Signature. This can be a user, Customer, or any individual confirming that the work associated with the Task has been completed.
- Signature: Allows the individual signing to use their finger or a mouse to add an E-Signature.
- Save & Close: There are two buttons at the bottom of the window, Save & Close, and Close. Save & Close will capture the name and signature that had been entered into their respective fields. The Close button alone will not retain any information entered within this window.
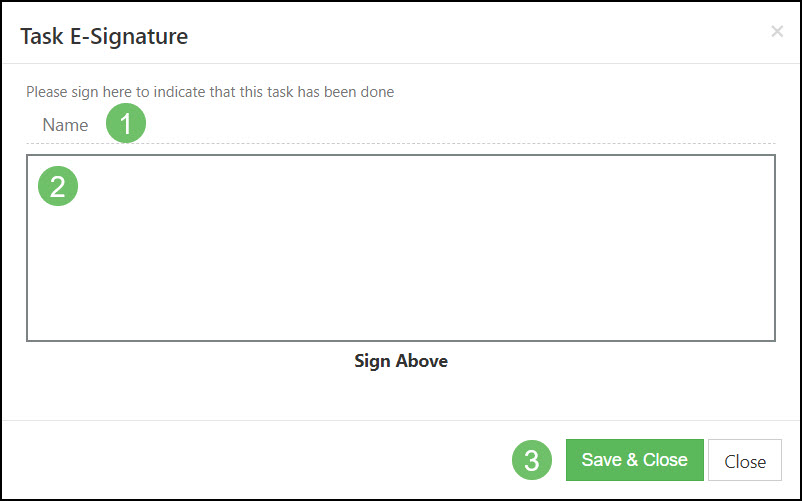
Example of the Task E-Signature Window
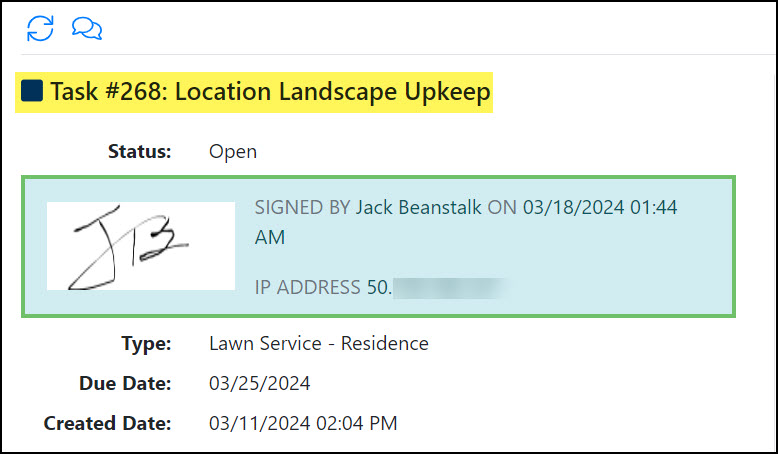
Once the changes made within the Task E-Signature window have been saved, the signature, the name of the signer, the date and time of the capture, and the IP Address of the device the signature was captured from will be recorded on the Task.
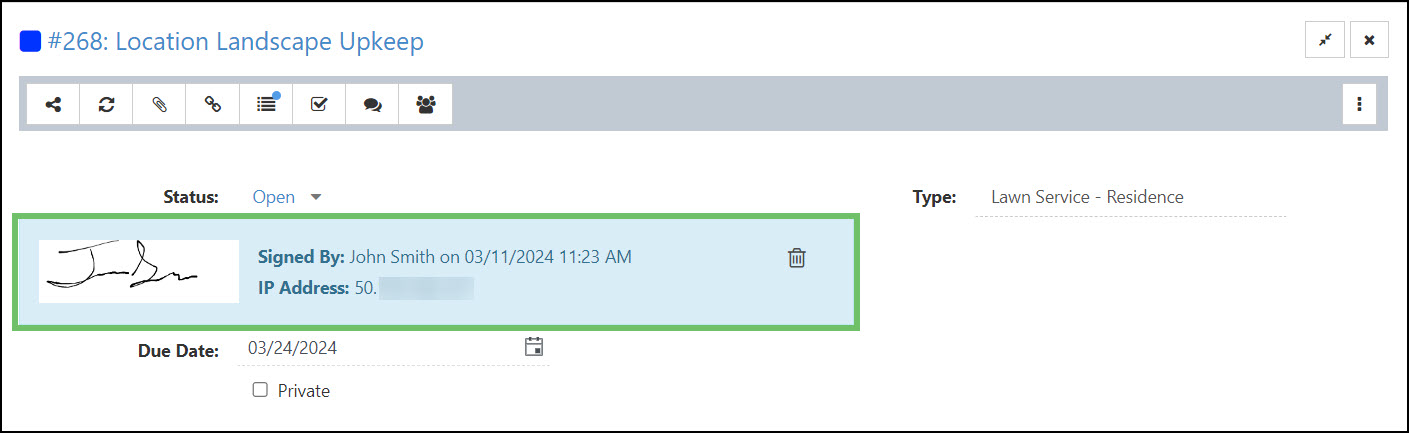
Example of a Completion Signature on a Task
Using the Trashcan icon located next to the Signed By information will allow users with the “Tasks – Delete E-Signature” permission to delete the captured Task Signature and add a new one.
If a user attempts to mark a Task as Done without adding a signature, a red error message will appear stating that a Completion Signature is required.

Example of the Completion Signature Required Error
Signing on Completion from the Portal
- To add a Completion Signature from within the Customer Portal, select the Completion Signature icon located next to the Task Status.
- Note: The Portal user adding the Completion Signature will need to have the “Tasks – Add E-Signature” permission added to their Portal Role in order to capture an E-Signature.
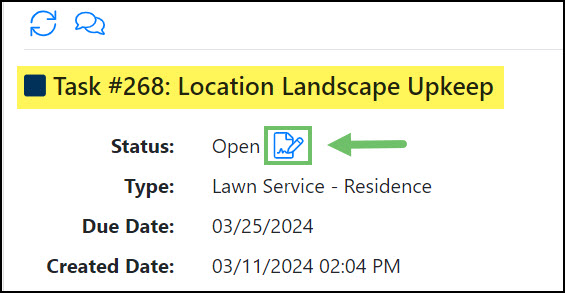
Example of the Completion Signature Icon in the Portal
Selecting the Completion Signature icon will open an E-Signature window with the following fields:
- Name: Allows you to enter the name of the person providing the Completion Signature.
- Signature: Allows the individual signing to use their finger or a mouse to add an E-Signature.
- Save & Close: There are two (2) buttons at the bottom of the window, Save and Close. Save will capture the name and signature that had been entered into their respective fields. The Close button alone will not retain any information entered within this window.
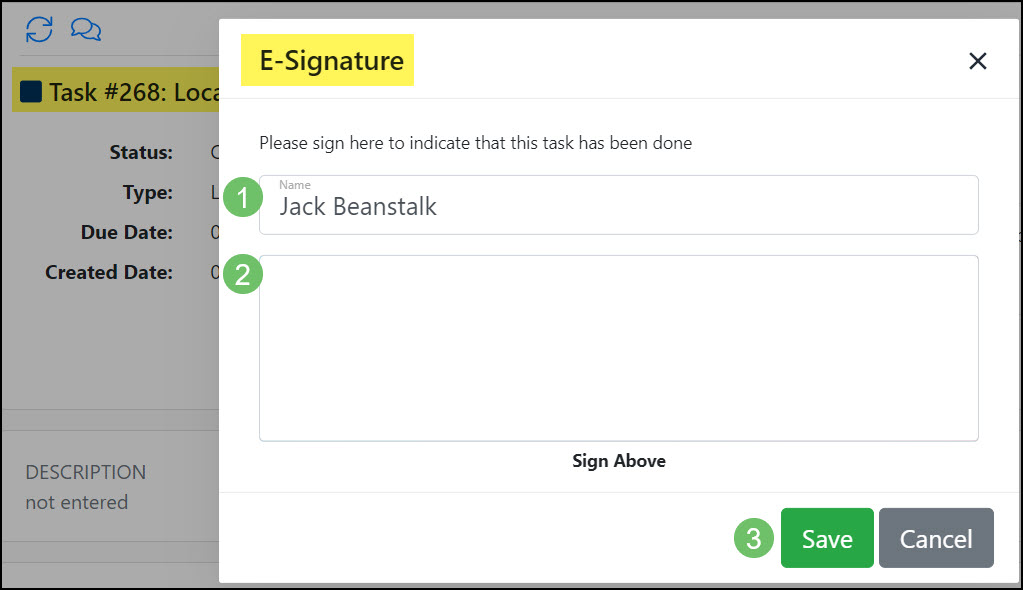
Example of the E-Signature Window in the Portal
Once the details recorded within the E-Signature window have been saved, the signature, the name of the signer, the date and time of the capture, and the IP Address of the device the E-Signature was captured from will be recorded on the Task.
Example of a Completion Signature in the Portal
-
Adding Checklist Items to a Task
While in a Task, you can use the button to Add Checklist Items to the Task. Checklist Items are useful to use when a Task is comprised of completing multiple things. As Checklist Items are completed, they can be marked off by checking the checkbox next to that Item. You have the ability to add notes to each Checklist Item in the list once they are marked off. Marking a Checklist Item as completed will stamp the name of the person that checked the Checklist Item below. In addition to name, there will also be a date and time stamp above the notes that were left, if any.
-
Importing Tasks
Tasks can be brought into Striven en masse by utilizing Striven’s Tasks Import. This can be done for large and small databases to bring in multiple Tasks at once.
- The Download Sample provides a spreadsheet with pre-filled column headers (listed on the mapping) to assist with entering data.
- The Mapping icon will initiate a popup detailing what goes into the import spreadsheet for successful importing.
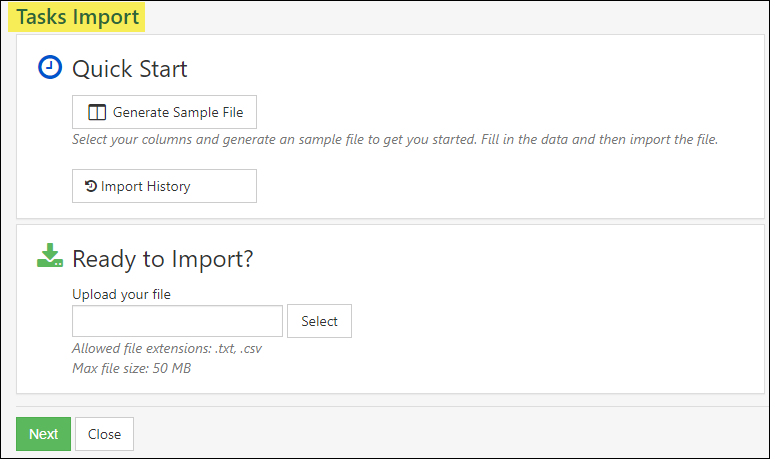
Example of Tasks Import Tool
-
Slide Task Due Dates in a Milestone
Striven has a time-saving feature to adjust Task Due Dates in Milestones in bulk. This feature is very useful and saves time and frustration when your deadlines change and the Milestone Task Due Dates need to be updated accordingly.
Instead of having to change the Due Date on each Task one-by-one, there are 2 options for changing the Task Due Dates using the Adjust Task Dates menu option on the Milestone kebab menu on the right side of a Milestone.
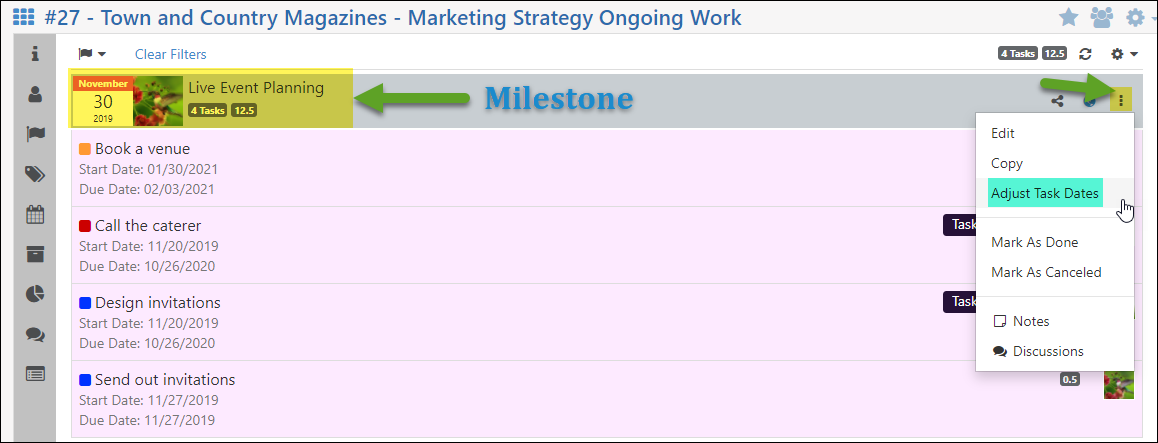
Example of Adjust Task Dates Option on Kebab Menu in Milestone
From this menu popup you will be presented with two options:
- Slide Due Dates of Open Tasks Under this Milestone: Provides the ability to enter the number of days, forwards or back, you wish to move the Task Due Dates. This is displayed by using positive numbers for a future date from the current Due Date, or negative numbers to move back the current Due Date to one that’s sooner.
- a. Checking the box for this option will also produce the choice to Adjust Start Date Also, which will include the same adjustment to the Start Dates as the Due Dates.
- Set Due Date of Open Tasks without Due Dates: Allows you to select either the Milestone End Date as the Due Date for Tasks within the Milestone that do not already have Due Dates set, or you can select a Custom Date to set as the Task Due Dates.
- Note: This will enter a Due Date for all Tasks without set Due Dates within the Milestone – you will not be able to select particular Tasks that have no Due Date to change in bulk this way. If you need to set a different Due Date for particular Tasks with no set Due Dates, those will need to be set individually.
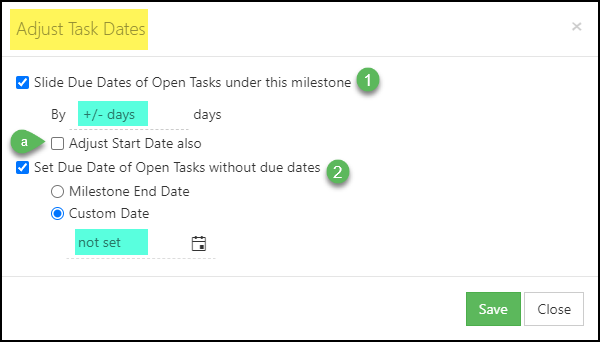
Example of Adjust Task Dates Options
Additionally, changing the End Date of a Milestone will provide these Slide Task Due Date options as well.
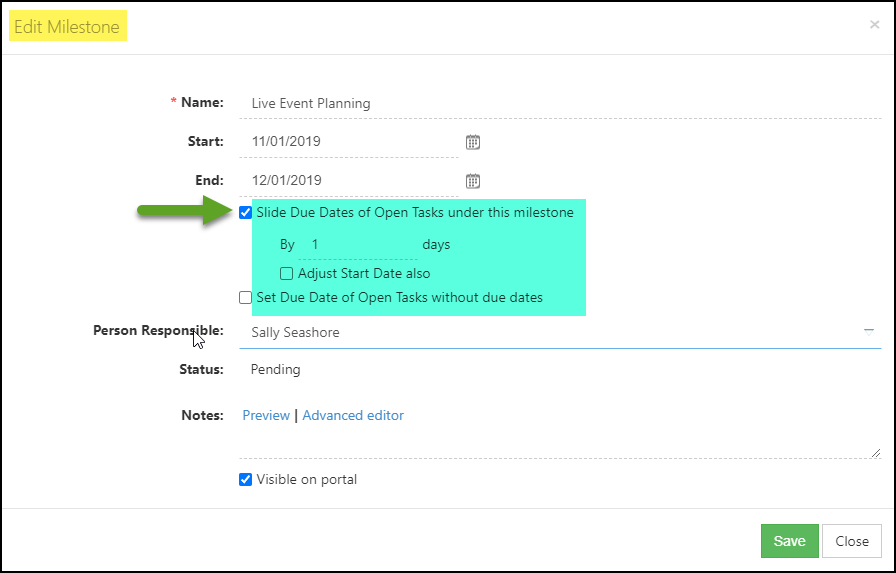
Example of Updating the Milestone End Date with Options to Slide Task Due Dates
- Slide Due Dates of Open Tasks Under this Milestone: Provides the ability to enter the number of days, forwards or back, you wish to move the Task Due Dates. This is displayed by using positive numbers for a future date from the current Due Date, or negative numbers to move back the current Due Date to one that’s sooner.
Task Groups & Task Library
-
Task Groups
Task Groups are a collection of Tasks that can be assigned all at the same time and can be saved for later use. An example of using a Task Group is new Employee onboarding. It is common to have new Employees complete forms for taxes, direct deposit, Employment Agreements, etc. Tasks to complete these forms can be added to a Task Group so when a new Employee starts, it only takes a few clicks to assign them. Checklist Items, Budget Hours, links, and attachments can also be added to Tasks within a Task Group.
Tasks within a Task Group can be assigned to a specific Employee, such as your HR Manager or a newly hired Employee for example. Also, these Tasks do not need to be assigned all at one time and can be created days apart from each other if that fits best for your needs. For example, if a new hire is required to wait 30 days before they can sign up for benefits, you can configure the Task Group to create and assign the Benefits Selection Task to the new hire after 30 days.
Tasks within Task Groups are housed within a Task Library. This makes it easy to add them to multiple Task Groups when needed.
To view, add, or edit Task Groups in your Striven system, navigate to:
Company → Settings → Tasks → Task Groups
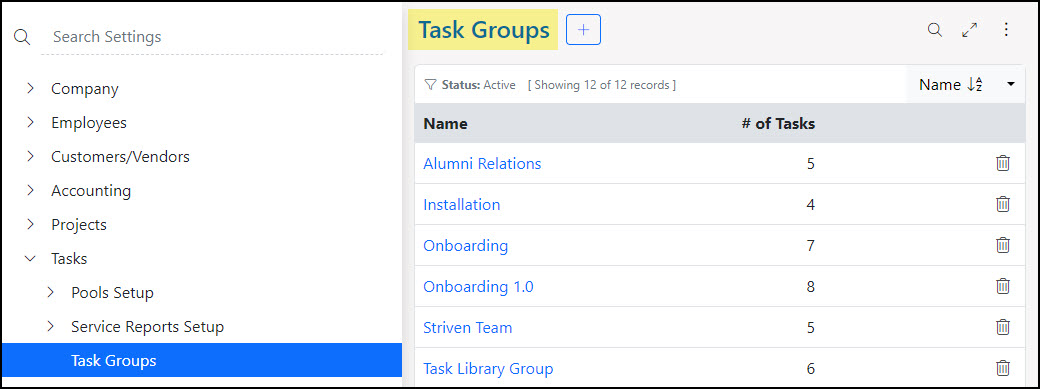
Example of the Task Groups Page
Creating Task Groups
From the Task Groups page, you can select the Add button in order to create a new Task Group. When adding a new Task Group, you have the ability to name the Group, and configure what Task Library Items the Task Group includes.
- Manage Task Library: Allows you to view and edit Tasks that have already been created within the Task Library. You can also add new Library Items from this page by using the Add button.
- Basic Info: Allows you to name the Task Group.
- Task Library: You can use the Select Task field to search for and add Library items to the Task Group.
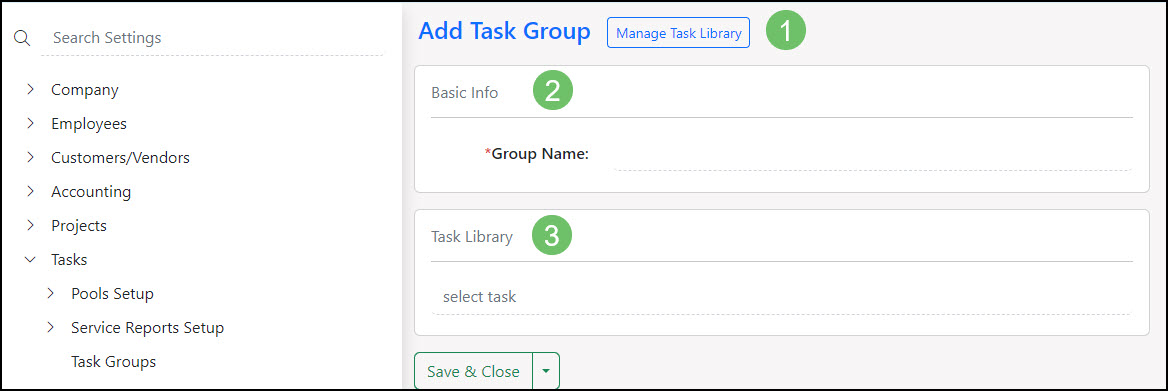
Example of Creating a New Task Group
-
Task Library
It is important to note that the Task Library can only be accessed while configuring your Task Groups. When creating a new Task for the Task Library, you will have the following settings to configure for the Task:
- Task Name: Populates as the Task title when a Task is created from a group that contains this library Task.
- Task Type: Set as the Task Type when a Task is created from a group that contains this library Task.
- Budgeted Hours: Populates as the Task budget when a Task is created from a group that contains this library Task.
- Description: Populates as the Task description when a Task is created from a group that contains this library Task.
- Attachments: Attachments that have been uploaded here will be available within the Task that is created from a group that contains this library Task.
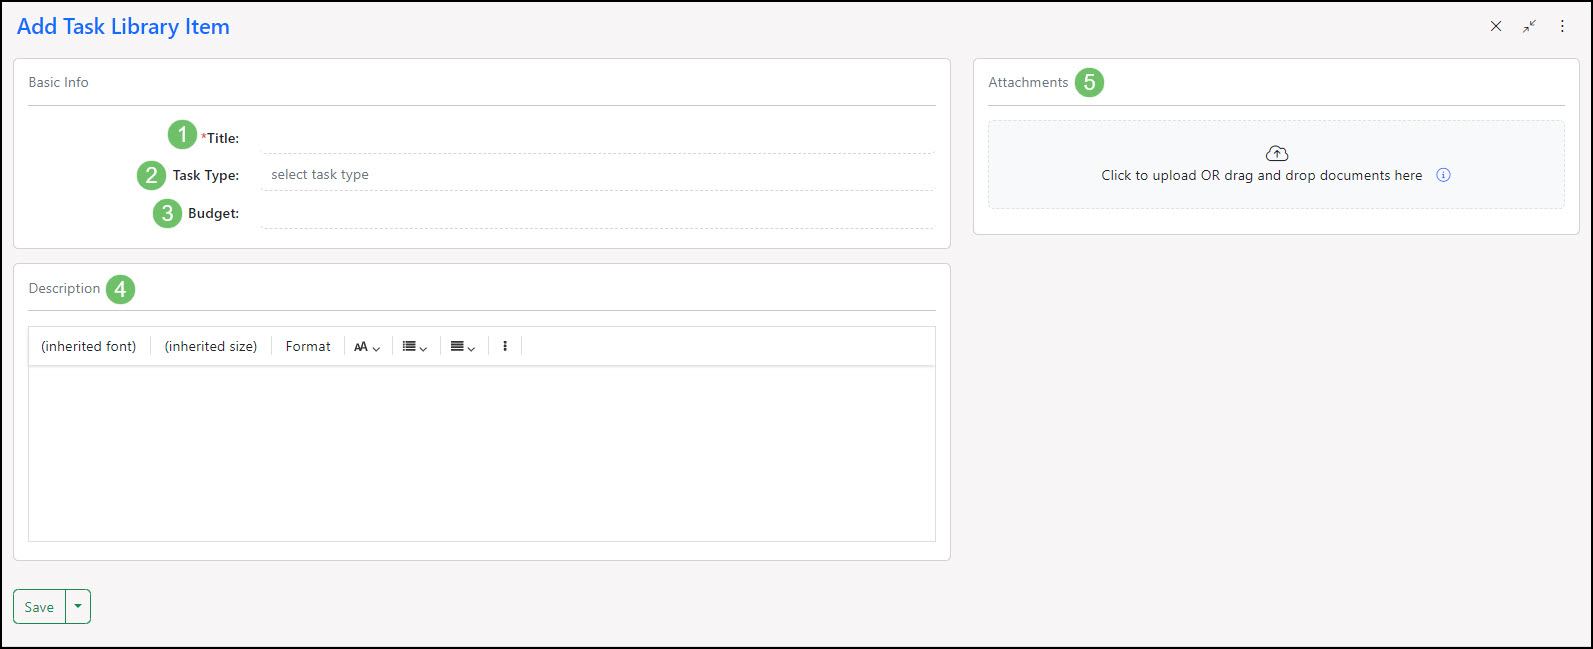
Example of Add Task Library Item Page
Assigned To and Time Apart
Once you have the Tasks selected from the Task Library listed within your Task Group, you will have two additional options per Task regarding assignments and timing:
- Name: Lists the name of the Task Library item added to the Task Group.
- Assigned To: Clicking on the hyperlink within the Assigned To column will allow you to change the assignment for the Task to the selected Employee when assigning out the Task Group, the Employee’s manager or a specific Employee’s manager, or a different Employee that you wish to specify.
- Time Apart: Setting the days apart will determine how soon after a Task is created and assigned will the next one generate.
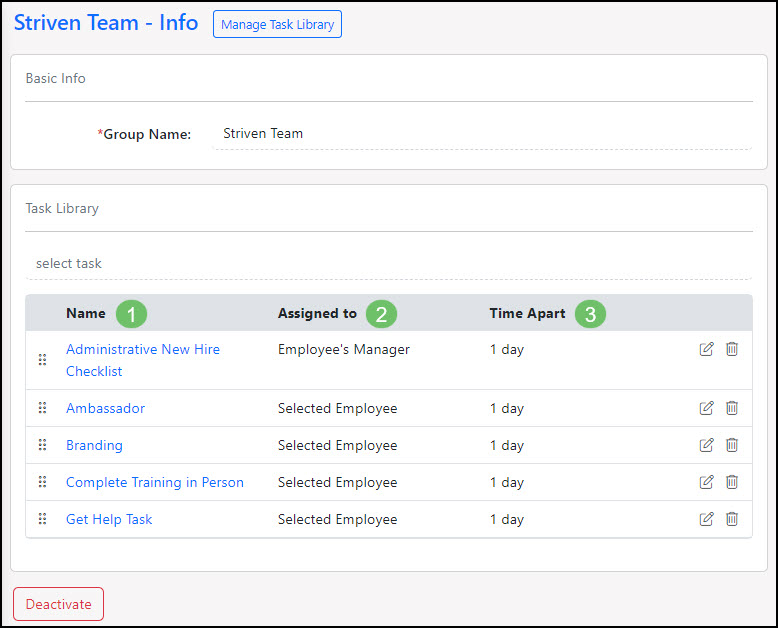
Example of Assigned To and Time Apart Options when Creating a New Task Group
-
Assigning Task Groups
From the Employees List
To assign a Task Group to an Employee(s), you can search for the Employee(s) from the Employees List. Once all Employees are shown from your search that should have the Task Group assigned, you can assign the Tasks using the small gray arrow below the Employees Search filters. The drop-down menu there will have an option to Create Task.
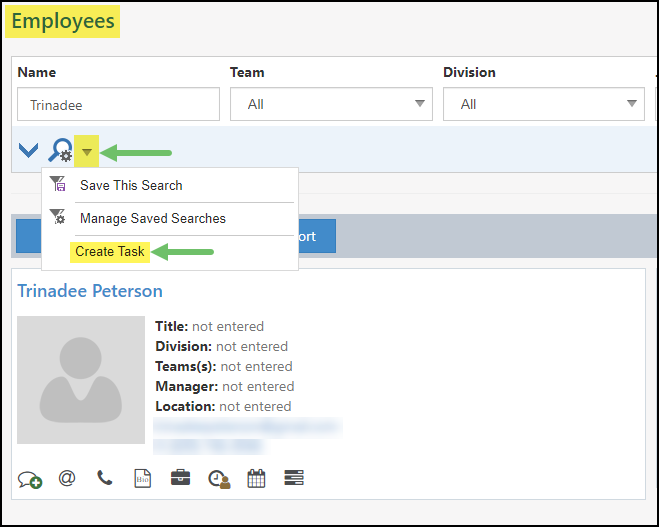
Example of Option to Assign a Task Group from the Employee List
After you select Create Task, a popup will display with a drop-down list for you to select the Task Group you would like to assign. The popup also has an Edit Tasks Here link to take you to the Task Group settings. Once finished, select Save and Close, and the Task Group will be assigned to the Employee(s) from your search results.
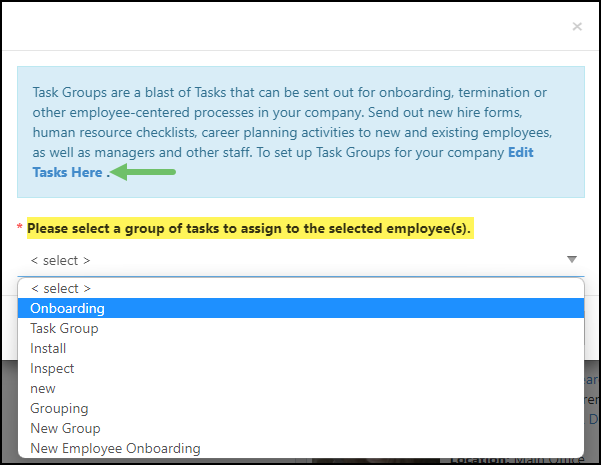
Example of Task Group Assignment Selection from Employee List
From the Task List
To create Tasks from the Task Library on the Task List, click the blue down arrow next to the Add Task option. The drop-down menu there will have an option to Create From Library.
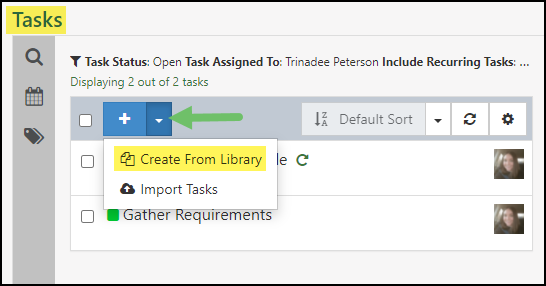
Example of the Option on the Task List to Create a Task from the Task Library
After you select Create From Library, a popup will display a list for you to select the Tasks that have been saved within the Task Library. Click Select on the Task you wish to create from the Task Library.
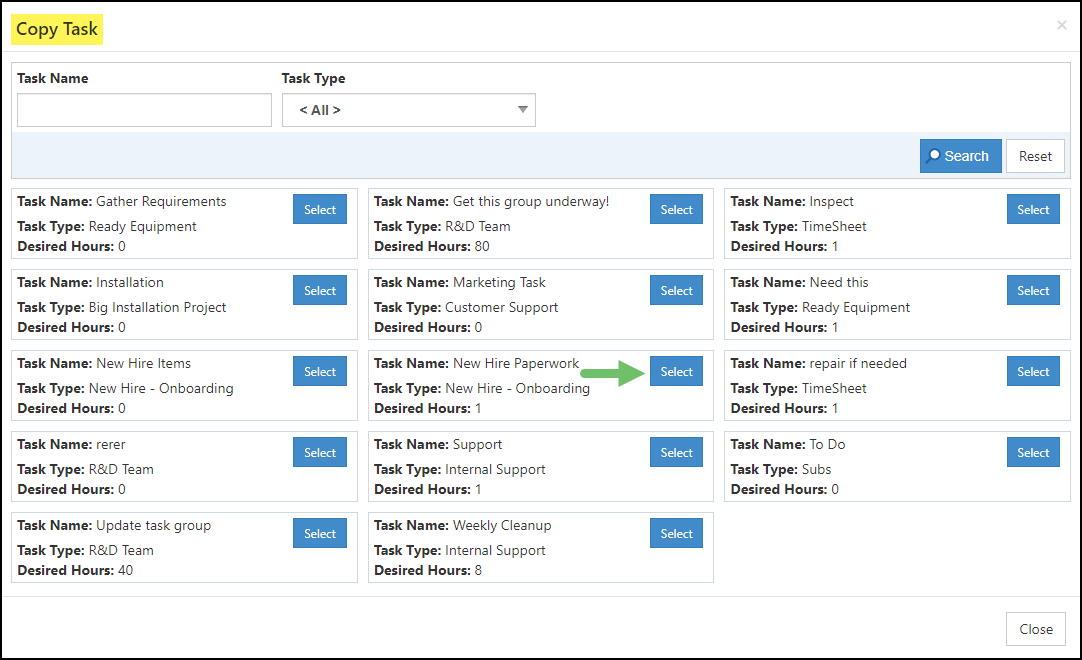
Example of Tasks within the Task Library
-
Dispatch Screen
The great thing about the Dispatch Screen is once Task Types and Task Pools have been set up, the Dispatch Screen is ready to use. This page is a great way for managers to quickly assign work to their Employees while having a visual summary of the current work hours they have already. Just create the Tasks that need to be completed and, if they are assigned to a Pool, you can divide the Workload from the Dispatch Screen. Below is a screenshot showing how the Dispatch Screen appears.
To view the Dispatch Screen, use the following steps:
Tasks → Dispatch
The Dispatch Tasks page is split into two (2) panes: the Task List Pane on the left side and the Employee List Pane on the right side. Each side has a Gear icon for settings, a Refresh icon, and a Search icon in the top right corner of the pane.
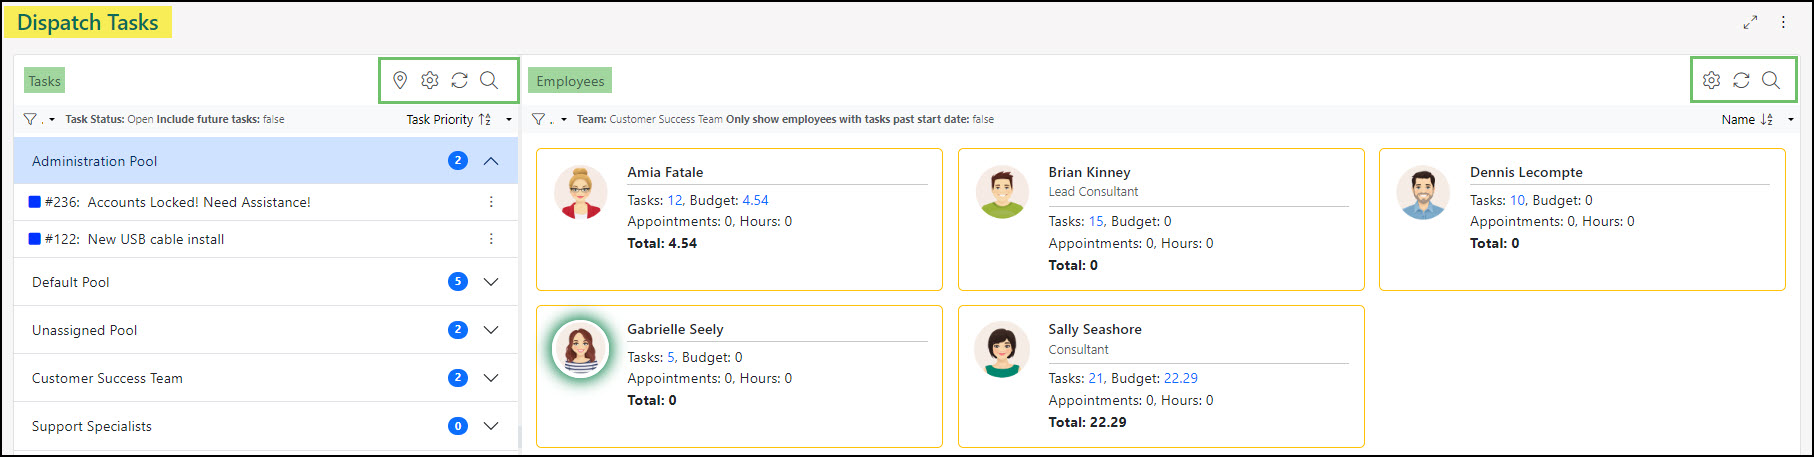
Example of the Dispatch Tasks Page
Task List Pane
The Task List Pane allows you to view the Tasks awaiting Dispatch. These Tasks are neatly organized within collapsible groups that allow them to be viewed clearly.
- Tasks: Displays all tasks within your configured groups.
- Task Group: Displays the name of the configured group. The blue number icon indicates the amount of Tasks currently assigned within the group. To expand or collapse the group, click the pennant icon on the far right.
- Task Name: Displays the configured information regarding the Task. The kebab menu on the far right of the Task Name allows you to view the Task Actions.
- Task List Tools: Includes the following options which will be reviewed in depth within the next section:
- Map It
- Settings
- Refresh
- Search
- Sorting Options: Allow you to select how the Task List will be sorted. These sorting options will be reviewed in depth within the next section.
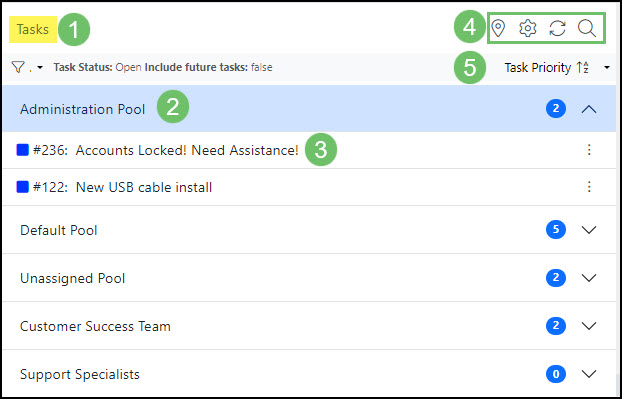
Example of the Tasks List Pane on the Dispatch Tasks Page
Map IT
The Map IT feature allows you to see the Tasks awaiting dispatch as pins on a map to make dispatching tasks located in the same area more efficient.To view the Tasks awaiting dispatch on the map, click the Map IT icon from the top right corner of the Tasks pane.
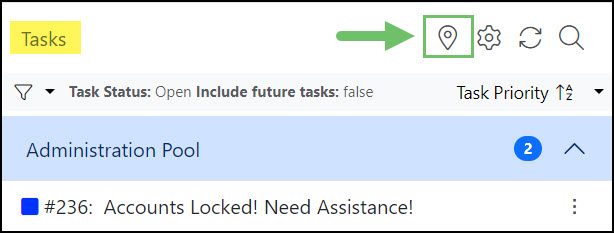
Example of the Map IT Icon Located on the Tasks Pane
When the map opens, the Tasks awaiting dispatch will appear as red pins on the map.
The Map IT feature works in conjunction with the Task Panes Filters. If filters are applied, narrowing the results for the Tasks awaiting dispatch, then selecting the Map It icon will prompt a map which displays pins for only the Tasks matching the filter’s criteria. If no search filters are configured, all Tasks awaiting dispatch will appear on the map.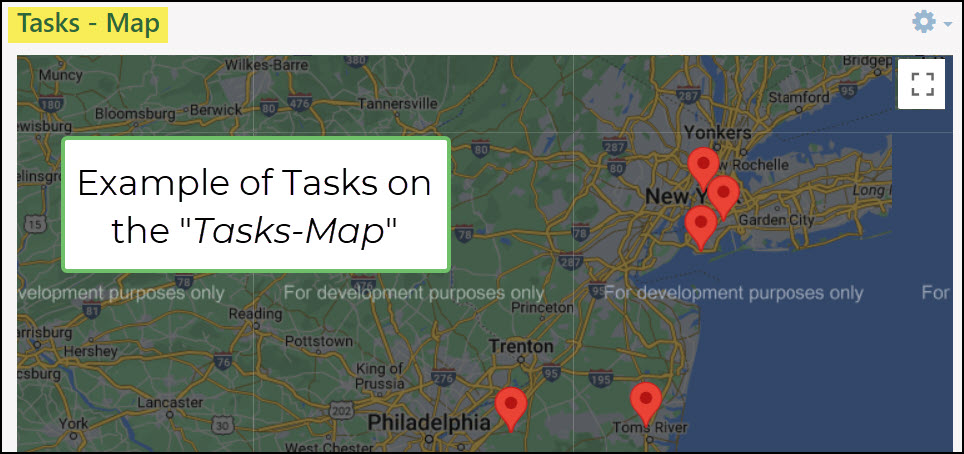
Example of the Map Displaying Tasks Awaiting Dispatch
Clicking on a pin will display the information for the Task associated with that location. This information will include the following:
- Location Address: Clicking on the address will open the Task’s location within Google Maps.
- Task Number and Name: Clicking on the Task’s name will open the task to view the Task details.
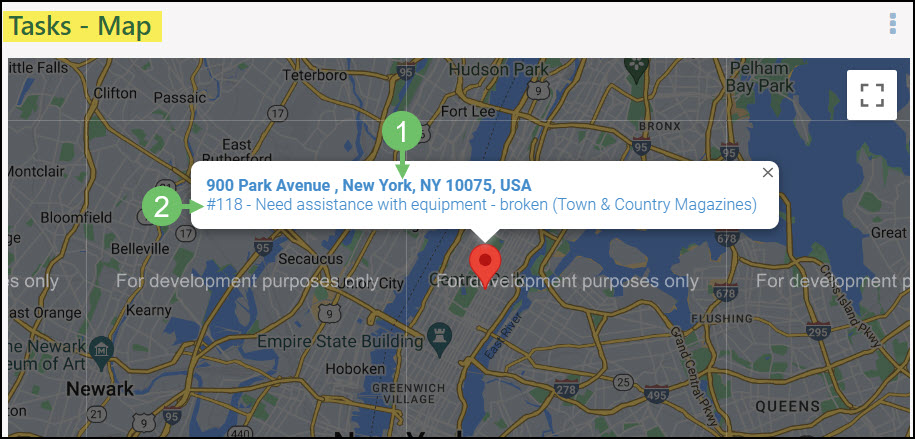
Example of Task Information within a Map Pin
If more than one Task is associated with a Location on the map, clicking the pin will display up to 10 Tasks. The total number of Tasks at that location will be notated beneath the location’s address. If more than 10 tasks are associated with a location, only 10 of the Tasks will be listed within the pin, sorted newest to oldest.
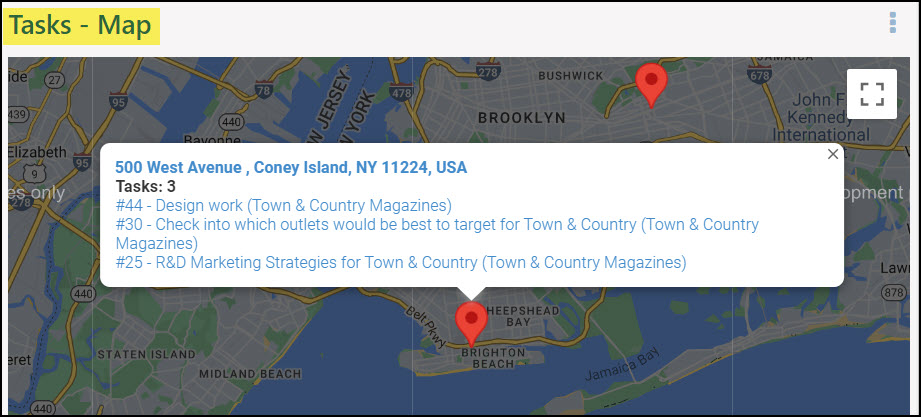
Example of More Than 1 Task Associated with a Location
Task Settings
There are a variety of settings available to display the Task List Pane as needed. These settings are found by clicking on the Gear icon at the top of the Task List Pane.The Task Settings popup allows you to choose how you want Tasks grouped and what Task information you want displayed on the page.
- Show Tasks Grouped By: Determines how the Tasks will be grouped in the Tasks pane of the Dispatch page.
- Pool: Shows the Pool and all Tasks assigned to the Pool directly.
- Team: Shows the Team and all Tasks assigned to the Team directly.
- Members of Team: Shows all Employees that are part of the selected Team as separate groups and Tasks assigned to each of them in their group.
- Manager: Shows all Employees that have the selected Manager as separate groups and Tasks assigned to each of them in their group.
- Employee: Shows the Employee and all Tasks that are assigned to the Employee.
- Task Display Settings: Determines which Task details are displayed on the Task List Pane. Display options include:
- Status
- Number
- Customer/Vendor
- Customer/Vendor Location
- Type
- Budget
- Start Date
- Due Date
- Created Date
- Last Modified Date
- Project
- Project Location
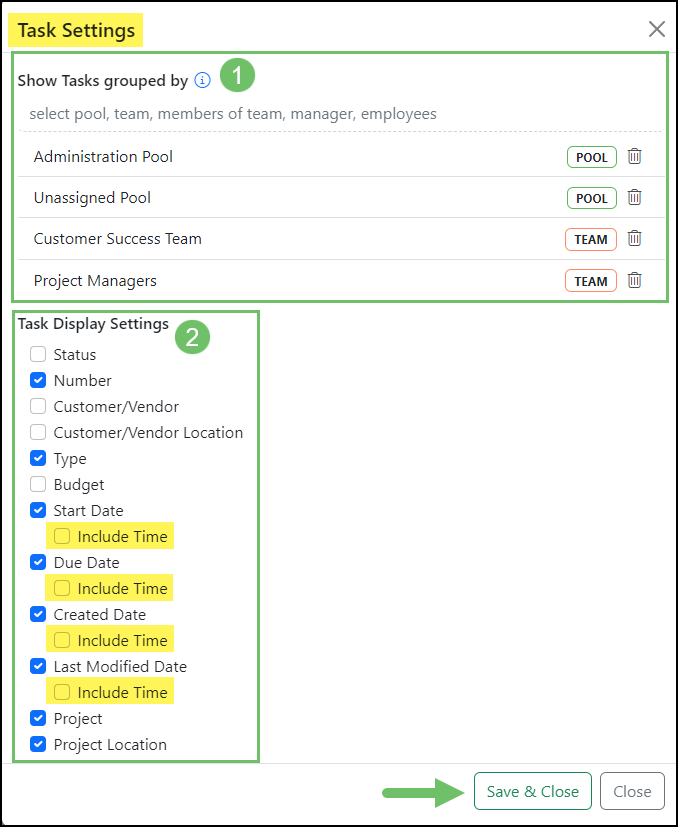
Example of the Task Settings Popup on the Dispatch Task List
- Note: The Start Date, Due Date, Created Date, and Last Modified Date will all display an option to Include Time when selected.
Task List Refresh
Tasks are displayed in the Task List Pane in groups based on your Task Settings selections. If changes are made to Tasks within these groups, a red alert message will appear at the top of the list notifying you that there are updates in the indicated group. This will provide you with the option to click on the group to expand it to see the updates, or you can click on the Refresh button at the top of the Task List Pane to show all the updates.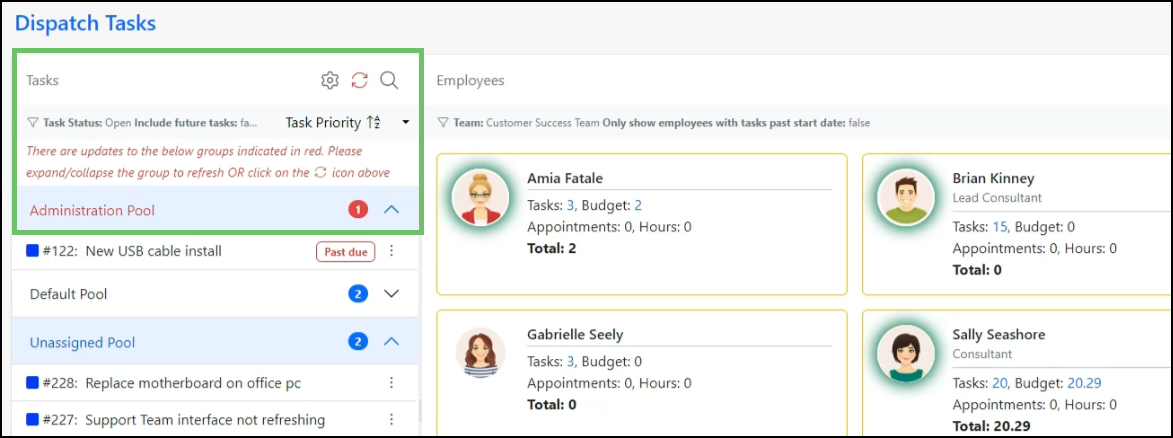
Example of the Red Update Alert to Refresh the List
Task List Search
The Search function can be accessed by clicking on the Magnifying Glass icon that is located in the upper right hand corner of the Task List Pane. Tasks can be searched by Type, Status, Task Name, Project Type, Project, and Customer/Vendor, with the option to include future tasks. This Search popup window also provides the option to save a search and access previous Saved Searches by clicking the Saved Searches tab.
Example of the Task Search Feature on the Dispatch Tasks Page
Task List Sorting
Sorting the Tasks List Pane is achieved by clicking the downward triangle located beneath the Search icon. The available Sort options are Task Priority, Start Date, Due Date, Date Created, Last Modified Date, and Last Modified by Me.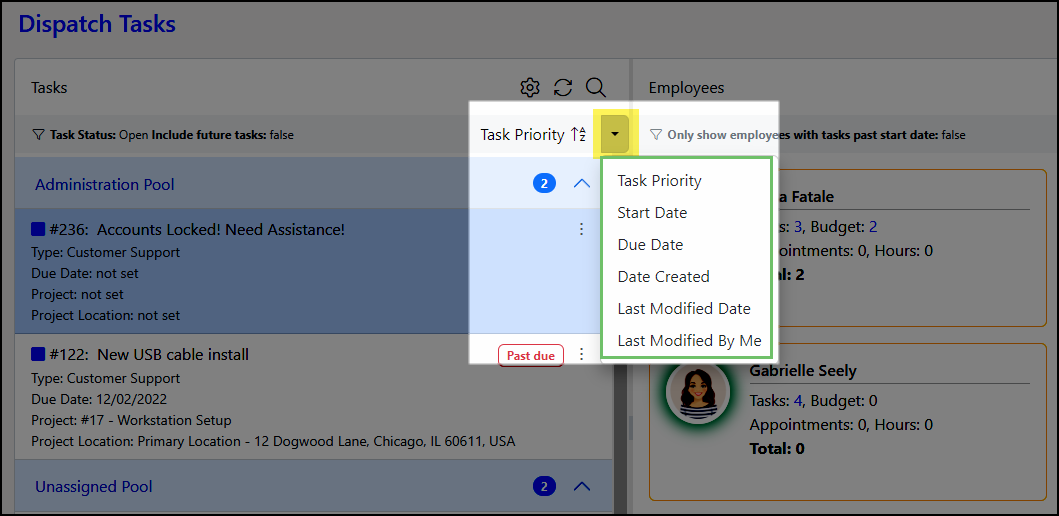
Example of the Tasks Sorting Options on the Dispatch Tasks Pane
Task List Actions
Each Task has a kebab menu which allows you to view the available Task Actions. These actions include View Task, Customer/Vendor Assignments, Assign to Me, and Dispatch.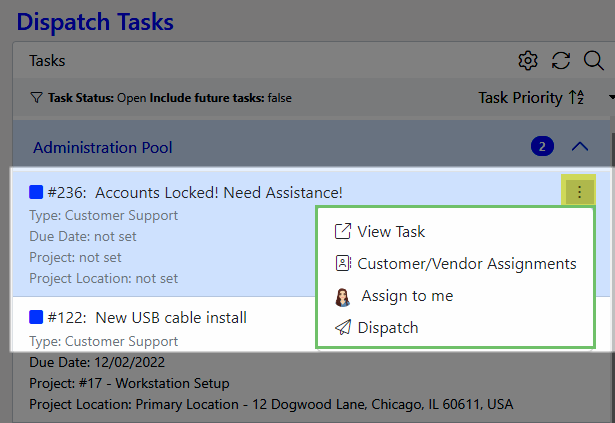
Example of Dispatch Tasks Action Options
Dispatching Tasks
There are multiple options for dispatching Tasks. For single Tasks, you can either click and drag a Task to an Employee in the Employee List Pane, or click the Dispatch option from the Task Actions menu and then select the desired Employee on the Employee List Pane to which you wish to assign the Task.To assign multiple Tasks to a single Employee, you can press the CTRL key (or Command key for Macs) while clicking on each of the Tasks you wish to assign. Then you can drag the selected Tasks to the Employee of your choice in the Employee List Pane.
You can also select Assign to Me from the Task Actions menu, which will assign the selected Task to yourself.
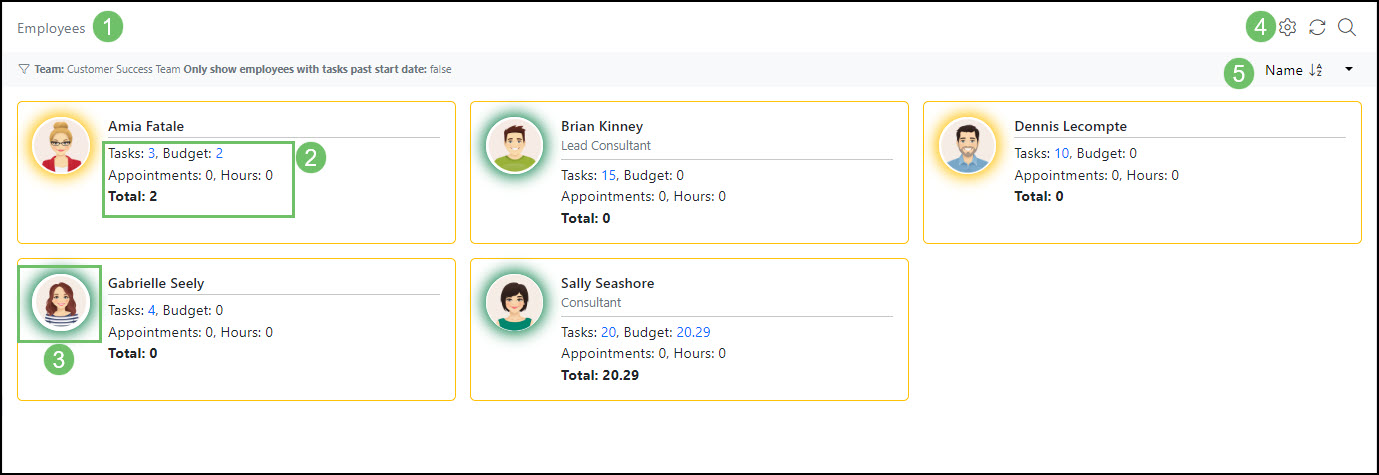
Employees List Pane
The Employees List Pane allows you to view Employees awaiting Task Assignments. The Employee List shows Employees based on your search filters. Each Employee has an Employee Summary Card which provides a variety of information related to the Employees listed.
- Employees: Displays all the Employees that are being tracked based on selected search criteria, including Team, Pool, Employee, etc.
- Employee Workload: Displays details related to the Employee’s current Workload to assist in determining the Employee best suited to complete the Tasks in the Dispatch list. These details include:
- Tasks: Lists the number of Tasks assigned to the Employee.
- Budget: Lists the total Budget Hours for the assigned Tasks.
- Appointments: Lists the number of Appointments the Employee has scheduled.
- Hours: Lists the total amount of hours for scheduled Appointments.
- Total: Lists the total amount of Task Budget Hours and Appointment Hours.
- Note: Clicking the hyperlinked number next to each detail will bring up a popup window that displays further details regarding the statistics.
- Employee Photo: The card displays the Employee photo with a colored halo to indicate the Employee’s availability. The Availability is indicated by the following colors:
- Green: Indicates the Employee is available.
- Yellow: Indicates the Employee has an hour or less remaining in their shift.
- No Halo: Indicates the Employee does not have a shift at this time and is unavailable.
- Employee List Tools: Includes the following options which will be reviewed in depth within the next section:
- Settings
- Refresh
- Search
- Sorting Options: Allow you to select how the Employee List will be sorted. These sorting options will be reviewed in depth within the next section.
Example of the Employees List Pane on the Dispatch Tasks Page
Employee Task Settings
There are settings available to configure the display of Workload details and Task details related to the Employees. These settings can be located by clicking on the Gear icon at the top right of the Employee List Pane.The Employee Task Settings popup allows you to choose what factors are calculated in the Employee’s Workload, and which Task details are displayed.
- Calculation Settings:
- Tasks Calculation: Allows Tasks with a status of On Hold to be included on the number of Tasks listed on the Employee Summary Card.
- Appointment Calculation: Allows the Hours and Count of all Appointment Types to be included in the Appointment Workload Details.
- Task Display Settings: Determines which Task details are displayed on the Employee’s Task Workload Details. Display options include:
- Status
- Number
- Customer/Vendor
- Customer/Vendor Location
- Type
- Budget
- Start Date
- Due Date
- Created Date
- Last Modified Date
- Project
- Project Location
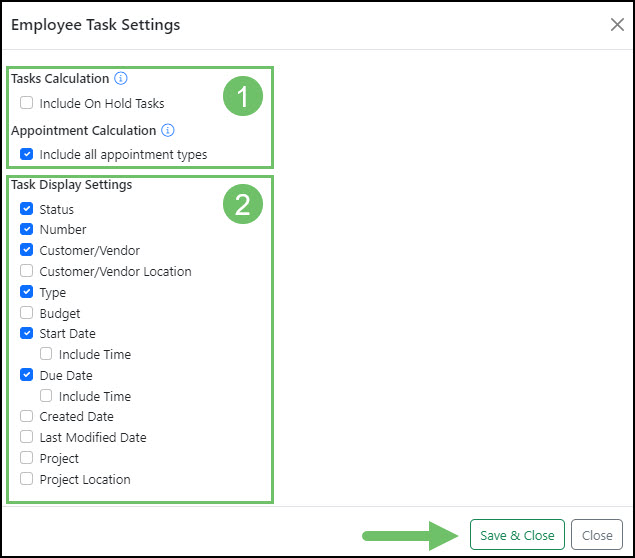
Example of the Employee Settings Popup on the Dispatch Task List
Employee List Refresh
The Employee List Pane features an Employee Availability feature and real time Workload updates that refresh automatically. To force these features to refresh, you can use the Refresh icon located at the top right corner of the Employee List Pane.Employee List Search
The Employee List Search will allow you to choose which Employees you view on the Employee List. You can access the popup Search window by clicking the Search icon found in the top right corner of the Employee List Pane.The Search allows you to find Employees by Team, Employee, Division, Job Title, and Shift. You also have the option to Only Show Employees with Tasks Past Start Date, and the window allows you to save a search or access previous Saved Searches.
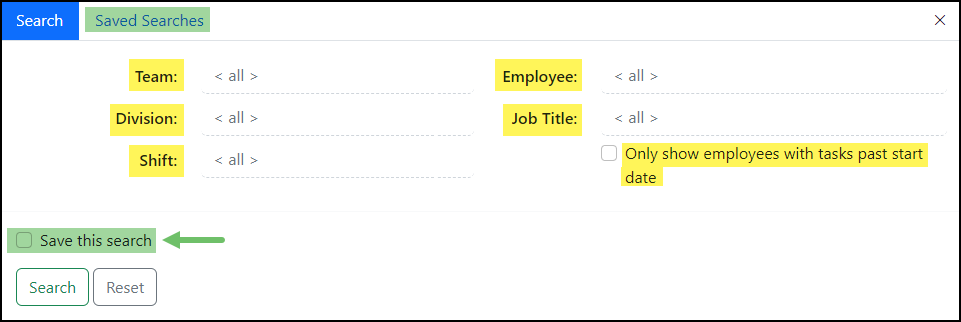
Example of the Employee Search Feature on the Dispatch Tasks Page
Employees List Sorting
Sorting the Employees List Pane is achieved by clicking the downward triangle located beneath the Search icon. You can sort the Employees by Name, # of Tasks, Task Budget, # of Appointments, Appointment Hours, and Total.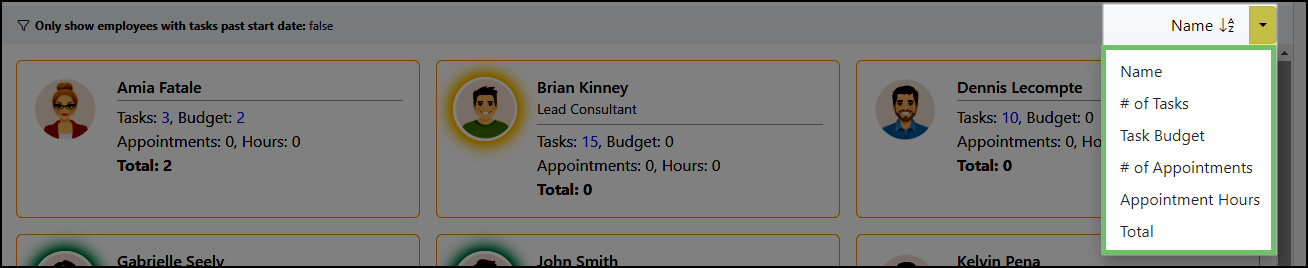
Example of Employee Sorting Options on the Dispatch Tasks Page
-
Workload Management
How to Use the Workload Management in Striven
Workload Management provides details on Employees’ overall committed work time. Here you can view Employees’ total hours of assigned Tasks, Appointments, and Approved Time Off. There are search filters available to view a date range, Teams, and Divisions to track Workloads as desired. There are also helpful hyperlinks to allow you to view details about Tasks, Appointments, and Time Off to help manage Workloads as needed. This page can be extremely useful for dispatchers, Team leads, or anyone responsible for managing and distributing work among Employees. Below is a screenshot showing how the Workload Management appears and a list describing what you can accomplish here.
To view Workload Management, use the following steps:
Tasks → Workload
- Date Range: The From Date and To Date fields allow you to select a specific date range to filter workload results.
- Team: Allows you to manage the workloads of all or specific Teams by checking the associated checkboxes to include them in your search results.
- Division: Allows you to manage the workloads of all or specific Divisions by checking the associated checkboxes to include them in your search results.
- Job Title: Allows you to select all or specific Job Titles to include in your workload search.
- Employee: Allows you to select all or specific Employees to include in your workload search.
- Employee Name: Lists all Employees displayed on the Workload Management page based on your search filters. Each Employee name is a hyperlink, which when clicked will initiate a popup displaying the Employee’s Info Card.
- Note: If the name is not hyperlinked, you do not have permission to view Employees’ info.
- Assigned Tasks: Displays the number of Tasks and the total amount of Budget Hours within the filtered date range. In the Employee rows, the number of Tasks is a hyperlink which triggers a popup displaying a list of the Tasks assigned to that Employee. This popup also provides a link to view the Task, a link to view the Employee’s Profile, as well as the option to send a new Discussion message related to the Task to the Employee.
- Note: This includes Tasks that are in Pending and In Progress statuses.
- Appointments: Lists the total number of Appointments scheduled and the total amount of hours for all Appointments. In the Employee row, the number of Appointments is a hyperlink which will trigger a popup displaying all the Appointments the Employee has scheduled within the filtered date range.
- Note: This includes Appointments that are in a Scheduled or Done status.
- Time Off: The total amount of Approved Time Off within the filtered date range.
- Total: There are three calculations listed in these columns.
- Committed: Lists the total of committed hours, which is the sum of the Task Budget Hours and the Appointment Hours listed within the filtered date range.
- Total Work: Lists the total work hours, which is the total scheduled hours to work from today to the selected due date, less the Approved Time Off.
- Allocated Percentage: Lists the total committed hours divided by the total work hours displayed as a percentage value.
- Calendar: Redirects the browser tab to the Employee’s Calendar.
The following details relate to the Workload search results in 2 ways. This guide will explain each column specifically, but note that the Gray Header Row displays this information for ALL of the Employees listed in the search results (like a grand total), while the individual Employee rows display information related to that particular Employee.
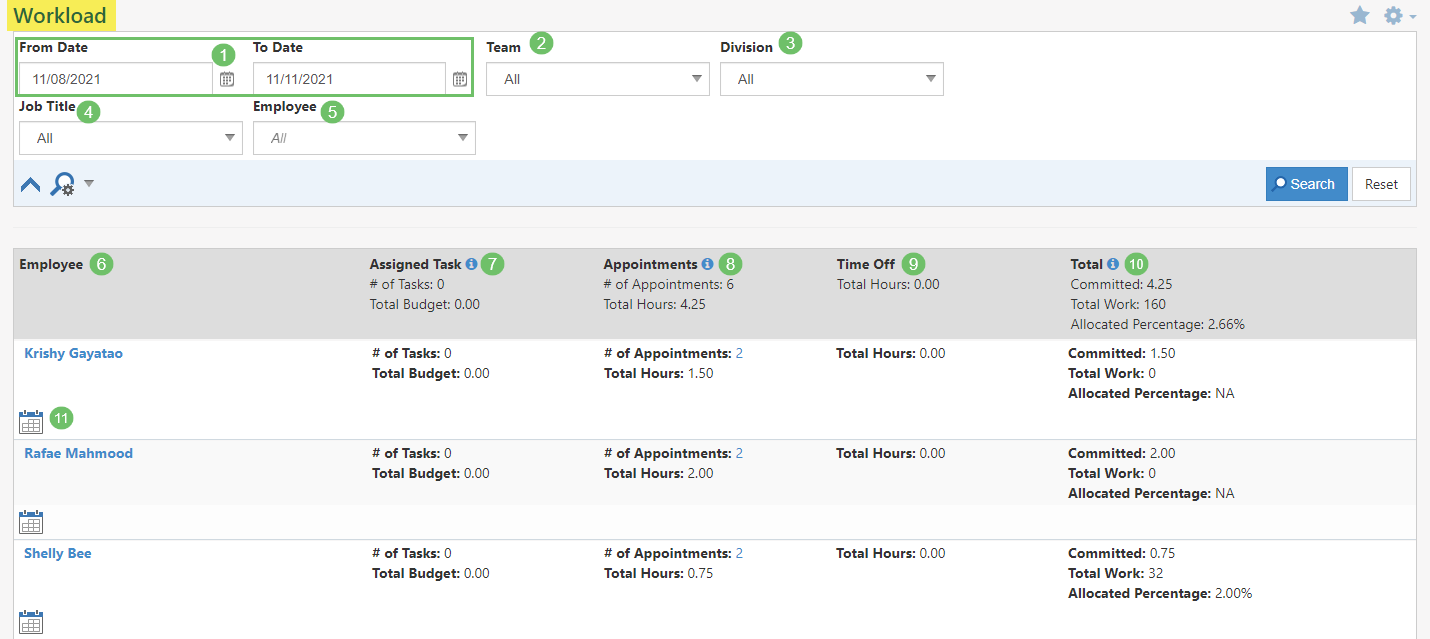
Example of the Workload Management Page
-
Task Service Metrics
Task Service Metrics are useful to calculate the level of productivity and efficiency with completing Tasks within Striven. These figures can be used to examine Employee performance and find strengths and weaknesses in your workflows.
This portion of the guide will explain how Task Service Metrics are calculated in Striven.
Task Service Metrics are calculated based on the following:
- Response Time: Calculated the first time the Task goes to In Progress status. The calculation is the length of time it takes for a Task to go to In Progress status relative to when it was created.
- Time taken to Start: Calculated the first time a Task goes to In Progress status. The calculation is the length of time taken for the task to go to In Progress status relative to when it was expected to be started (i.e. the Start Date Time).
- Resolution Time: Calculated the first time a Task is marked Done. The calculation is the length of time it takes for the Task to go to Done status relative to when it was created.
- Started on Time: A Task is determined to be Started on Time if the Time taken to Start is less than/equal to zero. In other words, if the Task has a Start Time set for 12:00 a.m. on a particular date and it is started at 11:59 p.m. of the date prior, or 12:00 a.m. exactly on the particular date, it is considered Started on Time.
- Not Started on Time: A Task is determined to be Not Started on Time if the Time taken to Start is greater than zero. For example, if a Task has a Start Time set for 12:00 a.m. on a particular date and it is started at 12:01 a.m. on that particular date, it is considered Not Started on Time. Anything later than 12:00 a.m. on that particular date is considered Not Started on Time.
- Total: The total number of Tasks matching the Metric’s search criteria.
- Average per Day: The total number of Tasks divided by the number of days within the search criteria. So if you have a Total of 50 Tasks and the date range is the month of July (which has 31 days), the calculation would be 50/31 = 1.61 (Avg. Tasks per Day).
Task Start Date/Time
There are certain details to keep in mind when considering Task Start Date/Time.
- If a Task Start Date/Time is set and it is not predated from the Task Created Date, then the Task Start Date/Time is used.
- For instance, if you have a Task with the Start Date/Time set for 11/15/2021 at 1:00 p.m. and the Task was actually created on 11/15/2021 at 8:00 a.m., the Effective Task Start Date/Time would be 11/15/2021 at 1:00 p.m. as set on the Task.

- If a Task Created Date is greater than the Task Start Date/Time, then add the response time (based on the Task’s Priority) to the Created Date and the result is the Effective Task Start Date/Time.
- In other words, if you have a Normal Priority Task (2-hour response time) created on 11/16/2021 at 8:00 a.m., but the Task Start Date/Time is set for a prior date/time, such as 11/15/2021 at 1:00 p.m., the Effective Task Start Date/Time would be equal to the addition of 2 hours to the Task Created Date, or 11/16/2021 at 10:00 a.m.

- If a Task has no set Start Date/Time, add the response time (based on the Task’s Priority) to the Created Date and the result is the Task Start Date/Time.
- For example, if you have a Normal Priority Task (2-hour response time) created on 11/16/2021 at 8:00 a.m. with no Task Start Date/Time set, the Effective Task Start Date/Time would be equal to the addition of 2 hours to the Task Created Date, or 11/16/2021 at 10:00 a.m.

In Progress Date Time
When considering In Progress Date Time, make note of the following:
- The first time a Task Assignee views the Task, it is put into a In Progress status. If the Task is assigned to the person who created it, it will immediately be put into an In Progress status upon creation.
- If a Task is marked Done before any of the Assignees view it, the date/time the Task is marked Done is used for the date/time the Task was set to In Progress status.
Service Metric Hours Calculations
Here are some other helpful facts to contemplate with regard to Service Metric Hours Calculations. Service Metric Hours:
- Exclude Holidays.
- Are based on the Striven Subscriber’s time zone.
- Are based on Service Metrics at a global level if not overridden at a Customer level.
-
Service Metric Report
The Service Metric Report is a tool you can utilize to report on information for services your Company provides on a monthly basis. Each month provides details about Tasks, including the number of completed Tasks, average response times, and average completion time.
This report also displays financial information related to Tasks, including the invoiced dollars each month and the average dollars per Task beginning from the start date of the service plan. Change Orders do not appear separately on this report, but they are included in the metrics for the original Order. Change Orders are, however, prorated based on the date they start in the month, up until a completion date is entered. Below is a screenshot representing how the Service Metrics Report appears.
To view the Service Metrics Report, use the following steps below:
Reports → Metrics

Example of Service Metrics Report
-
Customer/Vendor Portal Service Metrics
How to Configure the Service Metric Report
The settings related to the Service Metrics Report are established on a global level, but they can also be configured at each individual Customer’s settings section. The Service Metrics Report settings will allow you to do many things, including activate Service Metrics, including Task Types, and business hours to report on. This report will be available to Customers in the Customer/Vendor Portal, allowing them to see their Task history.
Although you can report on business hours, Holidays are not calculated in the Service Metrics Report. Below is a screenshot illustrating how the Service Metrics Report settings appear and a list describing what you can configure here. To view the Service Metrics Settings, use the following steps below:
Company → Settings → Tasks → Service Reports Setup → Service Metrics Settings
- Service Metrics Available: This checkbox will decide whether or not you make Service Metrics available for your Company to report on.
- Select Task Type: Enables you to choose which Task Types to include when calculating Service Metrics.
- Select Business Hours: In this section, you can choose business hours to report on.
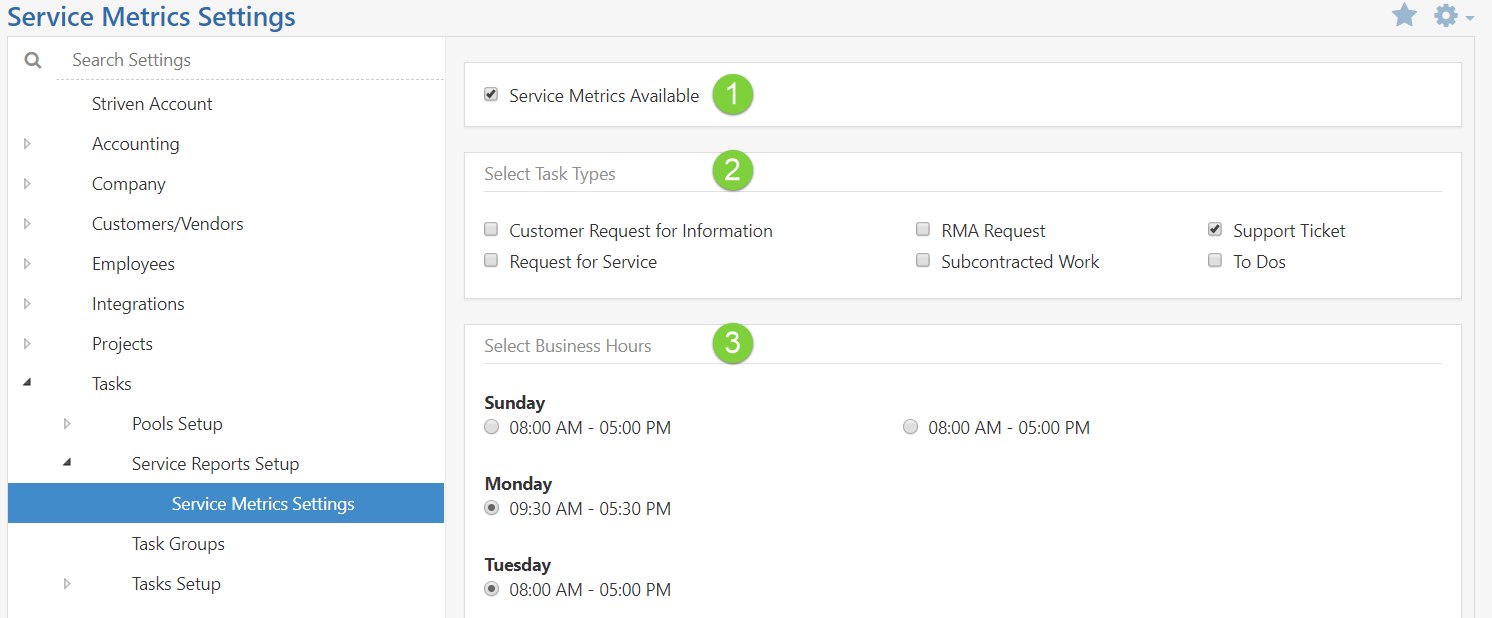
Example of Service Metrics Report Settings
-
Task Notification Customer Settings
Notifications for Tasks can be set up at the Customer level. This is a very useful feature if Tasks for a particular Customer are generally handled by the same Employee or Team. This is also very useful if a particular Customer Contact would like to be notified of activity for Tasks associated with their Company. Notifications can be set for specific Task Types or all Task Types.
To access Customer-Level Task Notifications from the Customer’s Dashboard Page, click on the Customer Navigation Menu → Settings → Task Settings.
The Task Notifications that can be set up here are:
- Task Default Assignments: Determines who should be assigned to Tasks associated with this Customer. It can be different for different Task Types or the same across all Task Types.
- Note: If there is a Project or Order listed on the Task, the Assignments listed for them will supersede the Customer Task Assignments. If a Project is listed, Project Assignments are checked first. If no Assignment is selected, the Default Pool will be assigned. If no Project is listed but an Order is listed, Order Assignments will be checked first. If no Assignment is selected, the Default Pool will be assigned. If there is no Project or Order related to the Task, the Customer Assignments will be used.
- Task Status Update – Task Created: The recipients listed here will be notified by email when a Task gets created associated with their Company.
- Task Status Update – In Progress : The recipients listed here will be notified by email when a Task associated with their Company is viewed by the Assignee.
- Note: If a Task is assigned to a Team (turned off by default), any Team member viewing the Task will put the Task in an In Progress status. This is not the case for Pools. The Pool member would need to reassign the Task to an Employee/Team. The Task will go into an In Progress status after it is viewed by the Employee or Team member.
- Task Status Update – Done : The recipients listed here will be notified by email when a Task associated with this Company is marked Done.
- Task Approvers: The recipients listed here will have the ability to approve Tasks that require approval associated with this Customer.
- Task Happiness Rating: The recipients listed here will be notified of any Happiness Ratings and comments left for listed Tasks associated with the Customer.
- Task Default Assignments: Determines who should be assigned to Tasks associated with this Customer. It can be different for different Task Types or the same across all Task Types.
-
Recap
With this guide, we’ve discovered how to create and manage Task Types, Task Pools, and more to enable your Task Management to suit your Company’s needs. We’ve also discovered ways to manage Task Dispatch and the Task List to ensure the best user experience when using Task Management in Striven!
FAQs
-
I received a notification that a Task came to the Pool I belong to, but the Task was not there when I went to re-assign it to myself. How can I find the Task?
This could have happened because someone else from your Pool already assigned themselves to the Task, which removes it from the Pool. Clicking on the Task link in the email notification will bring you to the Task. This will allow you to see if the Task has been re-assigned to someone else.
-
I need to re-assign a Task or mark it as completed, but I am unable to do so. What can I do to fix this?
You may not have the proper user role to complete your job. If this is the case, then it is best to reach out to your system administrator to discuss what exactly you need to do in Striven so they can update your permissions accordingly.