
Sales Management
Sales Orders
Support Guide
-
Overview
Sales Orders in Striven allow for vast flexibility to fit many different types of services or goods you may sell. Sales Order Types can be configured to accomplish many things such as acting as a Quote or Contract, time & materials billing, or even subscriptions. There’s no limit to the functionality that can be accomplished with Sales Orders within Striven.
Read this guide if you are trying to:
✔ Configure settings for Sales Orders in Striven.
✔ Set up Simple and Contract Managed Sales Order Types and create new Sales Orders.
✔ Arrange printable formats for Sales Orders.
Sales Orders
-
Sales Orders Setup
Before you can begin using Sales Orders in Striven, it is important to review the default configurations to make sure they will meet your needs. Data such as Payment Terms, Terms & Conditions, and more heavily impact Sales Orders. Deciding on these defaults per Sales Order Type will also allow for advanced configuration for many areas of your business.
-
Payment Terms
Payment Terms are one of the first things you’ll need to have entered into your system before you start working with Sales Orders and other transactions in Striven. Payment Terms note when Payment is agreed to be delivered to the buyer. There are defaults in Striven for this section including Net 30, Due On Receipt, etc. To edit Payment Terms, simply click on the name to edit the information. You can add Payment Terms as well by clicking the Add button on the Payment Terms list. Below is a screenshot of a Payment Term and what can be configured there. Once Payment Terms are added, they can be associated with Sales Orders and transactions in Striven.
To view Payment Terms, navigate to:
Company → Settings → Accounting → AR → Sales Orders → Payment Terms
It is important to note that the Has Discount option for Payment Terms is available for Accounts Payable type transactions only and will not be in effect for Sales Orders and their related Invoices.
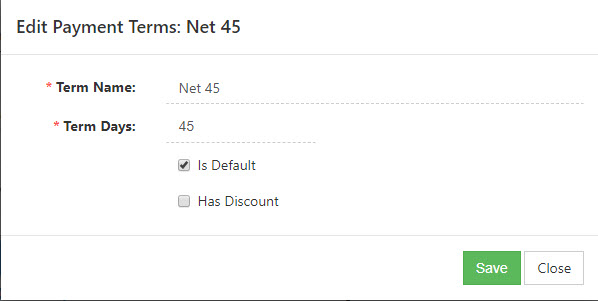
Example of Adding a Payment Term

-
Terms & Conditions
Striven can help facilitate your Contract Management and the Sales Orders active Customers have placed. Included with Payment Terms as discussed above, Terms & Conditions are agreed upon by both the seller and buyer upon the point of purchase. Once the Sales Order is approved, it is then considered a Contract and both parties must meet each other’s end of the Sales Order. When at the Terms & Conditions List, individual terms can be edited by clicking on the name. This will initiate a popup as shown below in which you can choose where the Terms & Conditions appear. These include Sales Orders, Purchase Orders, public forms, recruiting, and Surveying. These can be enabled by toggling the appropriate checkbox.
To view Terms & Conditions, follow these steps:
Company → Settings → Accounting → AR → Sales Orders → Terms & Conditions
To use Terms & Conditions on your Sales Order, your Sales Order Type must have the Turn on Contract Managed option toggled, as will be discussed in the next section of this guide.
- History: Displays previous versions of your Terms & Conditions. Striven keeps a history tab for you for when edits are made or Terms are updated. Keeping records of your previous Terms & Conditions can save you from legal liability at a later date if the situation arises.
- Categories: The entity in which the Terms & Conditions are in effect. With Striven you have the ability to set Terms & Conditions for different processes, such as Orders or recruiting. This will make sure these Terms show up as available for the entity it should be while hiding it from where it should not be applicable.
- Content: The text editor box is where you enter your Terms. The advanced editing option allows for precise formatting in order to make sure your Terms & Conditions are exactly as your Company needs them.

Example of Setting Up Terms & Conditions
-
Sales Orders Types
When you are ready to start selling goods and services, it is important to view and configure Sales Order Types. Sales Order Types can be configured to fit different needs for your Company’s sales department. There are defaults in your settings, which include Standard Orders and Contract Managed Orders. Standard Orders are flexible, meaning they do not require Customer approval and can be completed or edited at any time. Contract Managed Orders are stringent, meaning they require Customer or internal approval to start completing work. When on the Sales Order Type List simply click the Add button to start building a new type or click the name of an existing type to edit. Below is an example of a Contract Managed Sales Order Type and what can be configured there.
To view Sales Order Types, navigate to:
Company → Settings → Accounting → AR → Sales Order Types
- Order Type Name: The name of the Sales Order Type you are configuring. This will appear on Sales Orders to select a type in a drop-down list.
- Payment Terms: Choosing a default Payment Term for the Sales Order Type will assign them as the default for Sales Orders when using this type, but can be changed on a Sales Order later. If a Customer has default Payment Terms saved, their Terms will be used. To configure Payment Terms, review the section above.
- Invoice Format: Allows you to choose a default printable format for the Invoices generated from Sales Orders of this type. Further details about creating printable formats for your Sales Orders will be provided in the section below.
- Display Fields: Notes the information that can be captured on Sale Orders of this type. If the Sales Order name is selected, it will be required. Once the Target Date has been toggled on, you can then choose if this should be required when creating Sales Orders in Striven.
- Default Print Formats: Allows you to select the default format when printing the Sales Orders of this type.
- Advanced Features: By choosing to show advanced features, more options will appear for you to choose from. These include the following:
- Used for Time & Expenses: Makes Time Entries associated with this Sales Order billable by default. To learn more about managing Time Entries in Striven, please review our Time & Expenses Guide.
- Collect Feedback: Allows you to send a Survey, Quiz, Assessment, or Form when the Sales Order is marked complete. To learn more about setting up Surveys, review our Surveying & Feedback Guide.
- Fulfill Dates: Allows you to choose when Line Items on Sales Orders of this type must be fulfilled by. Whereas the Target Date indicates when the Sales Order as a whole is to be completed, the Fulfill By date per Line Item allows you to indicate the dates of each Item should be fulfilled.
- Create Task from Sales Order Settings: Allows you to choose from the following settings:
- Copy Name to Task Name: Sets the Task Name to match the Sales Order Name.
- Copy Customer Notes to Task Description: Copies the Sales Order Customer Notes to the Task Description, if applicable.
- Copy Internal Notes to Task Description: Copies the Sales Order Internal Notes to the Task Description, if applicable.
- Copy Contact to Task Requested By: Sets the Task’s Requested By entity with the Sales Order Contact info.
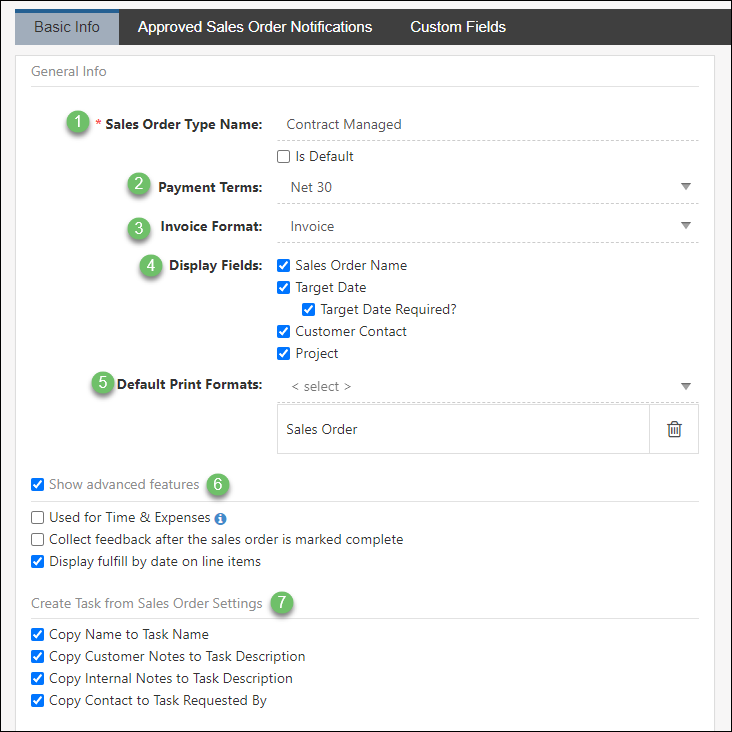
Example of Configured Sales Order Types
Contract Management
Contract Management designates your Sales Order Type work as a Contract. Once toggled on, you can choose Terms to be associated with the Sales Order Type, automatic invoicing based on triggers, and even the different ways your Customers can approve Sales Orders.
- Terms & Conditions: Allows you to choose from Terms & Conditions for the Sales Order of this type. The Terms must be agreed upon by the Contact before the Sales Order can be approved. To learn more about how to set up your Terms & Conditions in Striven, please review the section above.
- Invoicing Type: Allows you to select whether the invoicing should be done on a one-time basis or set up on a recurrence. If the Sales Order Type will have both one-time and recurring invoicing, Either can be chosen to allow for additional flexibility.
- When to Invoice: Allows you to choose when to invoice the Sales Order of this type. The choices on when to invoice are either on completion or approval, manual invoicing, or progress invoicing. To learn more about invoicing Customers, please review our Accounts Receivable Guide.
- Additional Options: Additional toggles are available to either hide the Items when the Sales Order is being viewed on the Portal by the Contact, as well as requiring internal approval (which will be reviewed in more detail below).
- Approval Methods: Allows you to choose how Contacts approve the Sales Orders of this type. Options include the following:
- Electronic: Enables an electronic signature field to be added to your Sales Order in the Customer/Vendor Portal. Once your Customer is ready to approve, they can simply sign digitally and your Contract is now in effect.
- Written: This is ideal if your Customer sends over documentation regarding his approval of the Sales Order. By clicking the configure hyperlink you will have the ability to require a document before an approval can be made.
- Verbal: Allows for approval of the Sales Order to be indicated as a conversation that happened. Requiring an attachment is also available for the verbally approved option.
- More Additional Options: Additional options are available at the bottom of your Sales Order Type that are related to Payment methods and auto-pay configuration that can give you a wide variety of automation with regard to receiving Payments from Customers. These options are described further below:
- Require Payment Method: Requires your Customer Contact to enter a Payment Profile before the Sales Order can be approved.
- Auto-Pay Option: Allows for a Contact to sign up for auto-pay for all Invoices related to the Sales Order they will be approving.
- Auto-Pay Required: Having this option turned on means a Sales Order of this type cannot be approved unless the Contact has agreed to and turned on the auto-pay feature.
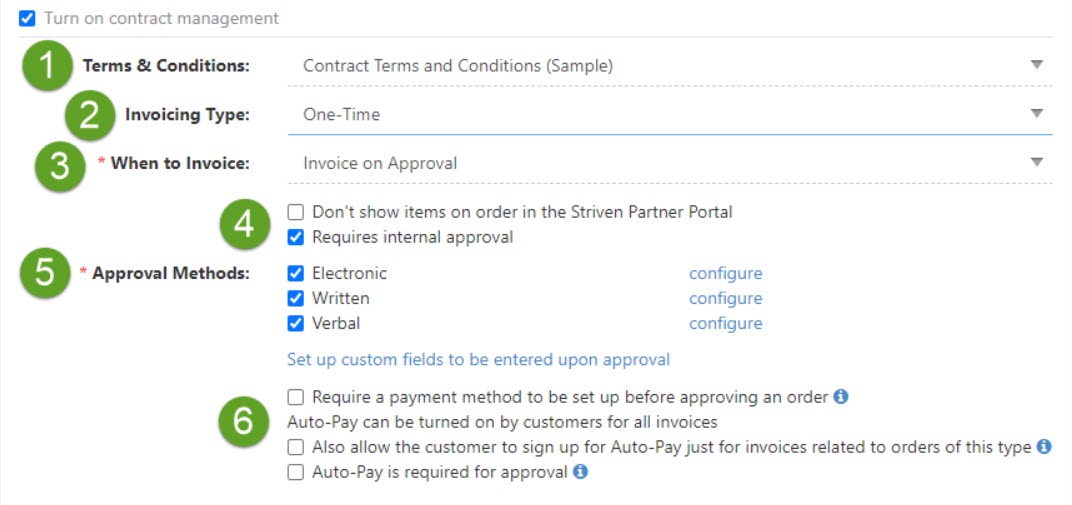
Example of Contract Management Options
-
Approved Order Notifications
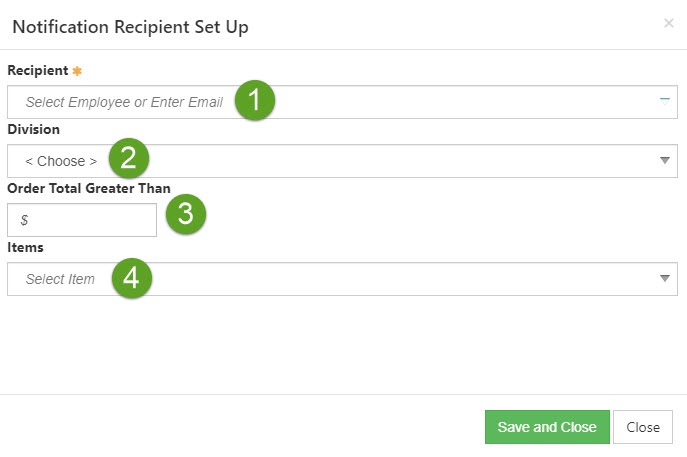
As you know, companies can be very busy and may not always have the time to check in on an update. Configuring your Approved Order Notifications for Contract Managed Sales Orders is a great way to make sure you are aware each time a Sales Order is approved of the selected type, no matter who the salesperson was. When viewing your Sales Order Type info, click on the tab Approved Order Notifications and choose to Add Recipient.
- Recipient: Select an Employee from the system or enter an email to make sure that person will always be notified when a Sales Order of this type is created. This will make sure they are notified even when not the salesperson on the Sales Order.
- Division: If you wish for the recipient to only be notified when Items from their Division are sold, select the Division here. Divisions can be assigned at the Item level. To learn more about Item Management, review our Item Management Guide.
- Order Total Greater Than: If you wish for the recipient to only be notified when Sales Orders over a certain amount are approved, then enter that amount here. This can come in handy if you want to make sure a warehousing staff is notified if a larger than normal Sales Order is approved.
- Items: Selecting an Item in this field will make sure the recipient is always notified when a Sales Order with that Item has been approved, regardless if they are the salesperson on the Sales Order.
Example of Notification Recipient on Sales Order Type
-
Custom Fields
If you wish to capture any additional data on the Sales Order, Custom Fields can be created. Custom Fields can be captured as a global Sales Order field, meaning it will appear for all Sales Orders, no matter the type. They can also be created per type to allow for a more specific information-gathering effort. To learn more about Custom Fields for Sales Orders, review our Custom Fields Guide.
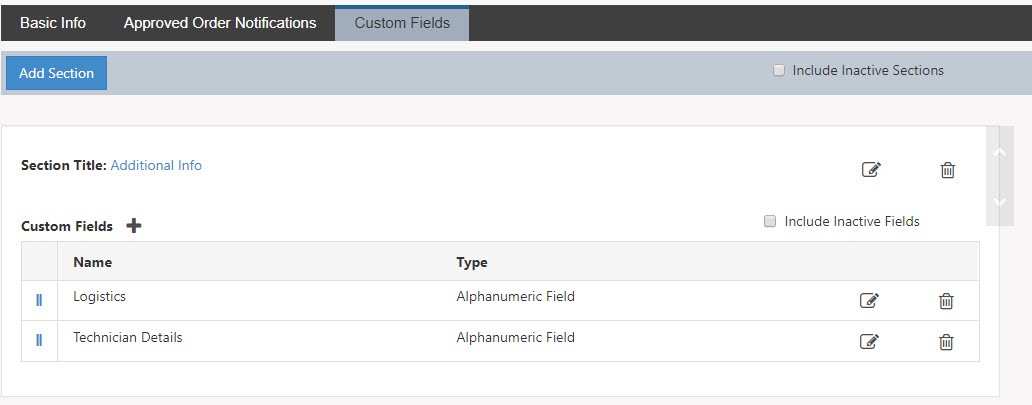
Example of Sales Order Type Custom Fields
-
Require Custom Fields When Approving Order
An additional layer of information you can capture from your Customer upon approving a Sales Order is through the use of Custom Fields set per Sales Order Type. A link labeled Set up custom fields to be entered upon approval will be available underneath the Approval Methods when configuring your Sales Order Type. A sub-tab is also available to access these fields when viewing the Custom Field Tab within a Sales Order Type.
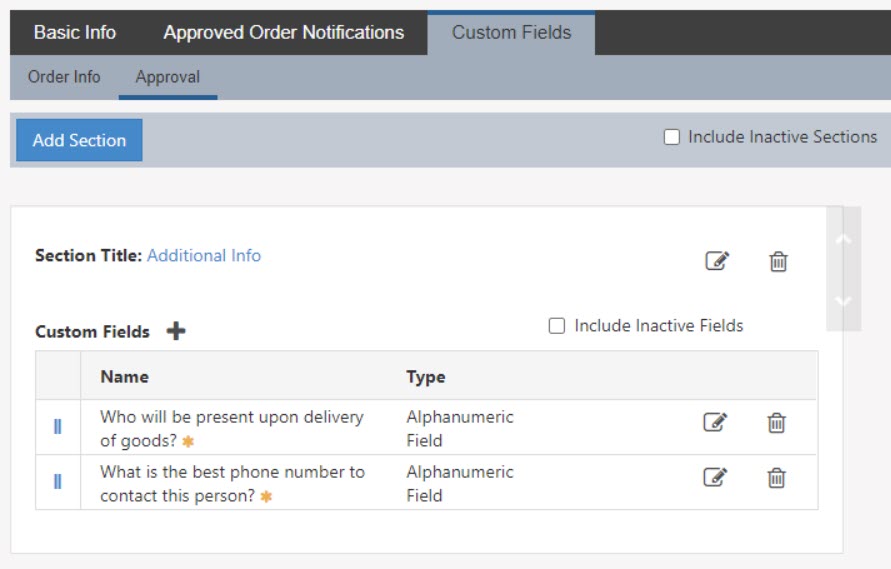
Example of Sales Order Type Custom Fields
Custom fields that are required for approving Sales Orders can be filled in either by Employees or Contacts. The custom field must be visible on the Portal in order to designate a Contact to fill in custom fields when approving Sales Orders. If a user is electing to approve a Sales Order via the written or verbal option, the fields will be displayed in order to fill in the appropriate information. Below is an example of custom fields that are visible to Contacts as they approve a Sales Order (indicated by the blue arrow):
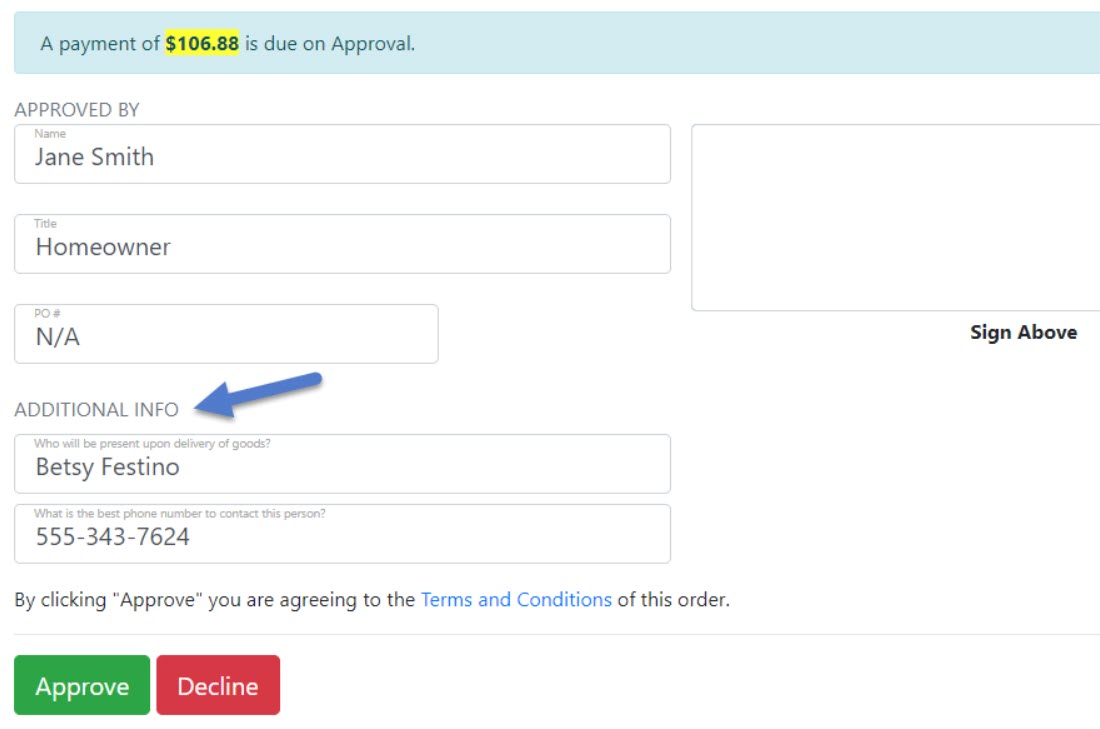
Example of Sales Order Custom Field Approval
-
Custom Columns Per Line Item
Custom Columns can be configured if you would like to track additional information per Line Item within a Sales Order. These fields can be useful for tracking information with regard to commission, shipping information, or product-specific detail such as attributes. To add Custom Columns to your Sales Orders, use the following steps:
Company → Settings → Accounting → AR → Sales Orders → Custom Columns
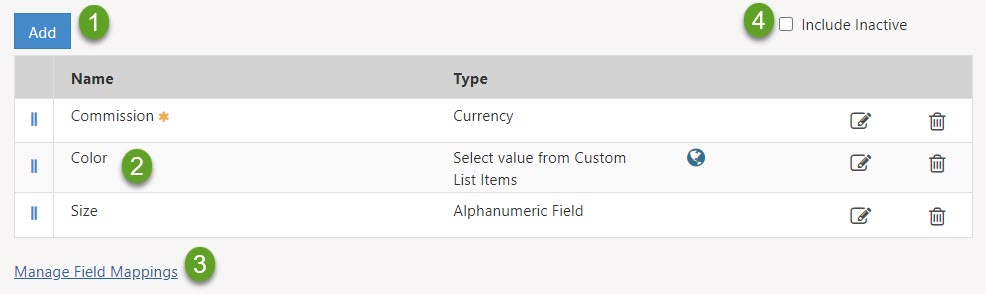
- Add: Creates a new Custom Column to appear on Sales Orders. A total of 3 additional columns can be added to Sales Orders through the use of Custom Columns.
- Name: List of Custom Columns. The list will indicate whether it is required or visible on the Customer/Vendor Portal. Additional options to Edit or Deactivate are available for each Custom Column to make changes or remove completely. The order in which the Custom Columns appear on Sales Orders can be rearranged by clicking and dragging the 2 blue vertical lines next to each column name.
- Manage Field Mappings: Option available if you plan to add Custom Columns to your Sales Orders that should also carry over to the related Invoices. This will be explained in more detail in the sub-section below.
- Include Inactive: Toggle the checkbox to include deactivated Custom Columns to the list.
Example of Sales Order Custom Columns
-
Sales Order and Invoice Custom Field Mapping
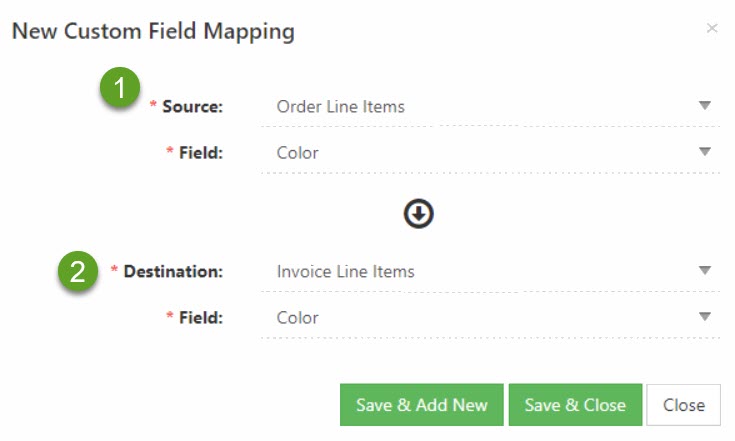
You will be brought to a new page once you have selected the option to Manage Field Mappings on the Custom Columns page for Sales Orders or Invoices. To map fields from a Sales Order to the related Invoice, you will begin by clicking Add Mapping. An example of configuring a Custom Field Mapping is displayed below:
- Source: The location in Striven where you want the information to pull from when a new Invoice is being created. In the example above, the source Order Line Items is selected along with the field Color.
- Destination: The location in Striven where the information should populate to when the entity of the destination is created. In the example above, the Invoice Line Items destination is selected in order for the field Color to populate correctly based on the information from the Sales Order Color Custom Field.
Example of New Custom Field Mapping
-
Line Item Grouping
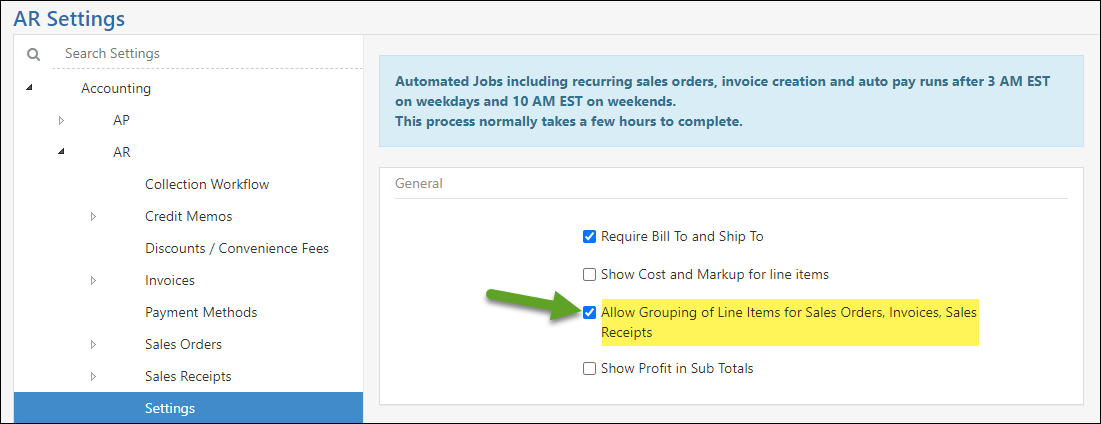
Sales Orders, Invoices, and Sales Receipts have the added feature to group Line Items by Item Type, Item Category, or a custom grouping of your design. Not only will this group your Line Items, but it will also supply a subtotal for each grouping.
The settings to turn this feature on in your Striven system can be found by navigating to Company → Settings → Accounting → AR → Settings to locate the option to “Allow grouping of Line Items for Sales Orders, Invoices, and Sales Receipts.”
Example of AR Settings to Allow Line Item Grouping
Grouping Options
Once the Line Item Grouping feature is turned on, you will find the grouping choices under the Options menu on the Sales Order or Transaction. These options include Group by Item Type, Group by Item Category, or create a Custom Group.

Example of Line Item Grouping Options
When Grouping by Item Type, you’ll be able to organize your Line Items under an Item Type header. Item Types include Inventory, Non-Inventory, Service, Item Group, Discount, Fixed Asset, and Manufactured. This will gather all Line Items of the same Type into one section on your transaction and provide a subtotal of those Items.
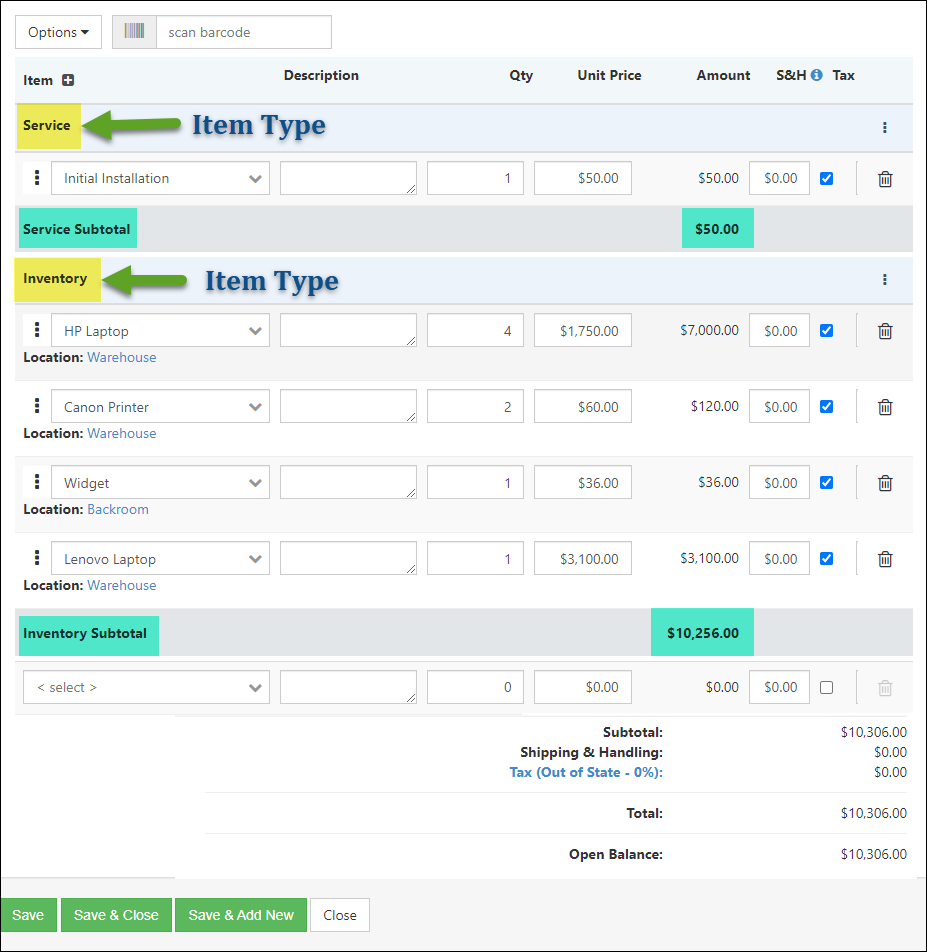
Example of Transaction Grouped by Item Type
Grouping by Item Category will arrange your Line Items into groups by their assigned Item Categories and provide a subtotal as well.
- Note: For more information about configuring and utilizing Item Categories, please refer to the Item Categories section of our Item Management Guide.
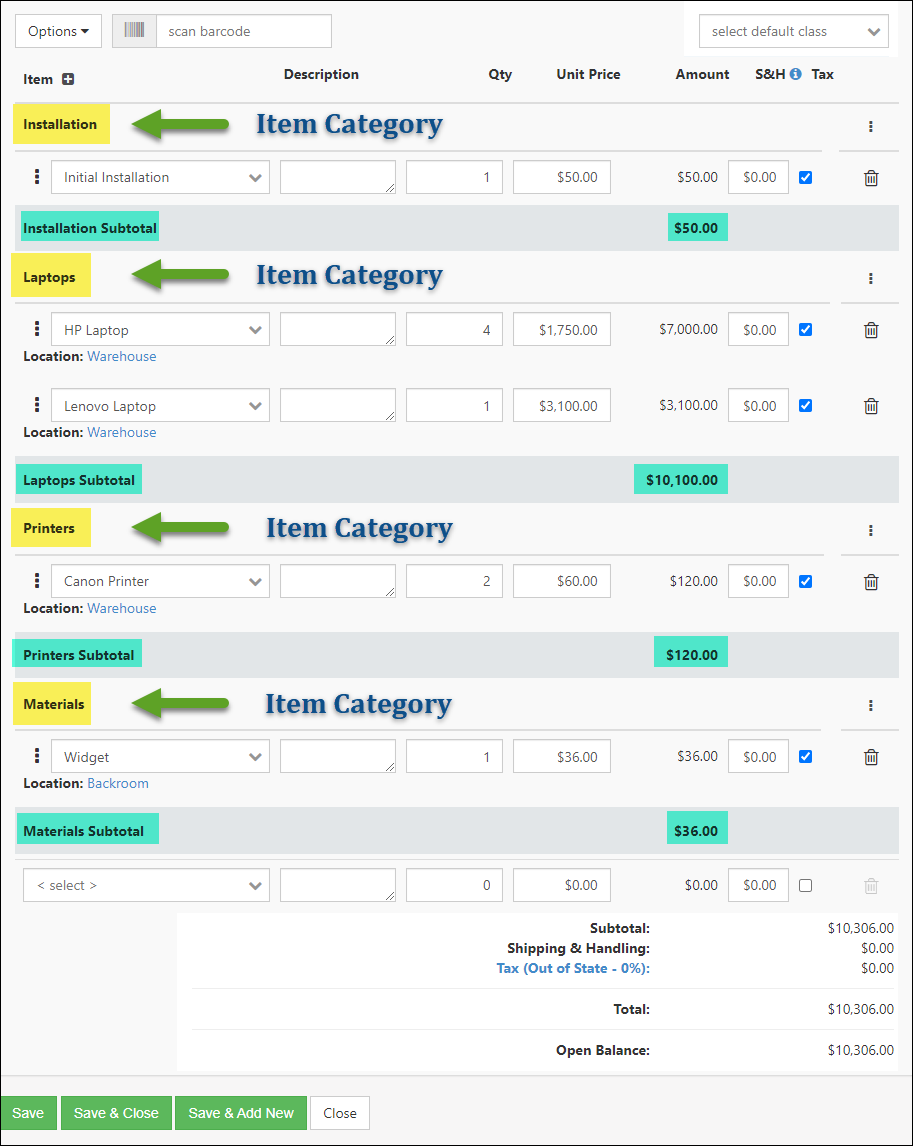
Example of Transaction Grouped by Item Category
The Custom Group option offers the ability to enter a group name, and then select the individual Line Items you wish to add to this group. There’s also the option to add all ungrouped Items at once to your Custom Group.
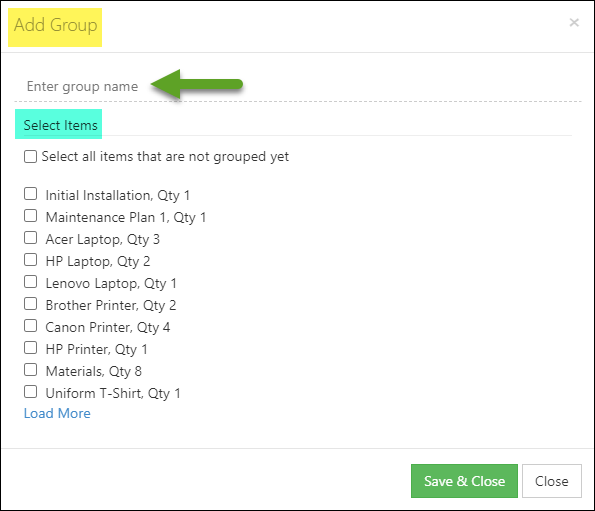
Example of Creating a Custom Group
Other Options
The Options Menu also houses the Manage Groups and Remove All Groups settings.
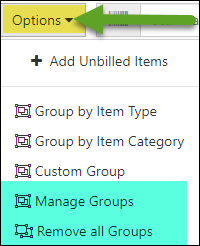
Example of Manage Groups & Remove Groups Options
The Manage Groups option allows you to sort the groups on the page by clicking and dragging the group name to the desired position, as well as edit a group name, create a new group, and includes the option to show subtotals for each group in the subtotal section below all Items.
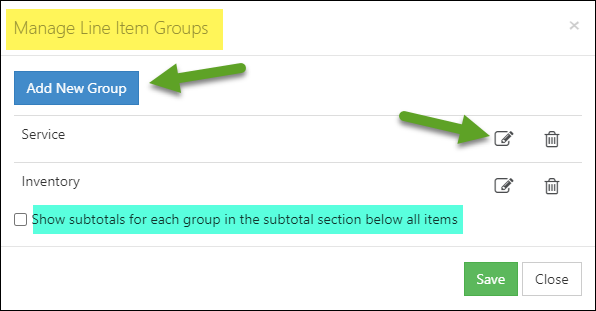
Example of Manage Groups Options
Should you wish to remove all groups, but keep the Line Items, you can select Remove All Groups and the Line Items will just be listed in the original order in which they were added to the list.

Example of Option to Remove All Groups from a Transaction
Grouping Header Menu Options
On the far right side of each group header you’ll see the kebab menu with options to Edit the group name or Remove the group.
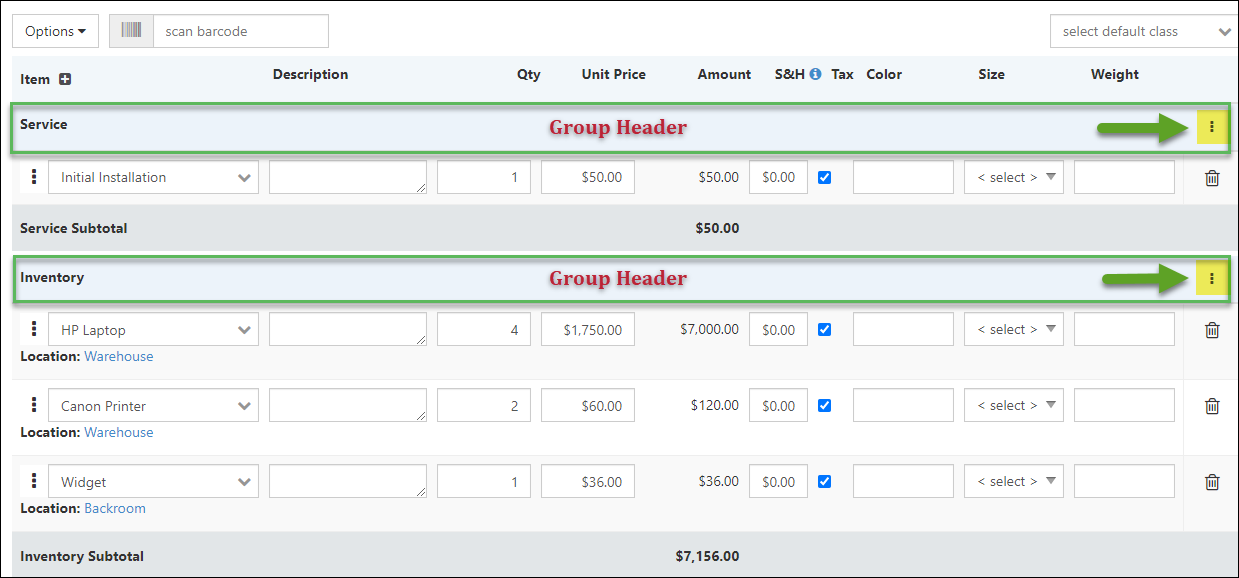
Example of the Kebab Menu on the Group Header
Line Item Menu Options
While nested in groups, all Line Items will have a kebab menu on the left side with options there to Move the Item to another group or Remove the Item from the current group.
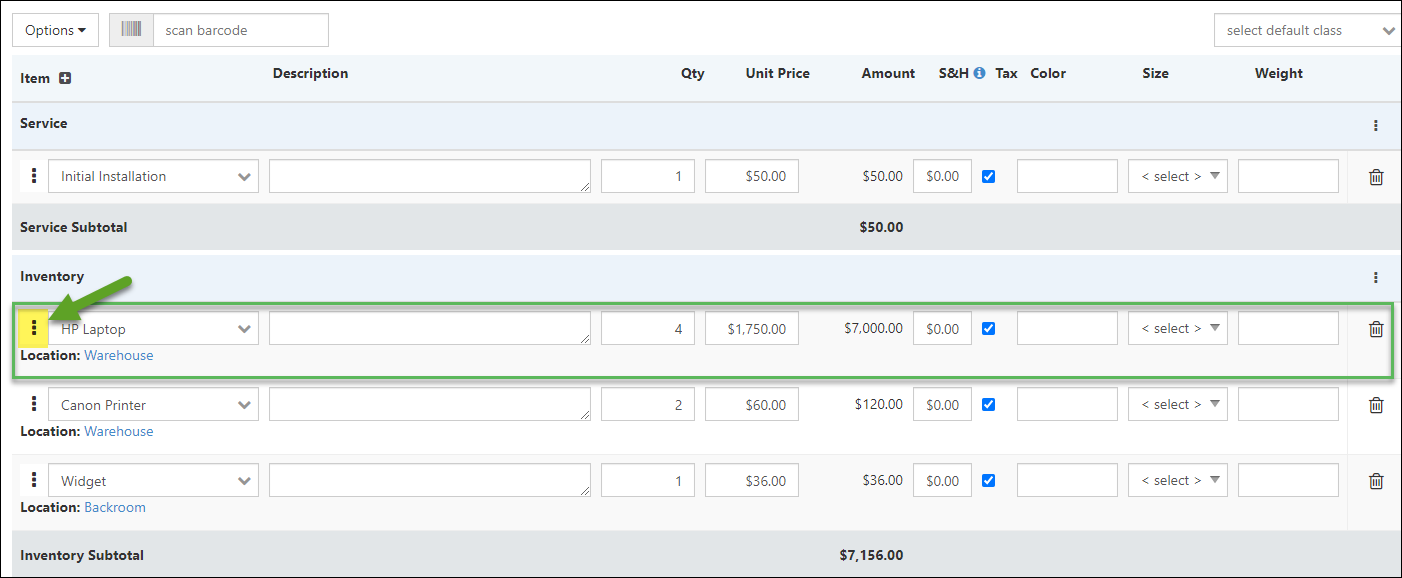
Example of Kebab Menu on the Line Item
Adding new Line Items after grouping your existing Line Items will not automatically list the new Items in the corresponding group. Newly added Items will be listed at the bottom of the groupings as ungrouped Items. Re-grouping is an option to ensure newly added Items are listed in the corresponding groups and can be easily accomplished by removing all groups, and then selecting your preferred grouping option again.
Since Sales Orders already have the ability to drag/drop Line Items into a specified order, this can still be done, but you will only be able to rearrange the Line Items within the groups – not between different groups.
Transaction Printable Format Options
Printable format options to accommodate the group headers and footers on your Sales Orders, Invoices, and Sales Receipts can be configured from the Items section of your printable formats. In order to display the group headers (which is the group name), and group footers (which is the subtotal), the option must be enabled under the Group Settings.
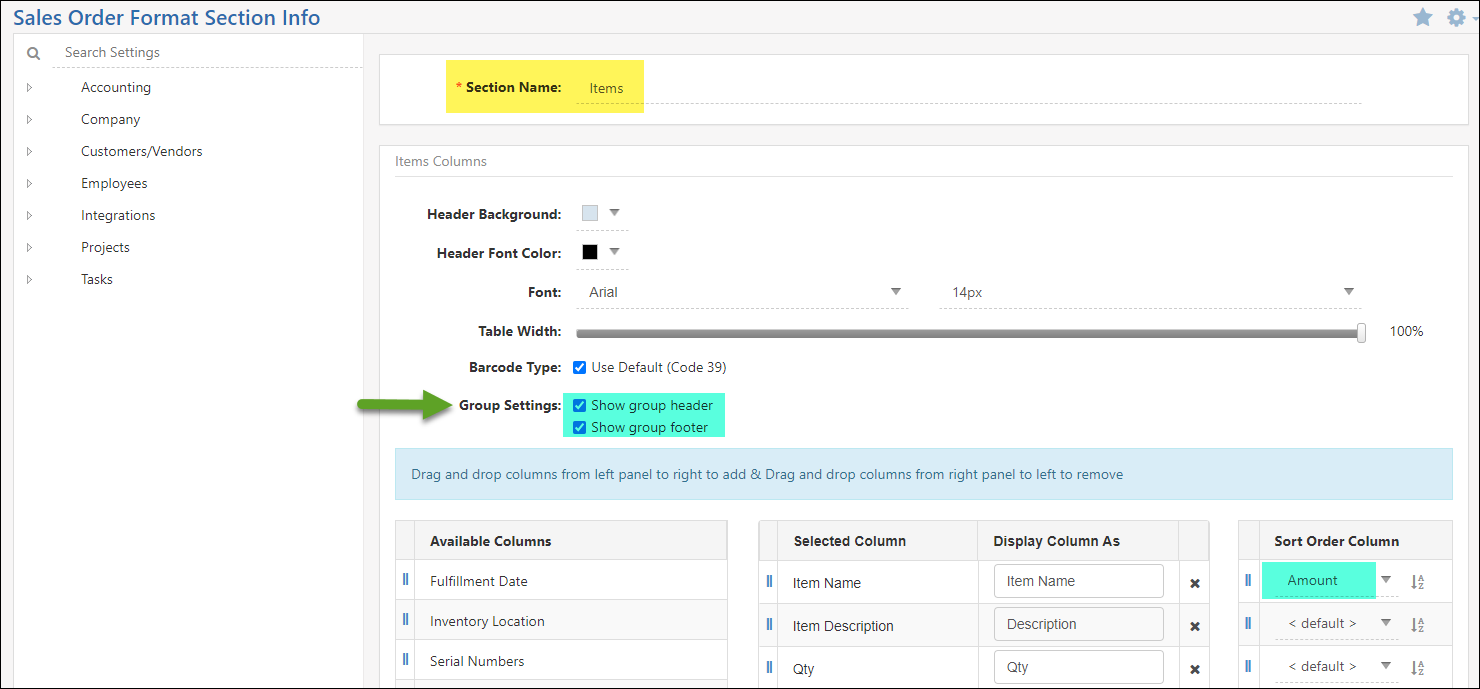
Example of Items Section of a Sales Order Printable Format
Additionally, if the Sort Order Column in the format is set for Amount, the items will be sorted automatically by amount within each group.
Enabling/Disabling Line Item Grouping
One last thing to note about this feature is that when the Line Item Grouping is turned on and transactions are created, turning the grouping feature off will cause those transactions to still display the Line Items in the configured groups, but none of the grouping related options would be available. The grouping feature would need to be re-enabled to make any changes to the grouping on those transactions.
-
Discount Calculator
The Striven Discount Calculator is available on Sales Orders, Invoices, and Sales Receipt pages to allow you to easily calculate a discount and apply it to the desired transaction. As a general note, all discounts are calculated pre-tax and before any shipping/handling charges are applied.
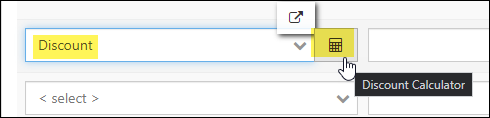
Example of Discount Calculator Icon when Adding Discount to a Sales Order
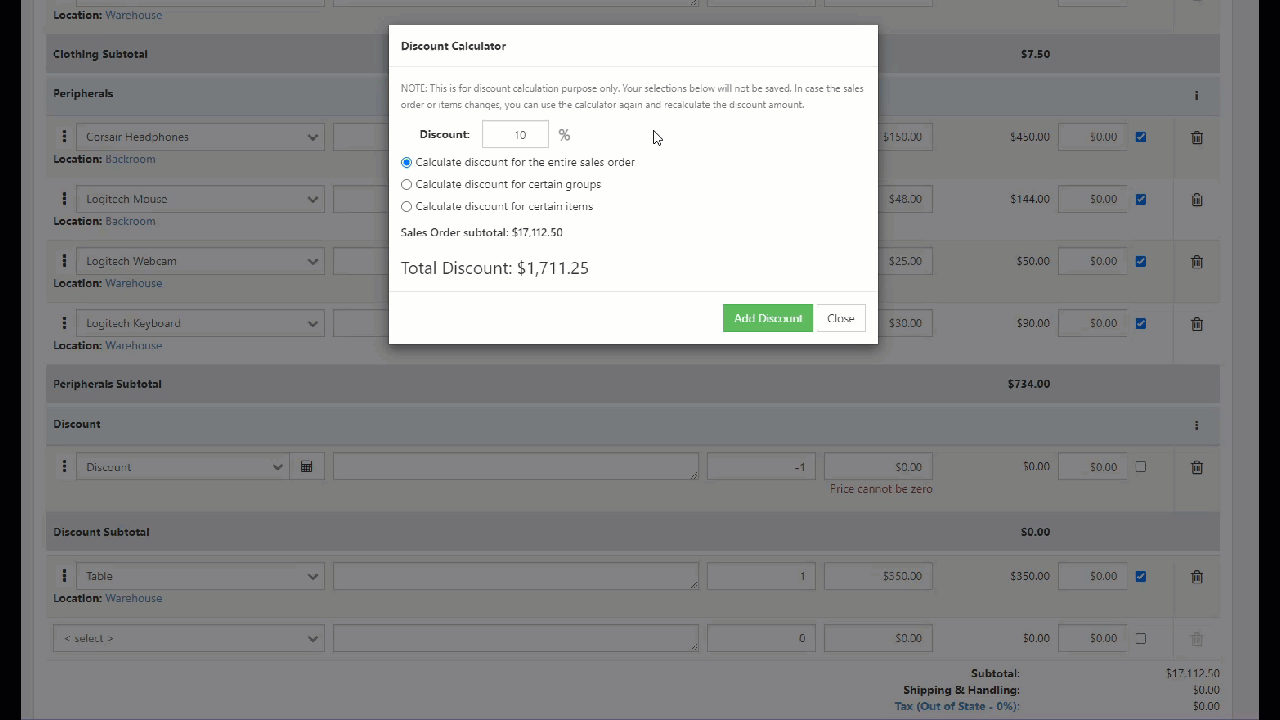
When adding a Discount Item to your transaction, a small Calculator icon will appear next to the Item name which when clicked will trigger a popup wherein you can enter your discount settings. If you’re utilizing the new Line Item Grouping feature, you will see 3 options for applying your discount on the transaction. You can select to apply the discount to the entire transaction, for certain groups, or for specific Items on the transaction. If you’re not grouping your Line Items, the option to apply to certain groups will not be available.
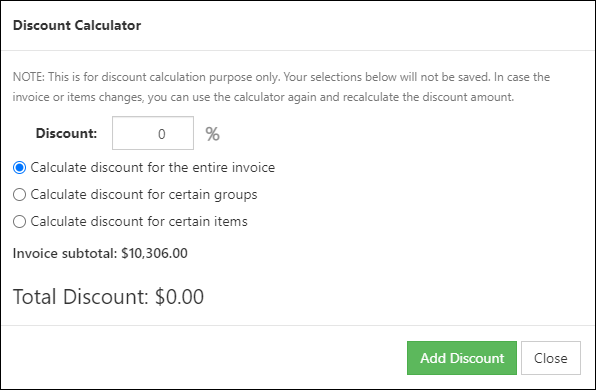
Example of a Discount Calculator Popup
When you are entering a discount for the entire transaction, you’ll see the discount Line Item amount and a reduced subtotal.
Example of Applying a Discount to an Entire Sales Order
Creating a discount for specific Items will show a list of available Items from the transaction to select for the discount. The transaction will display the discount amount for the selected Items and the reduced subtotal.
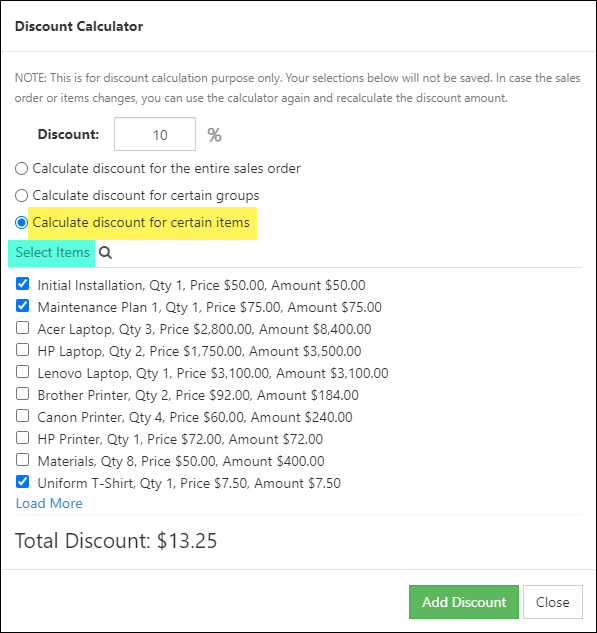
Example of Calculating a Discount for Certain Items
For transactions with a large number of Line Items (more than 10), you can either click Load More to see more of the Items, or you can utilize the search option to find the exact Items you wish to apply the discount for. Search options include searching by Item name or Item category.
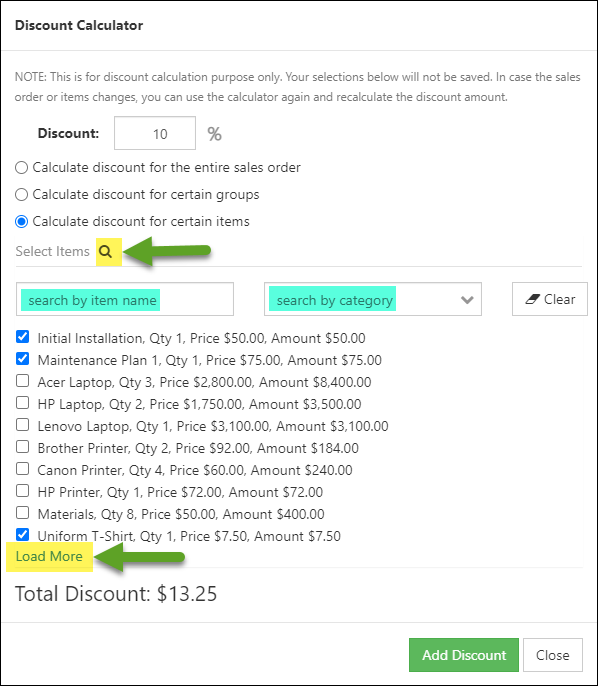
Example of “Load More” Option and Search Options for Calculating Discounts for Certain Items
And lastly, as mentioned earlier in this guide, if you’ve grouped your Line Items, you will have the option to apply the discount to certain Item groups.
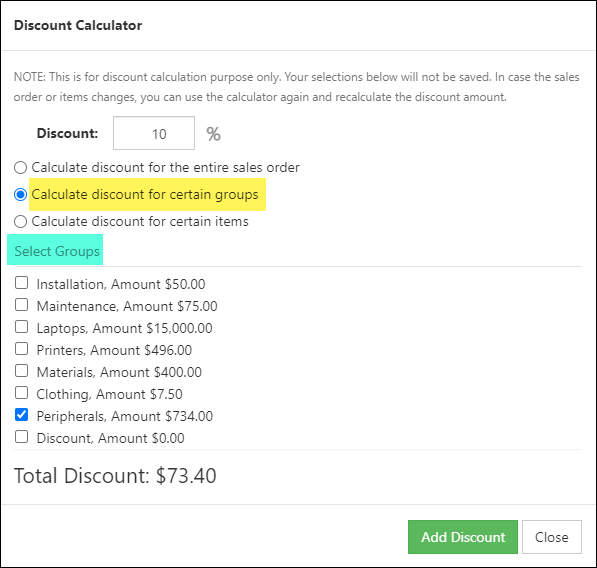
Example of Calculating Discount for Certain Groups
-
Sales Order Internal Approval
An internal approval process can be configured within Striven to allow for Employees to send a Sales Order to an internal user before it can be sent to a Customer for approval. This is a great way to make sure new Employees are trained properly. Sensitive Orders, such as over a certain amount, can also be flagged as needing internal approval to allow more flexibility on which Orders needs to follow the internal approval process.
As noted above in the Sales Order Type section, the Requires Internal Approval option will need to be toggled on for the process to take effect.
To begin setting up a Sales Order Internal Approval Process, you will navigate to the Employee which should not have access to send Sales Orders directly to Customers.
This can be done by navigating to Employees → List and typing in the Employee’s name in the search field available.
Once you have navigated to the Employee you wish to configure for the Sales Order Internal Approval Process, you will then click on the Order Approval Settings tab.
- Approve up to: Designates at what amount this Employee needs to send the Sales Order for internal approval rather than directly to the Customer Contact. By selecting No Limit the Employee will never be prompted to first go through the internal approval process and instead can send directly to the Customer Contact for approval.
- Quote approval: Determines per Employee whether they can send a Sales Order for approval when a Line Item within the Sales Order is either set as a negative quantity or with a $0 Line Item.
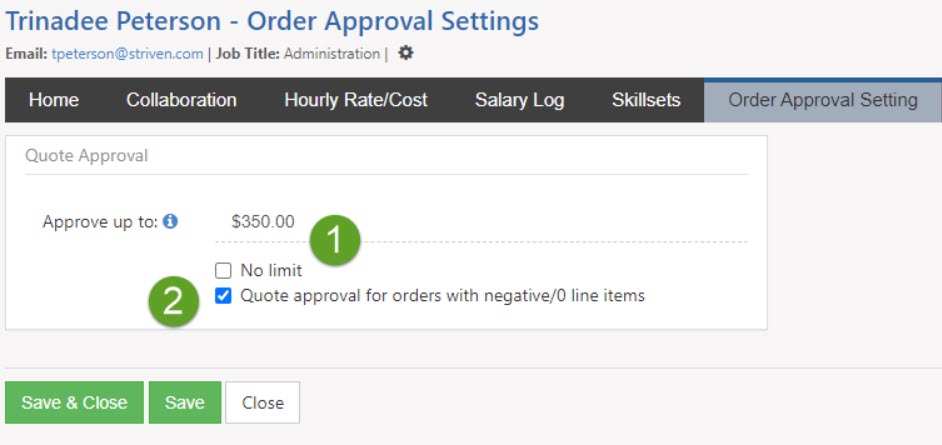
Example of Employee Order Approval Settings
When an Employee is required to send a Sales Order for internal approval, they will be prompted to select an Employee when they try to order for approval rather than the approval methods selected within the Sales Order Type. The Employee selected to review the Sales Order will receive an email informing them that they will then be able to send the Sales Order to the Customer Contact for approval.
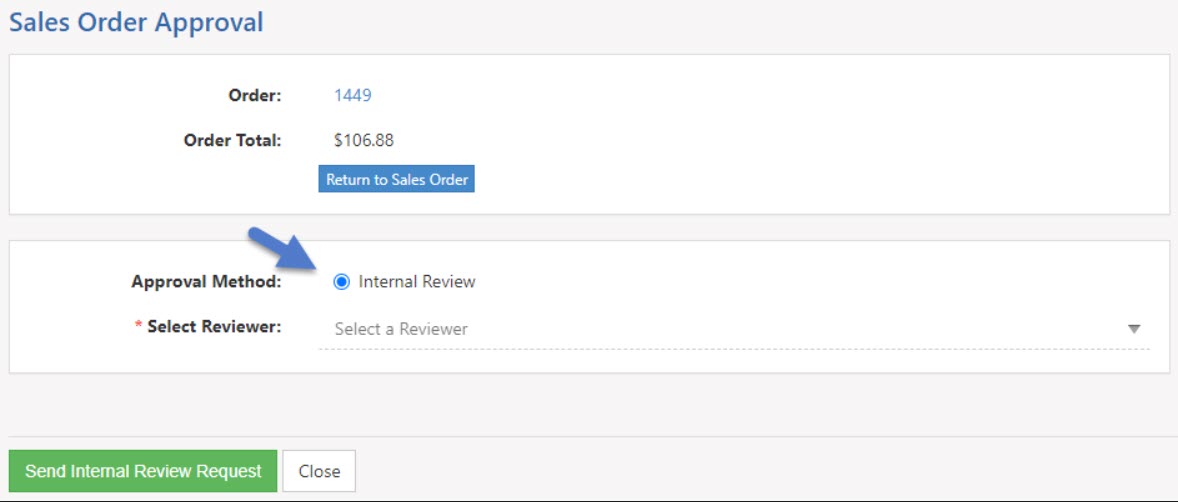
Example of Sales Order Internal Review Option
-
Printable Formats
Customers can view Sales Orders and transactions in many ways from the Customer/Vendor Portal, email, or mail. To provide a visual outside of the Customer/Vendor Portal, however, it is recommended you create Printable Formats. Using the Sales Order formats will allow a PDF printable version to be sent to the Customer. If they are using the Portal they will be able to view and print out the Sales Order so they have a hard copy for their records. There is a default Invoice format in Striven for your use, but you can also create your own. These are available with all Sales Orders and Invoices and function the same, but we’ll look at Sales Orders in particular with examples as well. Below is an image of the Sales Order Format List from which you can edit or add printable formats. To view Sales Order Printable Formats, use the following steps below:
Company → Settings → Accounting → AR → Sales Orders → Sales Order Formats
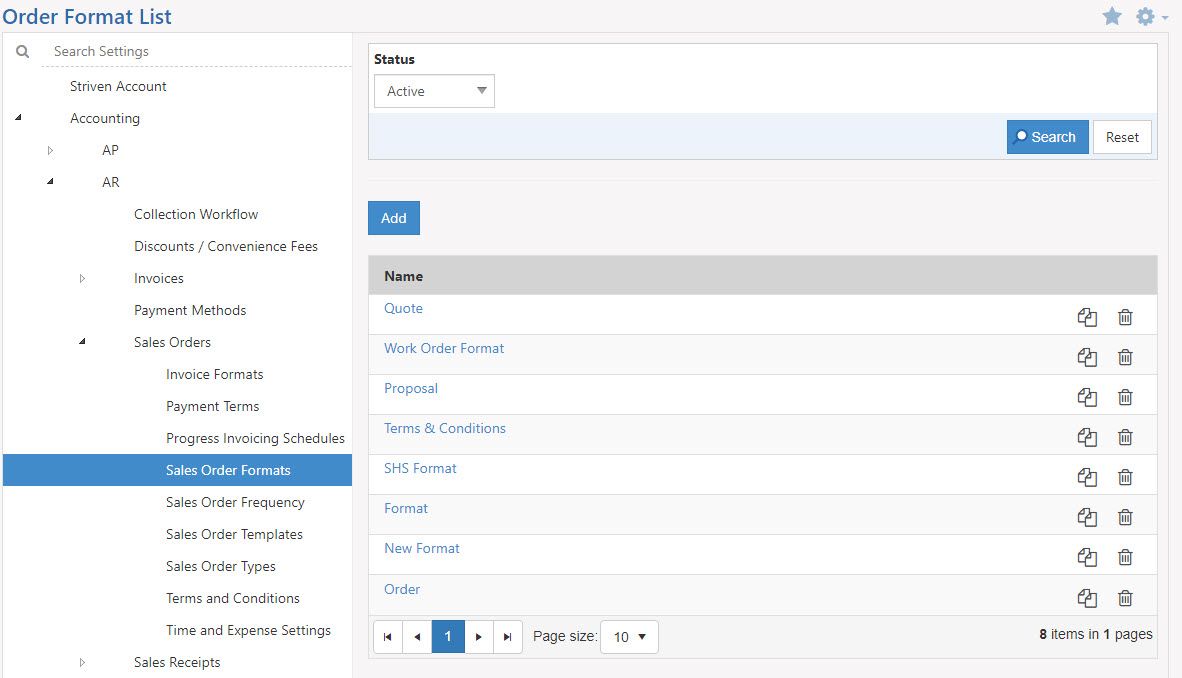
Example of Sales Order Formats List
When creating a new printable format there are three main sections available for you to configure to suit your Company’s needs including Content, Items, and Totals. Let’s discuss each section one by one and explore what each section can help you accomplish with printable formats.
Content: This section will allow you to utilize a text editor. Using merge fields is very important when setting up Sales Order Printable Formats. The merge fields will take information from the Sales Order or transaction and merge it into the PDF automatically. Things like the Company Logo can also be added using merge fields. Content sections can serve as headers, footers, or Terms & Conditions sections. Below is a screenshot demonstrating how this section appears with merge fields and formatting.

Example of Setting Up Content Section for Sales Order Formats
Items: This section will allow you to configure how the Items appear on the printable format. To configure the section header, you can choose a column header background color and font size and color. Within the Items, you can also choose what to include and exclude in the section, from quantity, name, description, and more. The columns can also be renamed and rearranged to fit your needs. If barcoding is enabled, there will be an additional option to select the Barcode Type as well as additional columns to add to your format. Any Custom Columns at the Item level can also be added into the printable format within the Item section. To learn more about these options for Items, please review our Item Management Guide. Below is a screenshot displaying how the Items section appears.
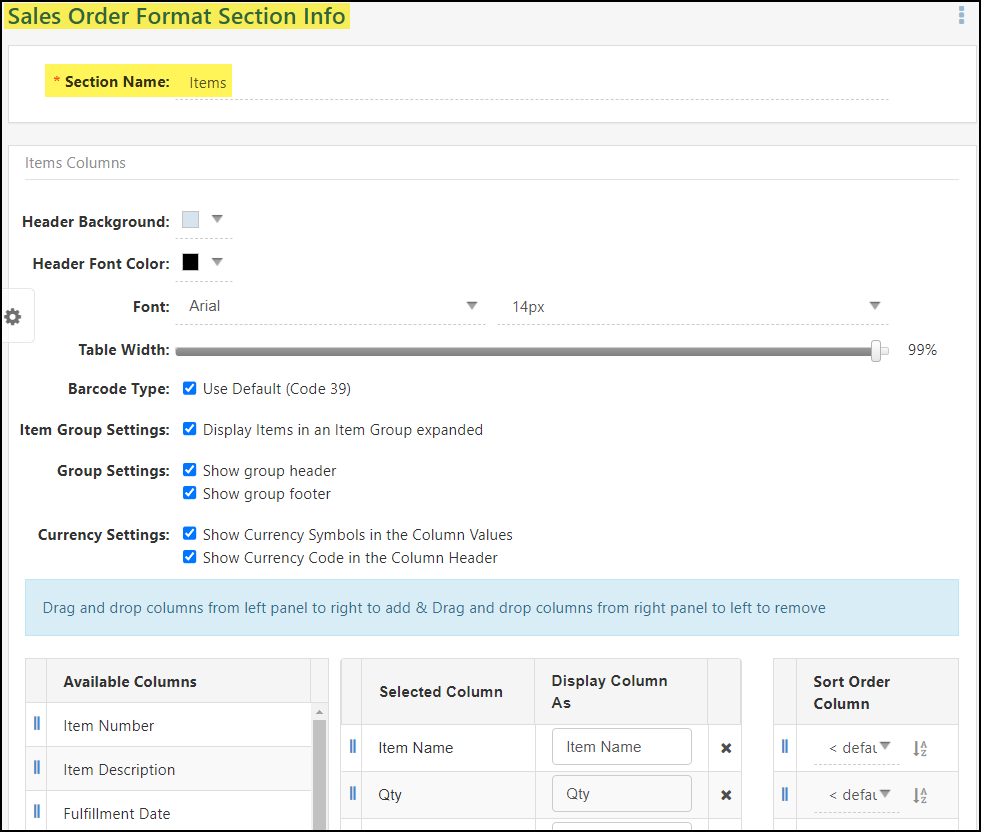
Example of Setting Up Item Section on Sales Order Formats
Totals: The Total section will add everything up and total Line Items on the Sales Order. This section also allows you to hide information deemed less vital to your Company using a series of checkboxes. By toggling the checkbox, this notes that the section will be hidden on the format. Options on changing the font are also available to keep a uniform look throughout your whole format. Below is an image that will help illustrate how this appears and what can be configured here:
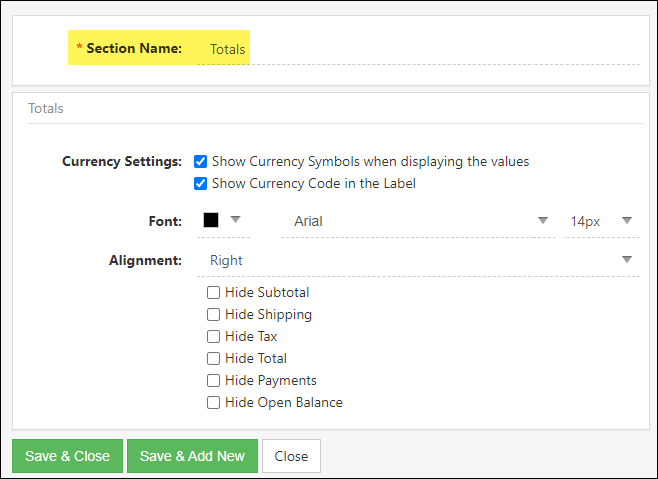
Example of Setting Up Totals Section of Sales Order Formats
-
Item Custom Fields for Formats
Striven allows the use of Custom Fields as Custom Columns in the Items section of the various formats within Striven. With the exception of encrypted Custom Fields and attachments, all other Item Custom Fields are available for use on all seven format types.
To create Custom Columns using the Custom Fields, you must first create the Custom Fields under the Items entity in the Custom Fields Settings.
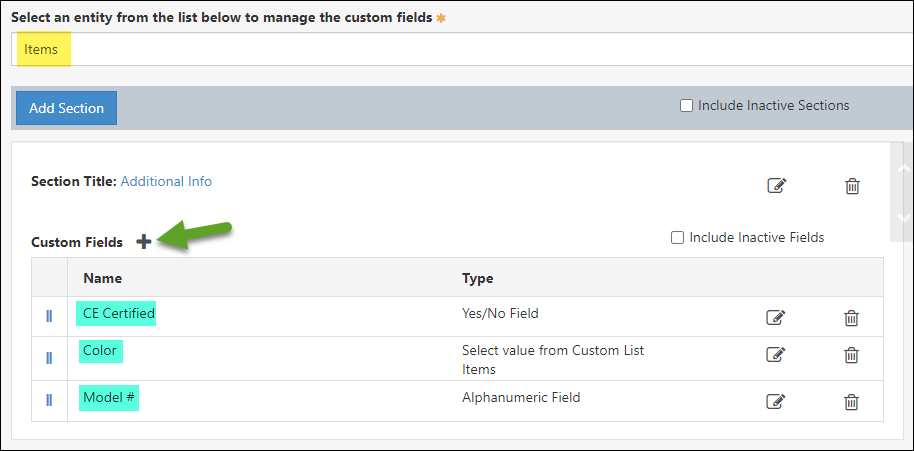
Example of Creating Custom Fields under Items Entity in Custom Fields Settings
These Custom Fields will display in the Available Columns area of the Items section in your formats for you to drag/drop where you would like them to display on the format.

Example of Custom Fields in the Available Columns Area of an Items Section in a Printable Format
-
Page Numbers in Printable Formats
Striven’s Printable Formats have the option to include page numbering on transactions. To turn on page numbering for your transaction formats, you will need to find the page number checkbox on the Format Settings page, above your format sections.
When the box is checked, further options appear for you to select the page number font color, type, and size.
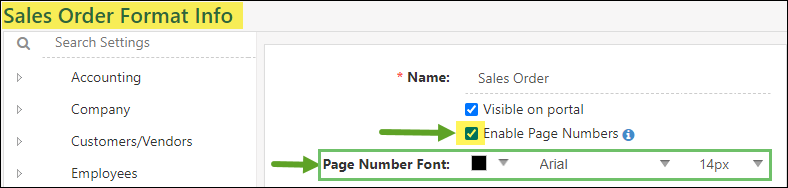
Example of Page Number Settings for a Sales Order Printable Format
These page numbers will display in a “Page __/__” format on the bottom of your transaction pages, but only when printing a particular transaction. Printing in batches from the Invoice Print Queue, for example, will not display the page numbers.
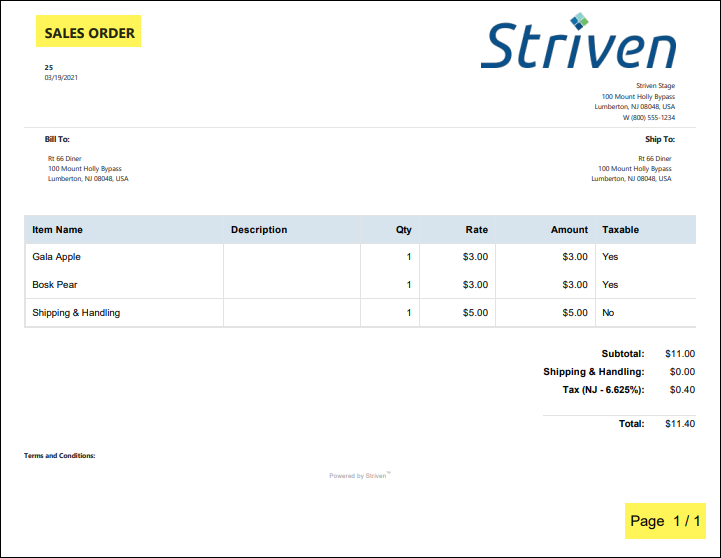
Example of Page Number Displaying on a Sales Order
-
Currency Settings on Printable Formats
Currency display settings can be determined for transaction printable formats. These settings options are located on the Content, Items, and Totals sections of your formats. Striven provides the ability to select whether currency shows with currency symbols or currency codes.
The default setting for all printable formats will be to show the Currency Symbols (i.e. $, £, €, etc.), but you will also have the option to show the Currency Codes (i.e. USD, EUR, AUD, CAD, etc.) in addition to, or instead of the symbols.
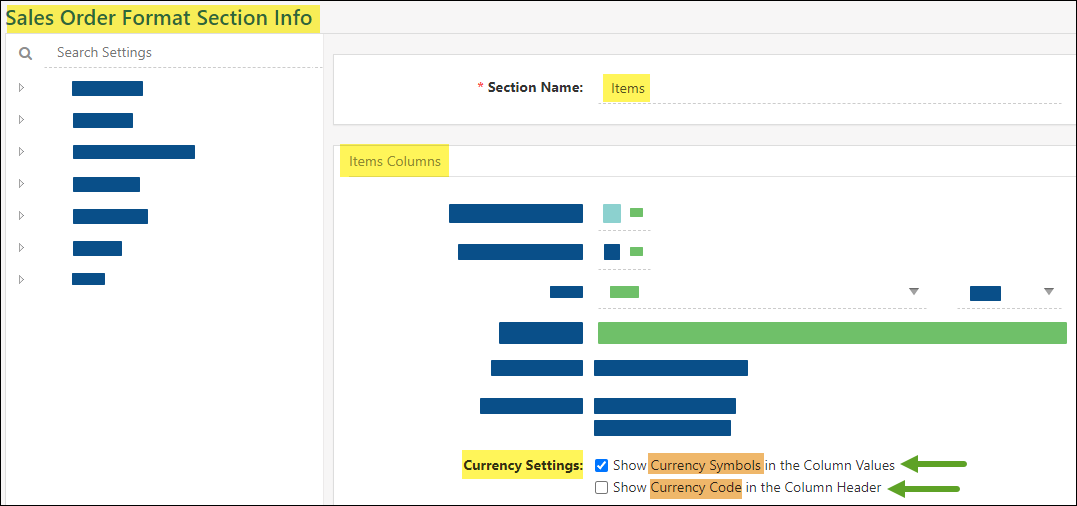
Example of Default Currency Settings for Items Section of a Sales Order Printable Format
If you wish to remove a currency setting from displaying, simply uncheck the box next to the display option you do not want to be displayed.
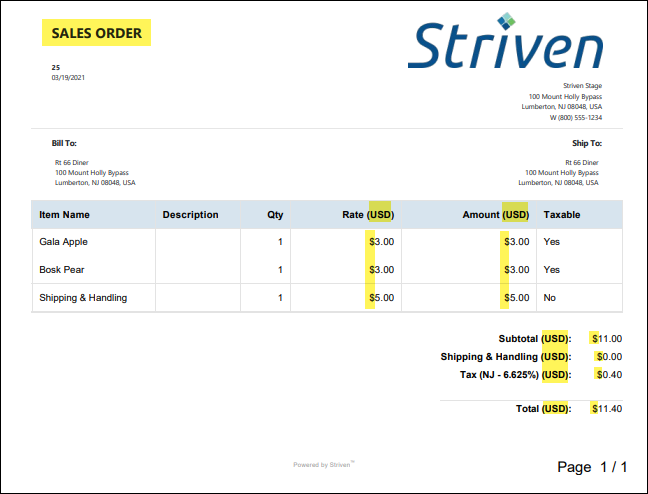
Example of Sales Order Printable Format Displaying Currency Symbols & Currency Codes
-
Sales Order Management
Once you have your Sales Order Types and settings configured, it’s time to start creating and managing your Sales Orders out of Striven. There are many tools and pages that help you manage your Sales Orders which are described below:
-
Sales Orders List
The Sales Order List will display important information in which you can view if you have the appropriate permissions. Sales Orders are also stored within the Customer’s Information and can be viewed by navigating to the A/R tab and the subsection Sales Orders. To view the Sales Orders List, navigate to the following:
Customers → Sales → Sales Orders
- Add Sales Order: Brings you to a Sales Order in which you can fill in the appropriate fields and set the status or send to your Customer for approval.
- Actions: There are many actions that can be taken from the Sales Order List. Quickly navigate to the Sales Order tabs, such as collaboration, Assignments, etc. Creating an Invoice can be done right from the list without having to click on the Sales Order for more information.
- Information Displayed: There is a lot of useful information that is displayed from the Sales Order List without having to navigate to view more. Information such as the sales rep, type, status, and important dates are all available right from the list view.
- Totals: The Sales Order total, along with the Invoice total, is displayed so you can see right from the list how much still needs to be invoiced.
- View Log: If the Customer has viewed the Sales Order within the Customer/Vendor Portal, a magnifying glass will appear. The number displayed will be the number of Contacts who have viewed the Sales Order. Clicking on this will display more information as to the date and time the Contact viewed the Sales Order.

Example of Sales Orders List
-
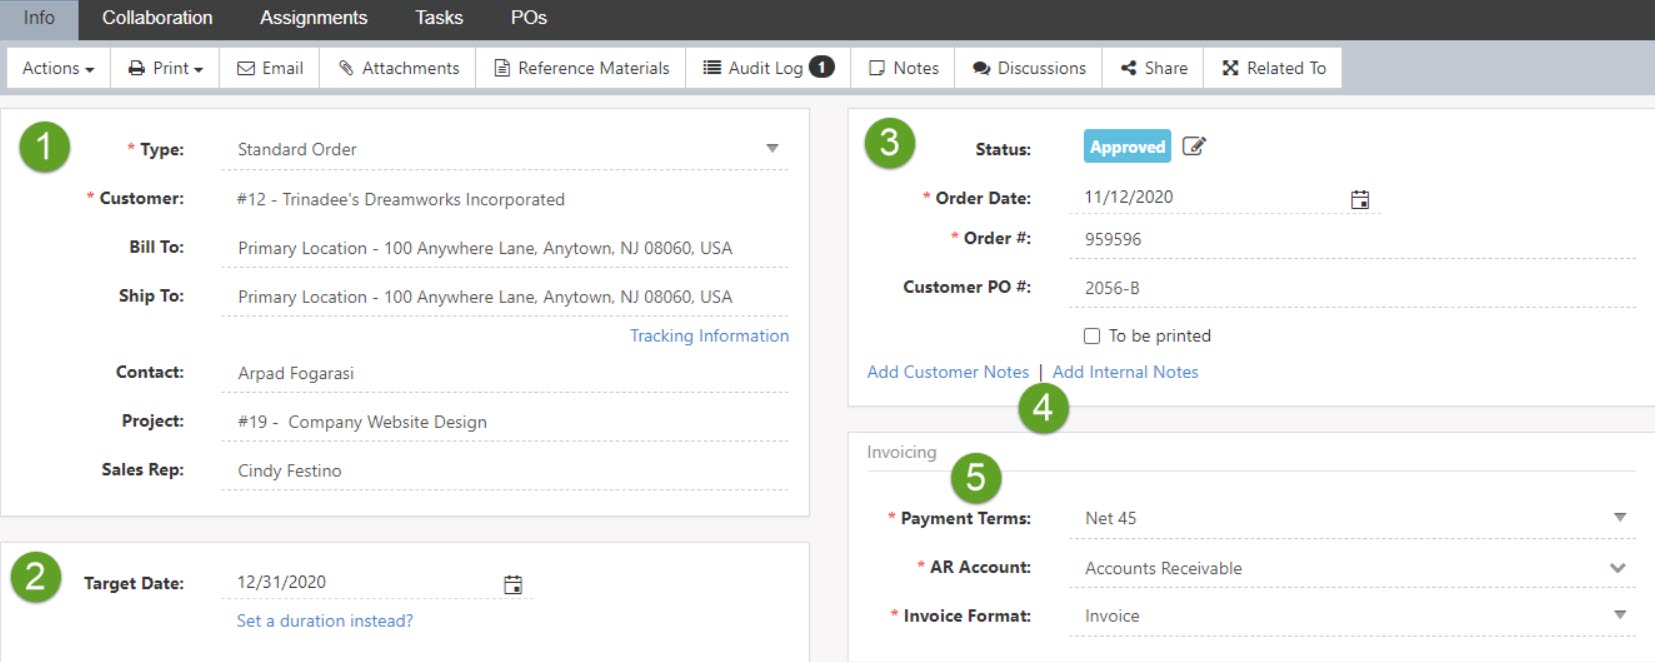
Sales Orders Info
The Sales Order Info screen will display all the information you will need regarding your Sales Order. From the status to the related transactions, this can all be gathered from right from viewing the Sales Order itself. While Standard Orders allow for editing as needed, Contract Managed Orders will follow a more strict editing process where only unapproved Sales Orders can be updated and edited. Change Orders can be used to make any increases or decreases to the overall Sales Order that have been configured as a Contract Managed Order.
- Customer Information: Allows you to enter the Customer Information related to the Sales Order. For example, the related Project or Sales Rep can be entered along with the Bill To and Ship To for the selected Order.
- Target Date: Indicates when the Sales Order is expected to be completed. An exact date can be chosen or the option to set a duration is available as well. Setting a duration for the Target Date allows the date to be calculated based on when the Order has been approved.
- Order Information: Displays additional Order information, such as the Order Status, Order Date, Order Number, as well as the Customer’s Purchase Order Number if they have provided one. The available Order Status options are hard-coded in the system and cannot be edited or customized. These options include Quoted, Pending Approval, Approved, In Progress, Completed, Declined, Canceled, and Lost. Toggling To Be Printed will send the selected Sales Order’s related Invoices into an Invoice Printing Queue to be printed en masse at a later time.
- Invoicing Section: Allows you to select Payment Terms, when to invoice, as well as the printable format for the related Invoices to this Sales Order. This section may vary depending on how you configured your Sales Order Type.
- Notes Section: Any notes that you would like to be stored with the Sales Order can be entered into these sections. The Customer notes section will allow you to enter a note that can be visible to the Customer in the Customer/Vendor Portal. The internal notes section will allow Employees to enter a note that will only be visible to internal Employees signed into Striven.
Example of Sales Order Info Page
-
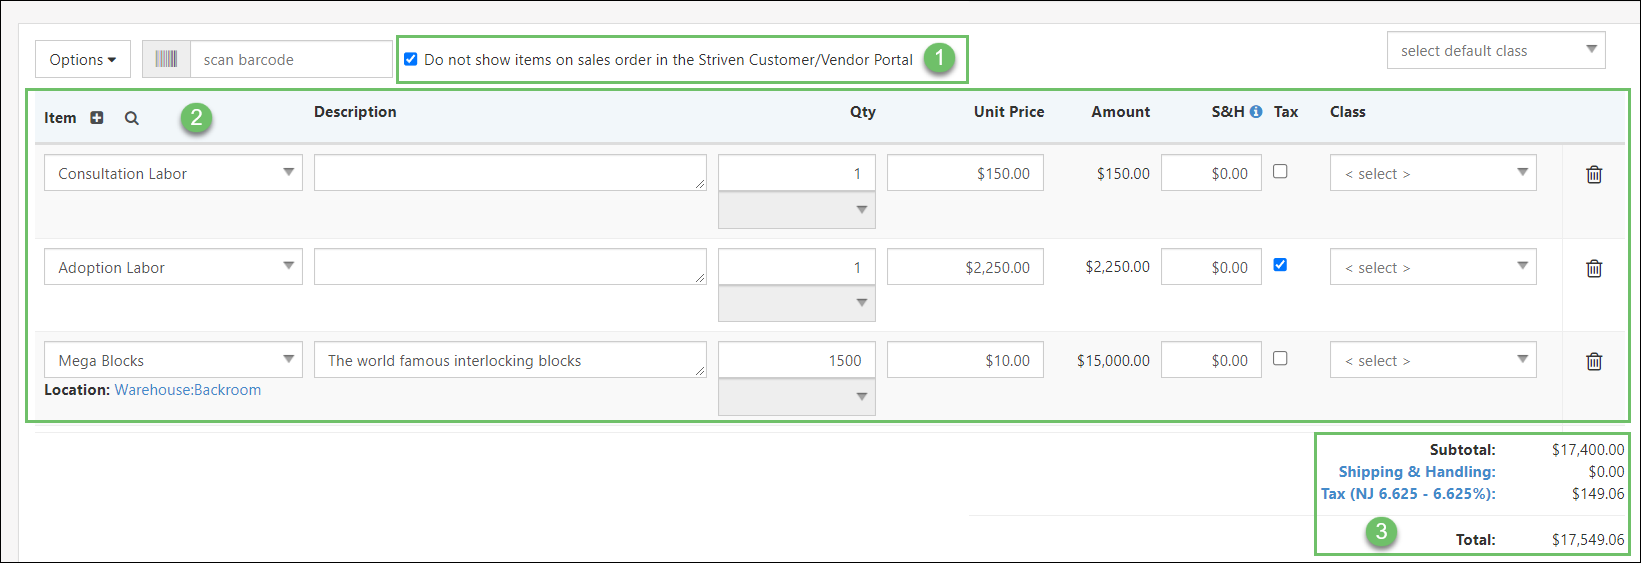
Sales Order Items and Total
Once the initial information for your Sales Order has been filled in, it is now time to select the Items. Items are goods or services that you wish to sell to your Customer. After selecting an Item, key information such as the quantity, unit price, and shipping & handling can be entered to calculate the overall total for the Sales Order.
- Do Not Show Items on Sales Order in the Striven Customer/Vendor Portal: Checking this box will ensure that Items specifically will not be displayed on the Sales Order in the Customer/Vendor Portal, while other Sales Order details will, such as the Sales Order Total, Sales Order Date, Completion Date, Bill To, and Sales Rep.
- Item Section: Allows you to choose existing Items within your Striven system to be sold to your Customer. If a description has been saved with the Item, this will populate the description field for convenience. If you have not added your Item into the system yet that needs to be included on the Sales Order, the Quick Add (+) option can be used to create an Item directly from the Order page.
- Totals Section: Displays the subtotal, shipping & handling, tax rates, and an overall total. The tax line can be clicked to edit for a different tax as needed. To learn more about configuring and setting up Tax Agencies in Striven, please review our Accounting Setup Guide.
Example of Sales Order Items & Total
Items Section
When selecting line items for your Sales Order, you can use the drop-down box on the Sales Order page to search for your Item. Clicking into this field will load the first fifty (50) Items in your Items List, along with an option to Load More. The Item Name is displayed at the top, and the Item Categories are displayed beneath the Item Name, in-line.
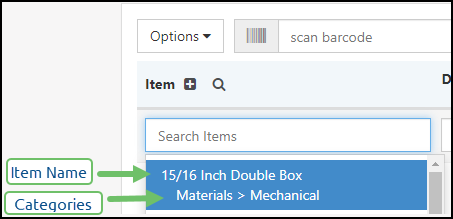
Example of the Item Drop-Down List on a Sales Order Showing the Item Name and Categories
If a Category is deeply nested under other Categories, the Category Name will be truncated so that you will not see the top level “parent” Categories, but there will be an ellipsis you can click on to display the full Category hierarchy in-line.
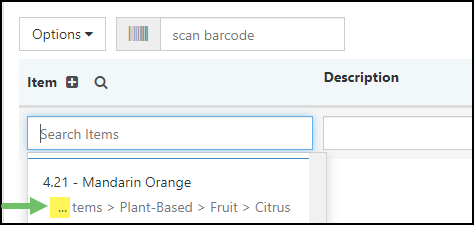
Example of the Category Ellipsis on the Items Drop-Down List on a Sales Order
You have the option to search using either the Item Name or Category Name, and any matching text will be highlighted in the displayed results.
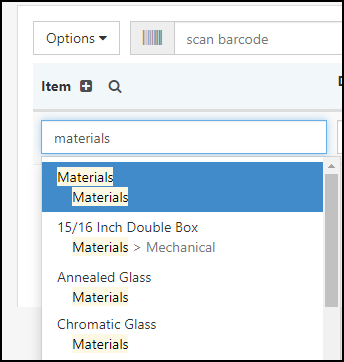
Example of the Highlighted Search Results on the Item Drop-Down List
-
Items Search & Add Option
When selecting Items to add to your Sales Order, Invoice, or Sales Receipt, you can use the Items Search & Add option as an alternative to selecting the items from the drop-down list. This feature is available on the Items header on the Sales Order, Invoice, or Sales Receipt by clicking on the magnifying glass icon and will allow you to search for Items by Item Name, Description, Manufacturer Part #, Category, or Item Type.
Example of Magnifying Glass Icon for Items Search Option
After selecting your search criteria and clicking the Search button, if the search returns more than 10 Items, a Load More button will appear at the bottom of the results to see more options.
You can select Items by checking the box to add them to the Sales Order, Invoice, or Sales Receipt. Once selected, you can click the Add button to add them to the page, or the Add & Select More button, which will add the selected items to your page, but maintains the search so you can continue adding other items as well.
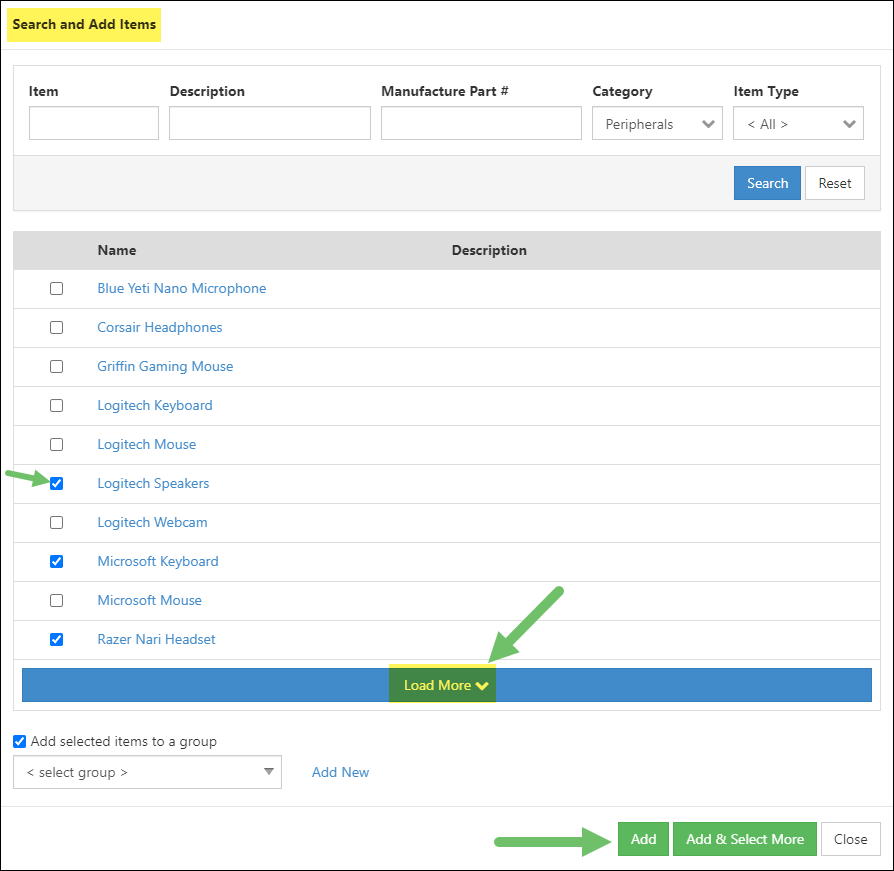
Example of Search & Add Items Popup
If you have Line Item Grouping enabled in your Striven system, you will also have an option to add selected Items to an existing Item Group, or create a new one.
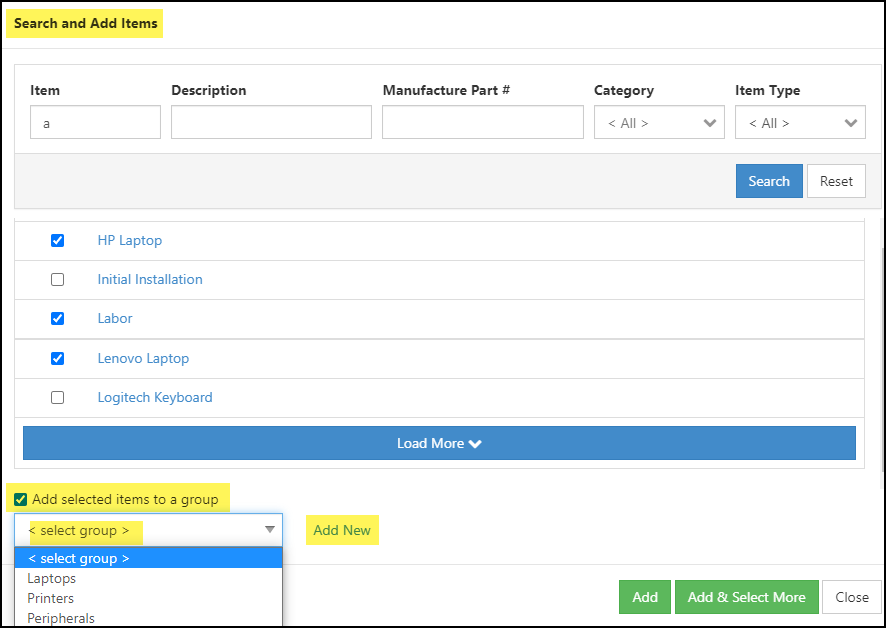
Example of Add Items to Group Option on Search & Add Items Popup
-
Editable Cost Columns
The Line Item costs can be edited from Sales Orders and Invoices. The new Item cost will be stored at the Sales Order level to be used as the default cost when creating a Purchase Order from the Sales Order.
- Note: While Item costs can be edited from an Invoice, the cost will not be stored at the Invoice level.
Before your Employees can use this feature, you will need to ensure they have the proper permission included in their User Role. The permission is called “Update Item Cost from Invoices and Sales Orders”. Without this permission, Employees will not have the option to update an Item cost at the Item or Cost List level.
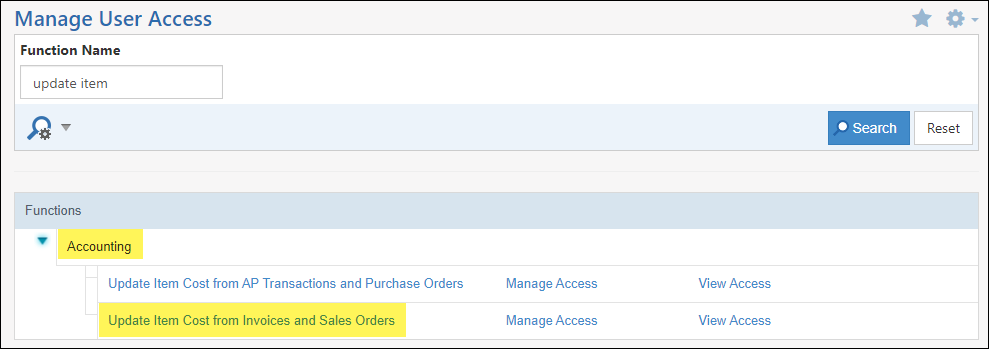
Example of Permission Required to Update an Item Cost at the Item or Cost Level
In order to enable this feature, you will need to visit the AR Settings page and look for the option in the General section of the page.
- First you must enable the Show Cost & Markup for Line Item option to make the new feature available for selection.
- Next you will see the checkbox for Prompt to Update the Item Cost if it is Changed While Creating Sales Orders & Invoices is now available for selection.
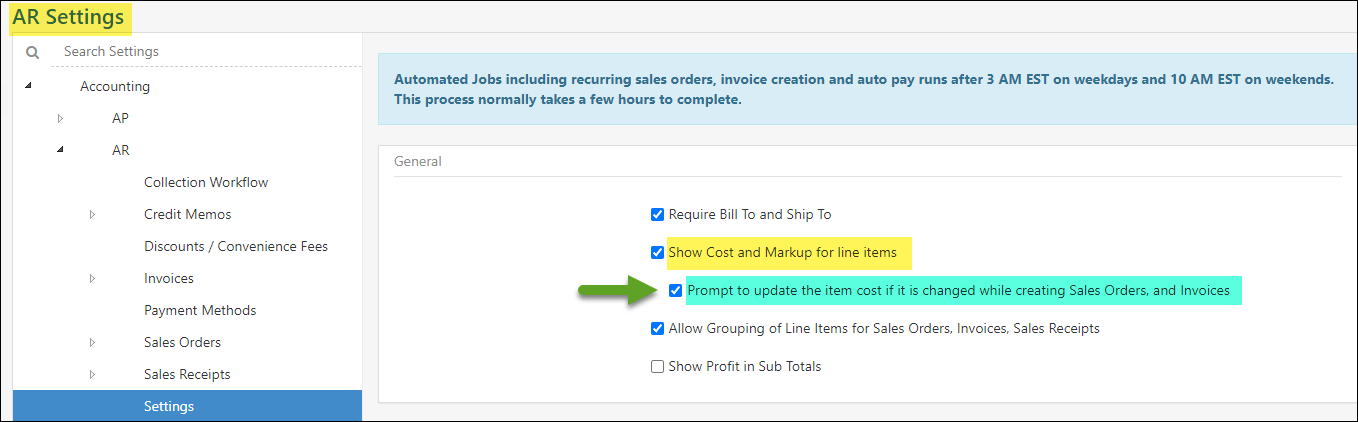
Example of AR Settings Page to Enable Item Cost Editing on Sales Orders & Invoices
Additionally, there is a tooltip icon next to the Cost column to inform Employees of all the results of changing the cost on the Order.
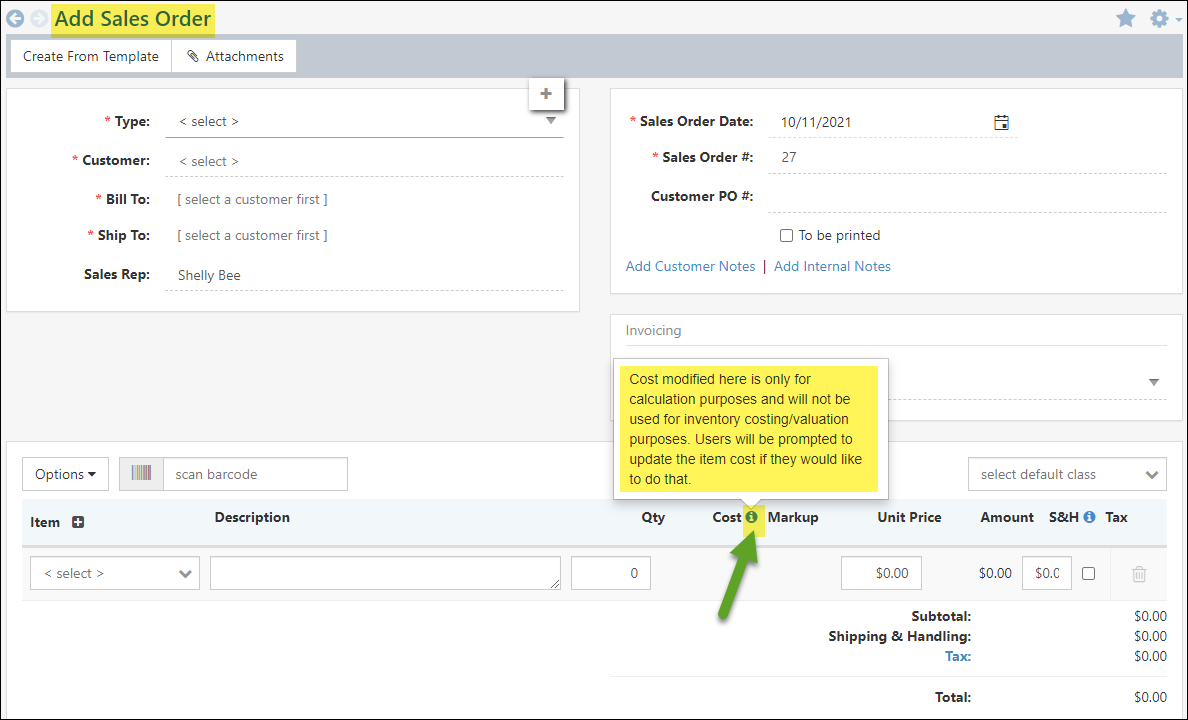
Example of Tooltip on Cost Column of a Sales Order
Depending on the Item Types included in the Sales Order, the cost will display differently.
- Item cost can be edited or updated for Items that are Inventory, Non-Inventory, and Service type Items as those are the only Items being loaded on the Purchase Order that is being created from the Sales Order.
- Item Groups and Manufactured Items will display as a static label since they have a cost, but are not being loaded on the Purchase Order created from the Sales Order.
- Fixed Assets and Discount Items do not have a cost, so they will not display cost information.
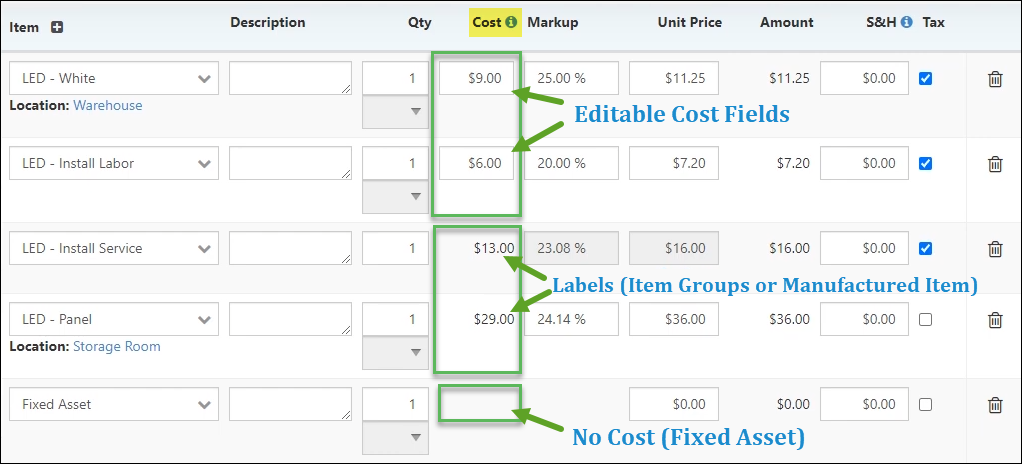
Example of Different Cost Displays Depending on the Item Type
When creating the Purchase Order from the Sales Order, you’ll see the costs that have been changed will carry over from the Sales Order to display accordingly on the Purchase Order.
-
Sales Order Actions
After a Sales Order is created, there are many actions that can be taken right from the Sales Order. From creating related entities, such as Invoices or Tasks, to notifying your Customer, there is no limit to the accomplishments that can be made right from this screen without having to navigate away. Review the available actions and related information in regards to Sales Orders below:
- Actions: There are many actions geared to quickly create related entities within Striven. This allows you to keep the relationship with the Sales Order by utilizing the Related To tab throughout the system. Entities to create from a Sales Order include Opportunities, Purchase Orders, Projects, and Tasks. Creating a copy of the Sales Order and invoicing the Customer can be done right from the actions menu as well.
- Notifying: The option to either print or email your Sales Order is available from the Sales Order Info screen. If you have your type configured to act as a Contract Managed Order, a prompt to send an email to the Customer regarding the Sales Order is available upon creation. However, for Standard Orders that do not have Contract Managed set at the type level, the Print and Email option can be used to inform the Customer regarding their Sales Order or Quote.
- Attached Materials: Attachments can be added to the Sales Order that will be available for the Customers to view as well in the Striven Customer/Vendor Portal. For documentation that should only be available internally, the Sales Order’s Hub should be used instead. Reference material that is related to the Sales Order can also be viewed using the Reference Materials tab. Reference Materials are documentation or uploads that can be stored at the Item level.
- Audit Log: Any changes that have been made to the Sales Order will be logged within the Audit Log. When a change is made, the person who made the change, along with the date and time, will be listed.
- Notes: A notes log is available to keep any ongoing notes regarding the Sales Order. This can then be available to any Employee who is looking for an update on where the Sales Order currently stands. Similar to the Audit Log, each note will display who entered the note along with a date and time stamp.
- Discussions: This option can be used to create a Discussion with your Customer or internal Employees regarding the Sales Order. Any Discussion that has started from within Striven will then track any replies that have been completed in email inboxes. Discussions started by Contacts in the Portal related to a Sales Order will go to the Sales Rep selected on the Sales Order if a recipient is not selected.
- Share: To copy a direct link to this Sales Order that can be shared with Employees who have access to Striven, click Share to copy the available link.
- Related To: To view any related transactions or other entities to this Sales Order, click on the Related To tab. This will initiate a popup which will hyperlink each related entity such as Invoices, Payments, Opportunities, Projects, etc.
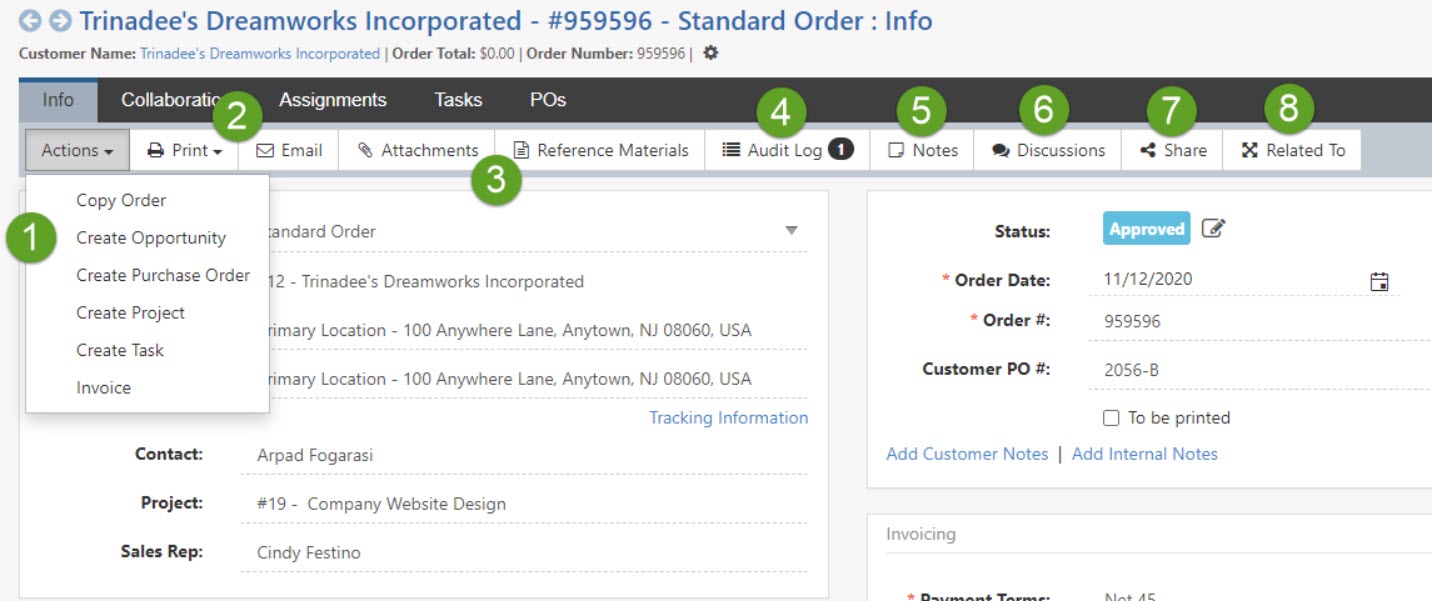
Example of Sales Order Actions
-
Progress Invoicing for Sales Orders
Progress Invoicing in Striven allows users to define an invoicing schedule for Sales Orders. This creates a staggered invoice process based on thresholds such as on Order approval, on Order completion, or by reaching a completed percentage of the Order’s timeline.
To begin using Progress Invoicing, you will first need to configure your Invoicing Schedules. Invoicing Schedules determine how invoicing is triggered based on the Order. Once the Invoicing Schedules have been configured, you will then need to configure the Sales Order types to include the schedule as an option when creating the Sales Order.
To configure a Progress Invoicing Schedule, navigate to:
Company → Settings → Accounting → Sales → Sales Orders → Progress Invoicing Schedules.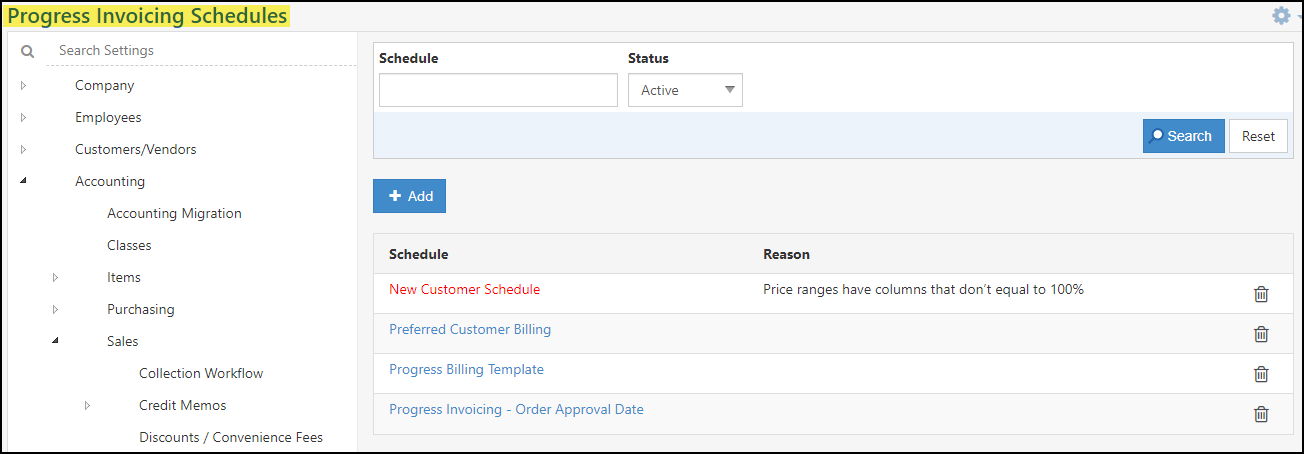
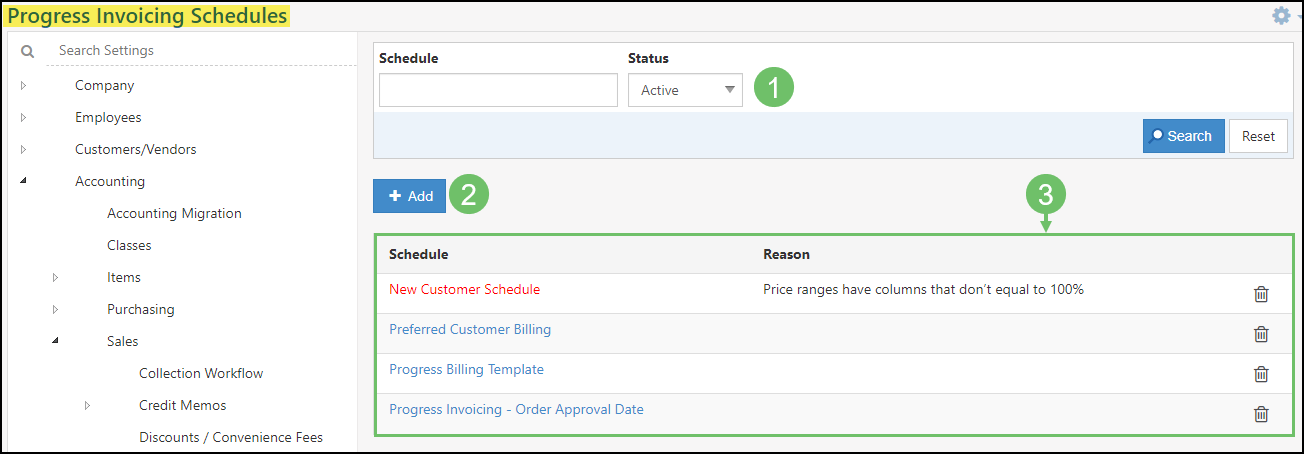
Example of the Progress Invoicing Schedules List Page
The Progress Invoicing Schedules List page will display the schedules that have been added to your Striven system. Information is available from the list, as well as the option to search through the list with filters to narrow down results.
- Search Filters: Allows you to search the list of created schedules. Filters available in this section allow users to search by the schedule name or the schedule’s status (active\inactive).
- Add: Allows you to create a new Invoicing Schedule. For more information on creating a new Invoicing Schedule, please see the section below on Creating a Progress Invoicing Schedule.
- Schedule Info: Displays the schedule’s name and if the schedule’s setup has been completed. A trashcan icon is available to the right side of the schedule if you would like to deactivate a specific schedule. Clicking the name of an existing schedule will allow you to view information about the schedule.
Note: If further configuration for an Invoicing Schedule is required, the schedule name will be displayed in red, and a summary of the setup concern will be listed in the Reason column. The schedule must be properly configured to be available for use on a Sales Order. To learn more, read the Notes and Warnings section below.
Example of the Information Available on the Progress Invoicing Schedules List
Creating a Progress Invoicing Schedule
To create a Progress Invoicing Schedule, select the blue Add button from the Progress Invoicing Schedules List.
After selecting the Add button, you will be redirected to the New Progress Invoicing Schedule page, where you can enter the following information:
- Schedule Name: Allows you to name the Invoicing Schedule. Once created, the Schedule Name will appear in the drop-down menu when selecting a Progress Invoice Schedule on Sales Orders and Sales Order types.
- Time Line Based On: The Time Line Based On options allow you to choose if the Orders will be invoiced based on the Order Approval Date or the Order Date.
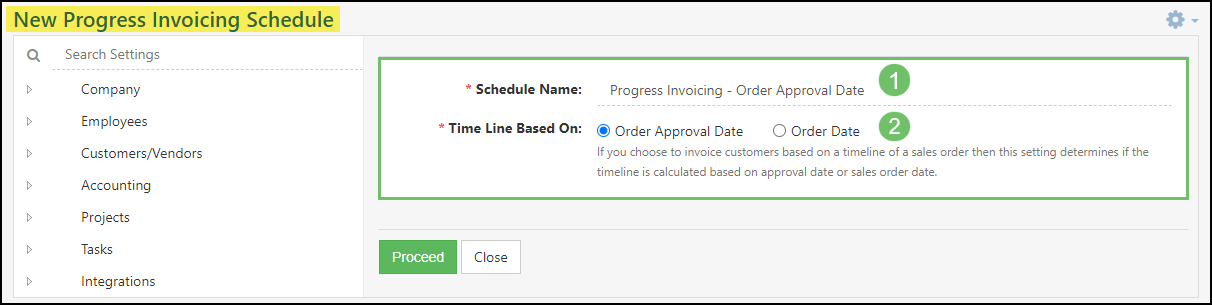
Example of the New Progress Invoicing Schedule Page
After saving the schedule name and timeline settings, you will be directed to the Schedule Info page where you are able to complete the Invoice Schedule’s setup. The Basic Info section will contain the information you chose for the timeline options and the Schedule name. You are able to update these settings as needed by selecting the Edit icon.
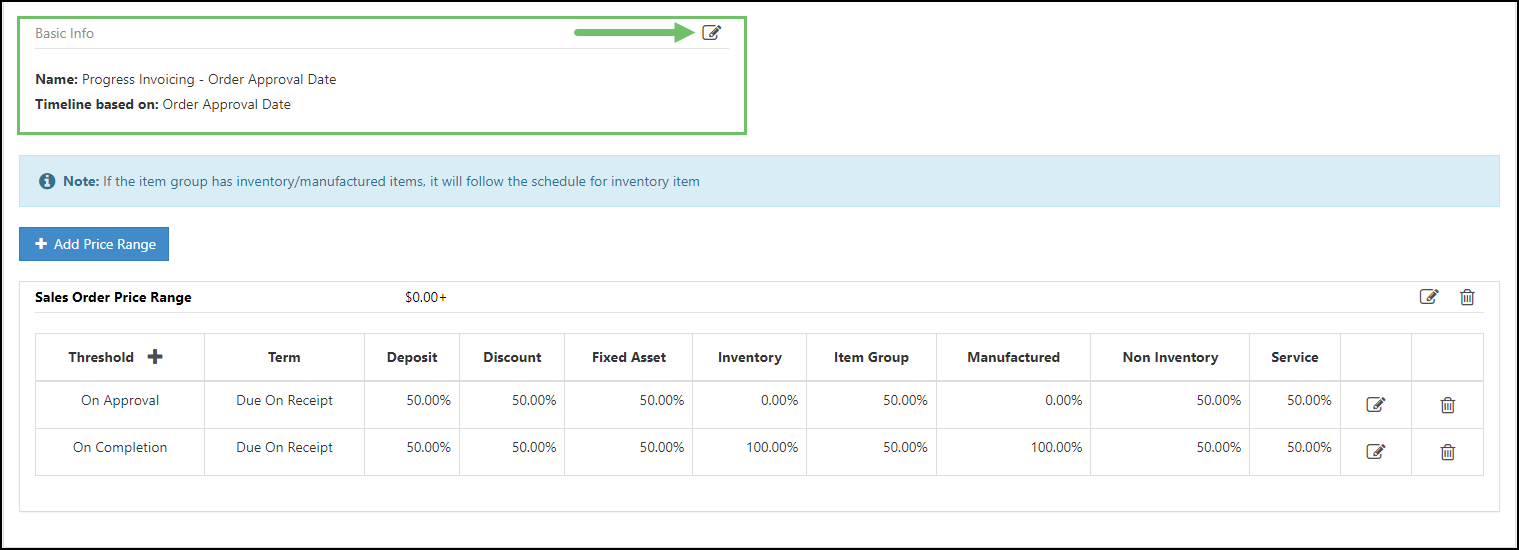
Example of the Basic Info Section on the Schedule Info Page
Configuring Invoicing Schedules
When creating a new schedule, a message will display stating “No schedule set up. Click here to add one now.” Clicking this text will allow you to determine your schedule’s settings by opening an Add Threshold window.
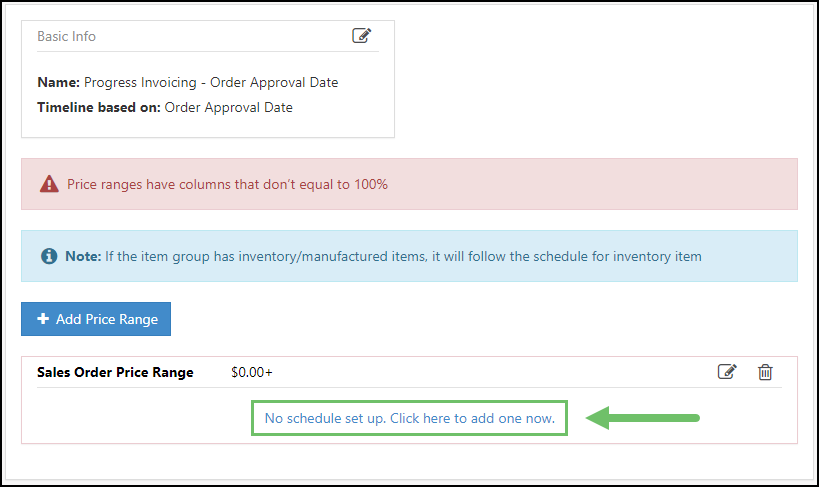
Example of the No Schedule Set Up Message on the Schedule Info Page
To begin, you will need to set the Schedule Detail type. The Schedule Detail type determines what thresholds related to the Order will trigger invoicing. There are options for creating an Invoice based on the approval of the Sales Order, completion of the Sales Order, or when a percentage of the overall Order timeline has been completed.
After determining the Schedule Detail Type, you can add Payment Terms to inform the customer when payment for the Invoices generated are due.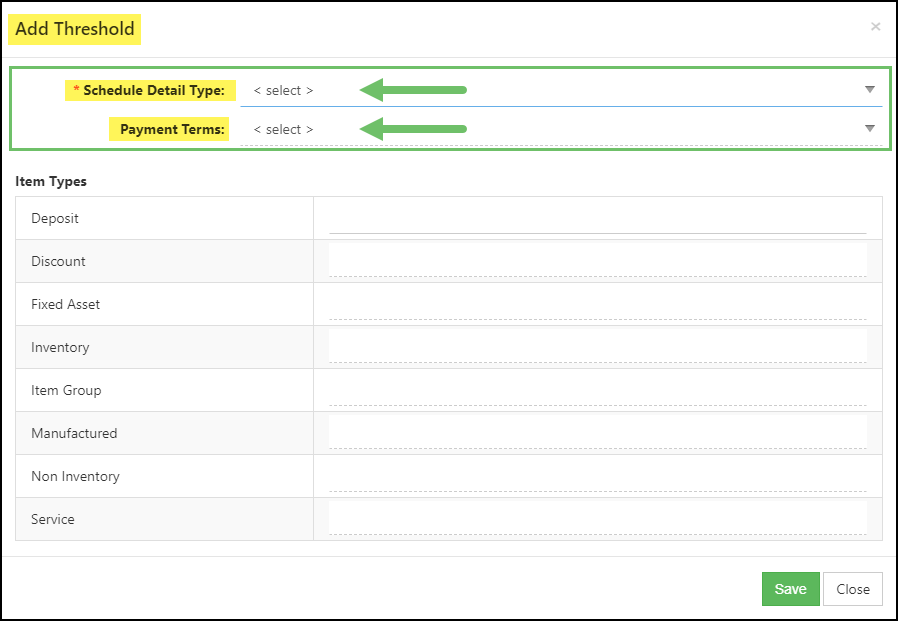
Example of the Add Threshold Window
For each item type, you can determine the percentage of the item’s total amount to be invoiced with each threshold. The item type’s percentage to be invoiced with each threshold must total 100%.
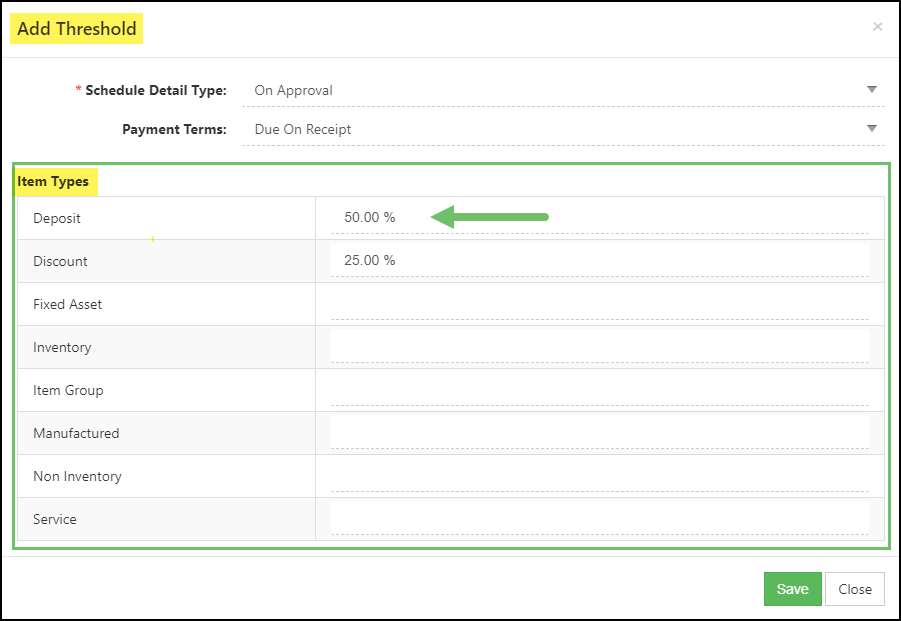
Example of the Item Types Section of the Add Threshold Window
It is important to note that Inventory and Manufactured type items will need to be set at either 0% or 100%. For example, you can choose to invoice all Service and Non-Inventory type items in increments, but physical inventory being sold will be invoiced all at once during the timeline.
In the event that you would like to partially invoice for Inventory items, the Deposit item type can be utilized. For more information regarding Advanced Deposit processes, please reach out to our Support Team for assistance.
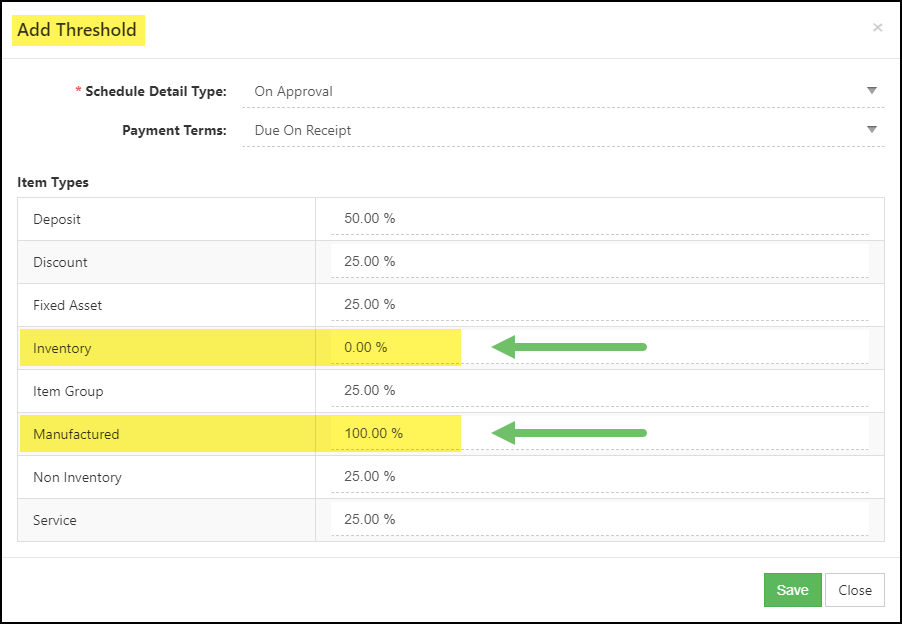
Example of Configuring Item Types for Invoicing
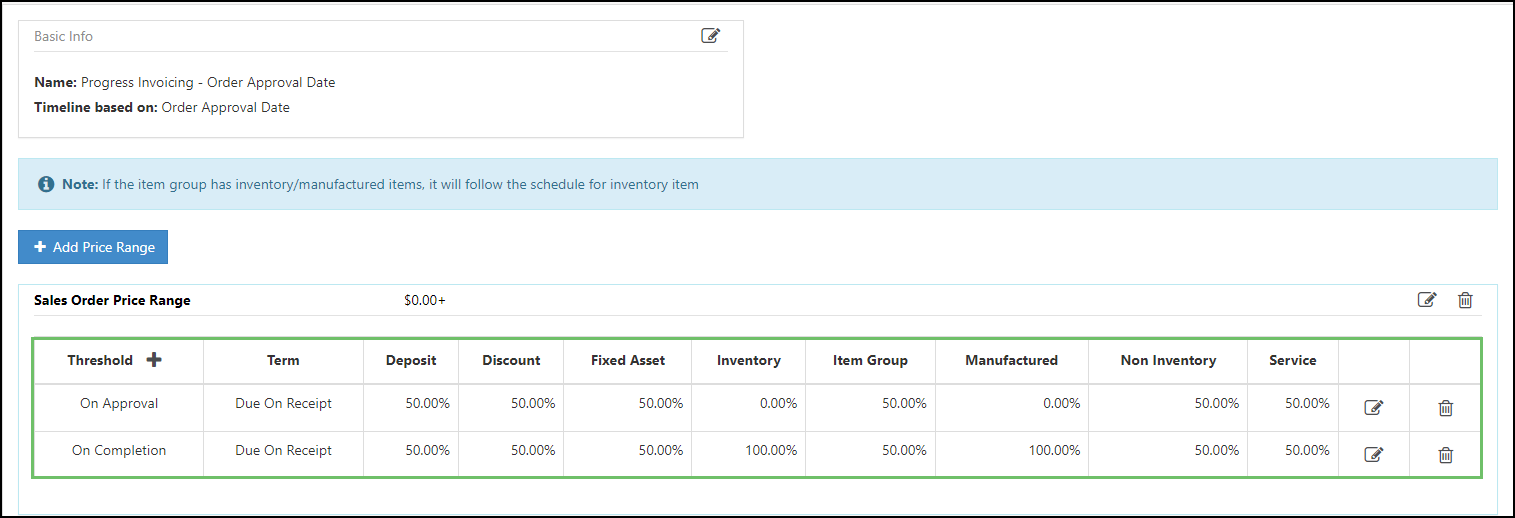
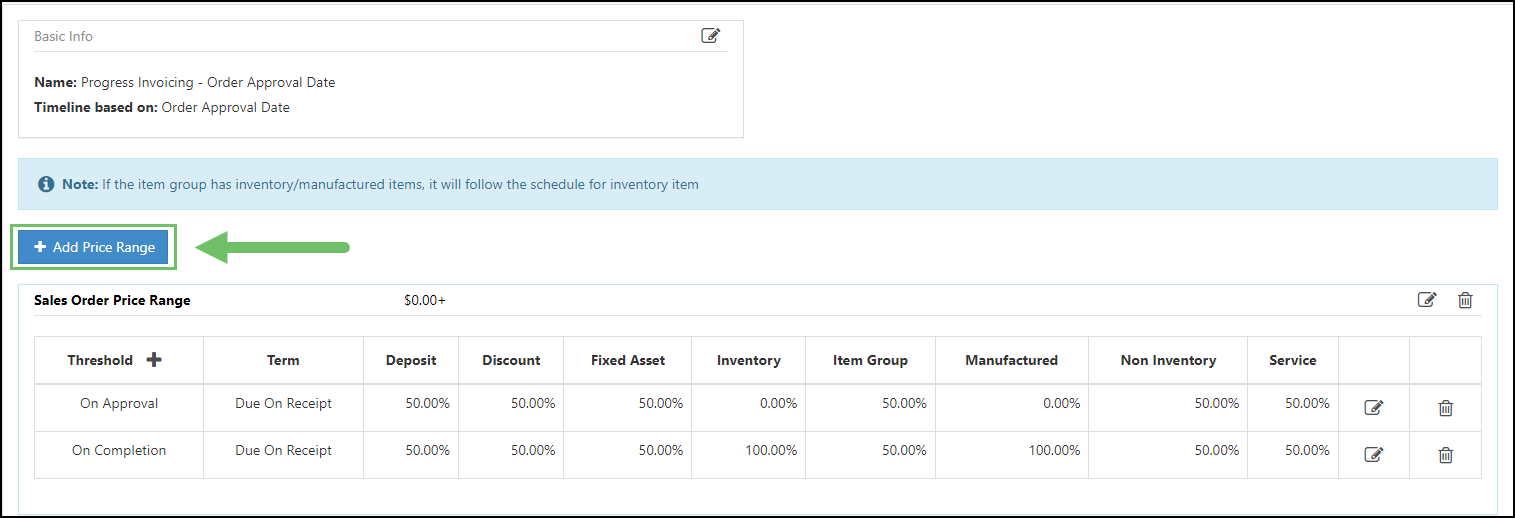
Below is an example of a completed Progress Invoice Schedule which indicates all item types, except for Inventory and Manufactured, will be invoiced 50% on the approval of the Sales Order and then the other 50% on the completion of the Sales Order. For the Inventory and Manufactured type items, they are set to be invoiced in full on the approval of the Sales Order.
Example of Configured Payment Thresholds
Configuring Price Ranges
Progress Invoicing Schedules can be configured to have different invoice terms and thresholds based on the price range of the Sales Order.
Example of the Add Price Range Button
Selecting “Add Price Range” will prompt a pop-up window to appear with fields for Range From and Range To. These fields can be utilized to input the price range of Orders that can be invoiced using the created Invoicing Schedule. By default, the “No End Range” checkbox will be checked.
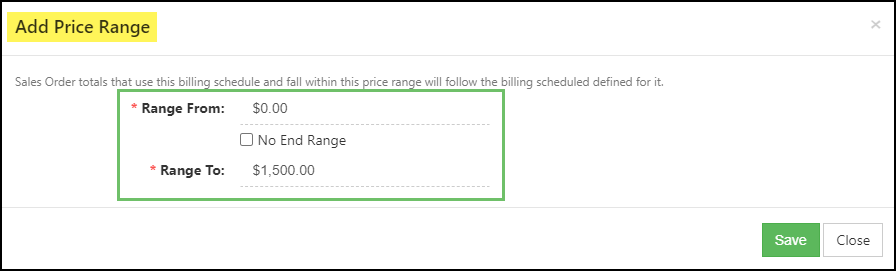
Example of Adding a Price Range to a Progress Invoicing Schedule
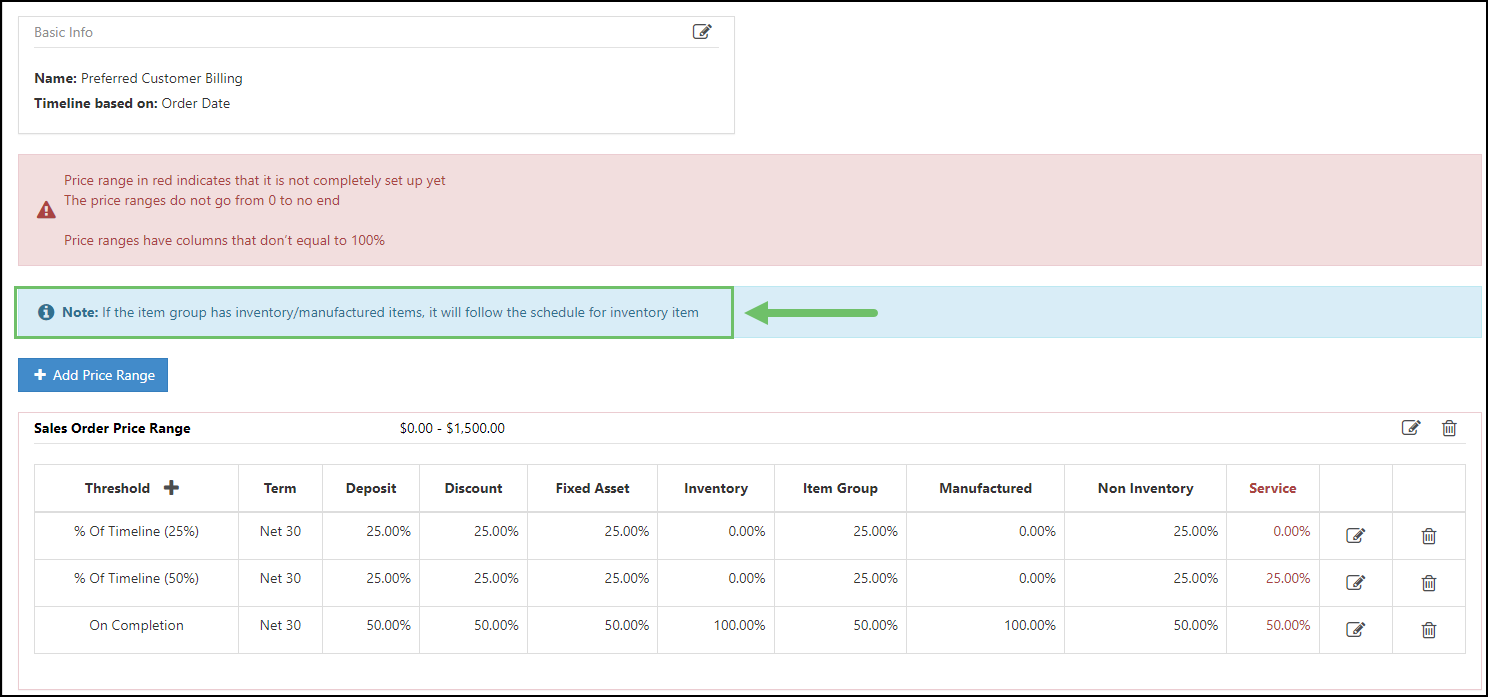
Notes and Warnings
Notes and warnings can be displayed beneath your schedule’s Basic Info. This section will display a warning advising you that the Progress Invoicing Schedule has not been properly configured. Until the price range warnings have been resolved, the schedule will not be available for selection on Sales Orders and Sales Order Types. Read the section below for in-depth information regarding these warnings.
Price Range Warnings
- “The price ranges do not go from 0 to no end”
- “Price ranges have columns that don’t equal 100%”
Your configured price ranges should cover values from $0+, meaning there should be no end range. For example, having a singular price range for an Invoicing schedule of “$0 – $1500.00” will prompt this warning, but can be corrected by adding a second price range with a value of “$1500.01+” to cover any Sales Orders with prices of over $1500.00 and up.
In order for a schedule to be properly configured, each item type will need to have a total of 100% invoiced over the whole timeline of the order.
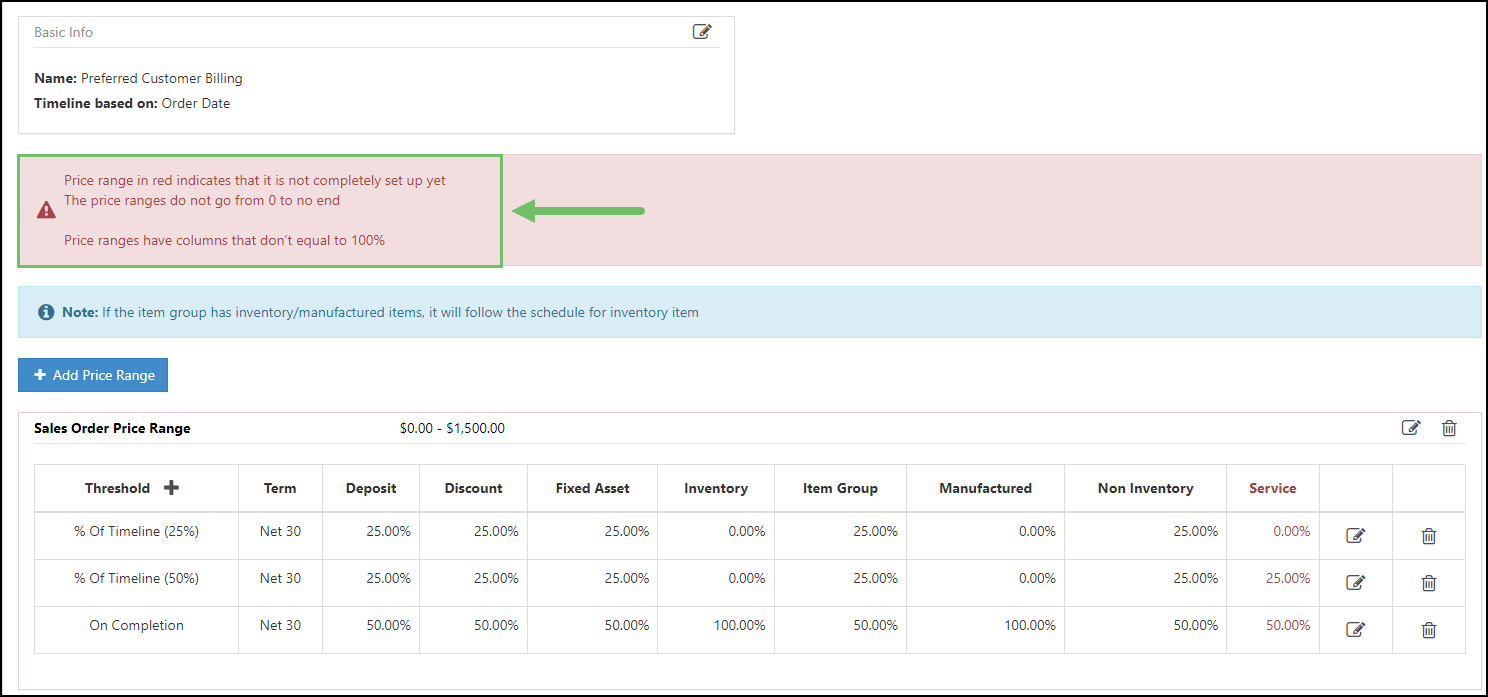
Example of Warnings on the Schedule Info Page
Notes
A note will be displayed permanently on the Schedule Information page stating that if an item group contains inventory items, or manufactured items, the item group will be invoiced according to the configured schedule for inventory items.
Example of a Note on the Schedule Info Page
Sales Order Type Settings for Progress Invoicing
Once you have created your Progress Invoice Schedule, you can then set it as the default setting for invoicing at the Sales Order Type level.
To have a Progress Invoice Schedule be an available option on a Sales Order Type, you will need to have the “Show advanced features” option selected within your Sales Order Type. Once this is checked, there will be a checkbox available to “Turn on contract management”. The Sales Order Type must be contract managed to enable Progress Invoicing.
After enabling Progress invoicing, you can then select the Invoicing Type; it is recommended to use the “One Time” invoicing option in conjunction with Progress Invoicing.
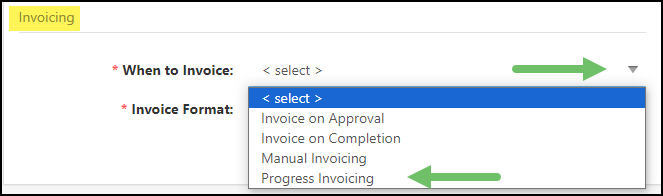
When choosing a When to Invoice option, select “Progress Invoicing”. This will allow you to then select the Progress Invoicing Schedule that you would like to make default for this Sales Order Type.
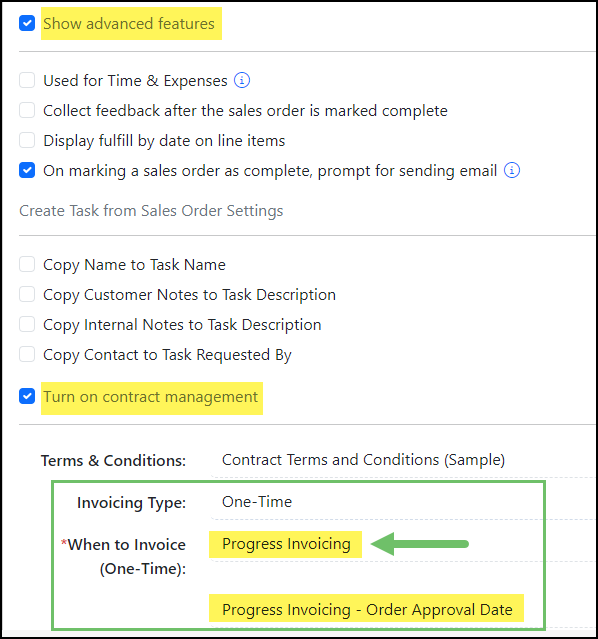
Example of Sales Order Type Settings for Progress Invoicing
Managing Progress Invoicing
When creating a Sales Order using a Sales Order type with Progress Invoicing enabled, the Invoicing Schedule will populate automatically within the Invoicing section of the Order.
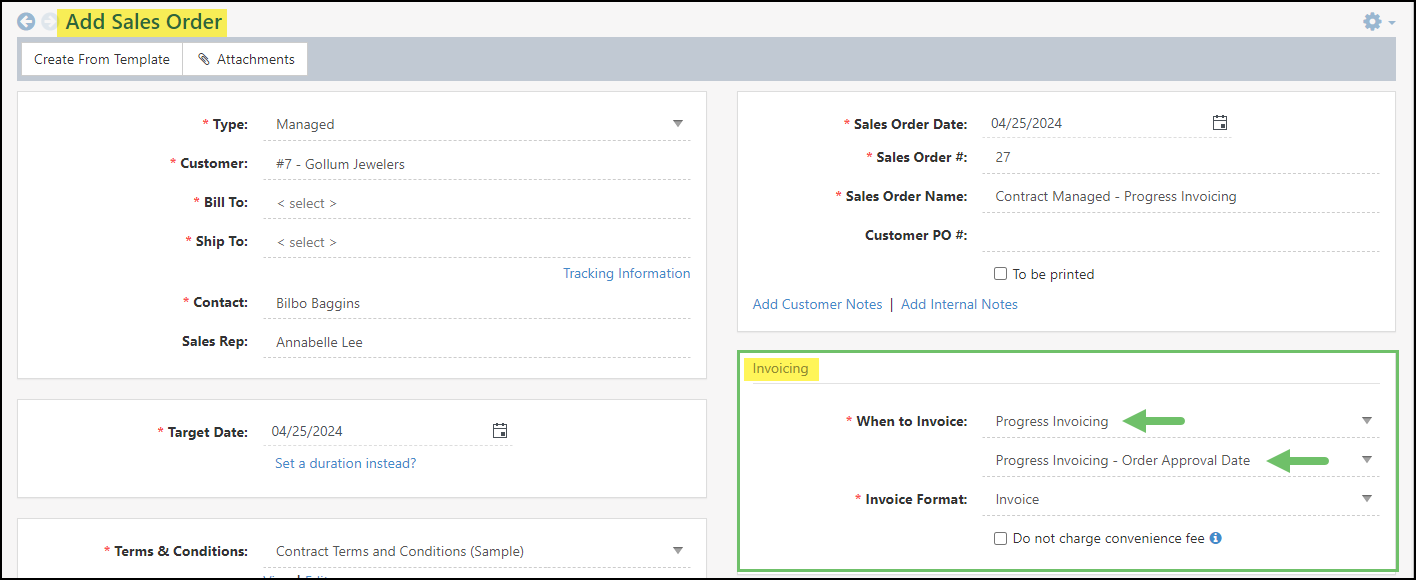
Example of a Sales Order Created with Progress Invoicing as the “Default for When To Invoice”
If you need to change the Invoicing Schedule while creating an Order, you can do so by utilizing the drop-down menus located within the Invoicing section of the Sales Order.
Example of Adjusting the “When To Invoice” Settings on a Sales Order
Viewing Progress Invoicing Schedules
The anticipated Progress Invoicing Schedule for a Contract Managed Sales Order can be viewed on the Sales Order Approval page by selecting the Progress Invoicing drop-down.
Once expanded, you can view the projected Invoice Dates, Item Type total breakdown, taxes, and total amount to be invoiced. The blue Edit button will allow you to quickly add or remove payment thresholds to the Invoicing Schedule.
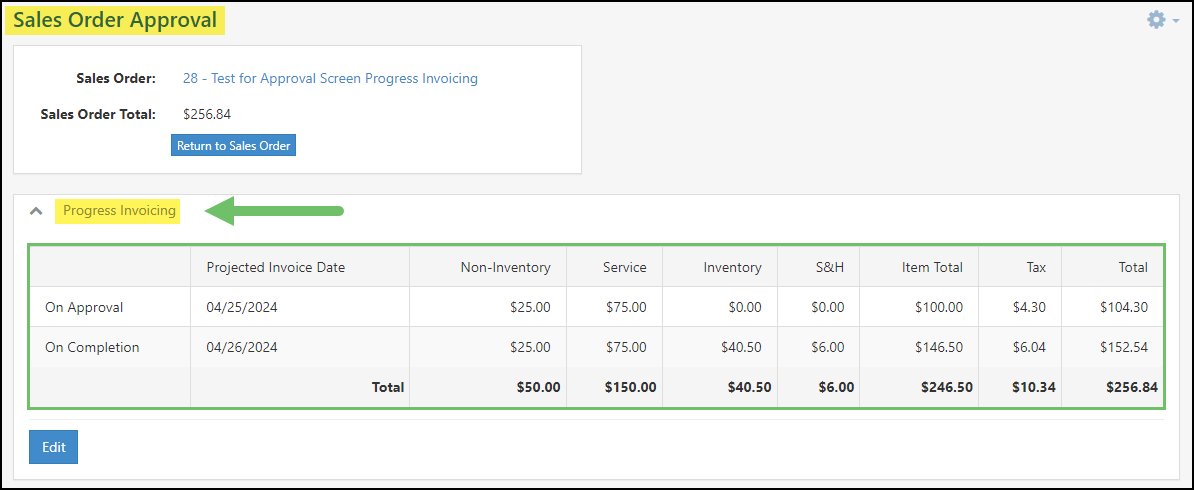
Example of Viewing the Progress Invoicing Schedule on the Sales Order Approval Page
When viewing a created Sales Order, you will be able to select the “View Progress Invoicing” option within the Invoicing section on the Order to view more details about the schedule.
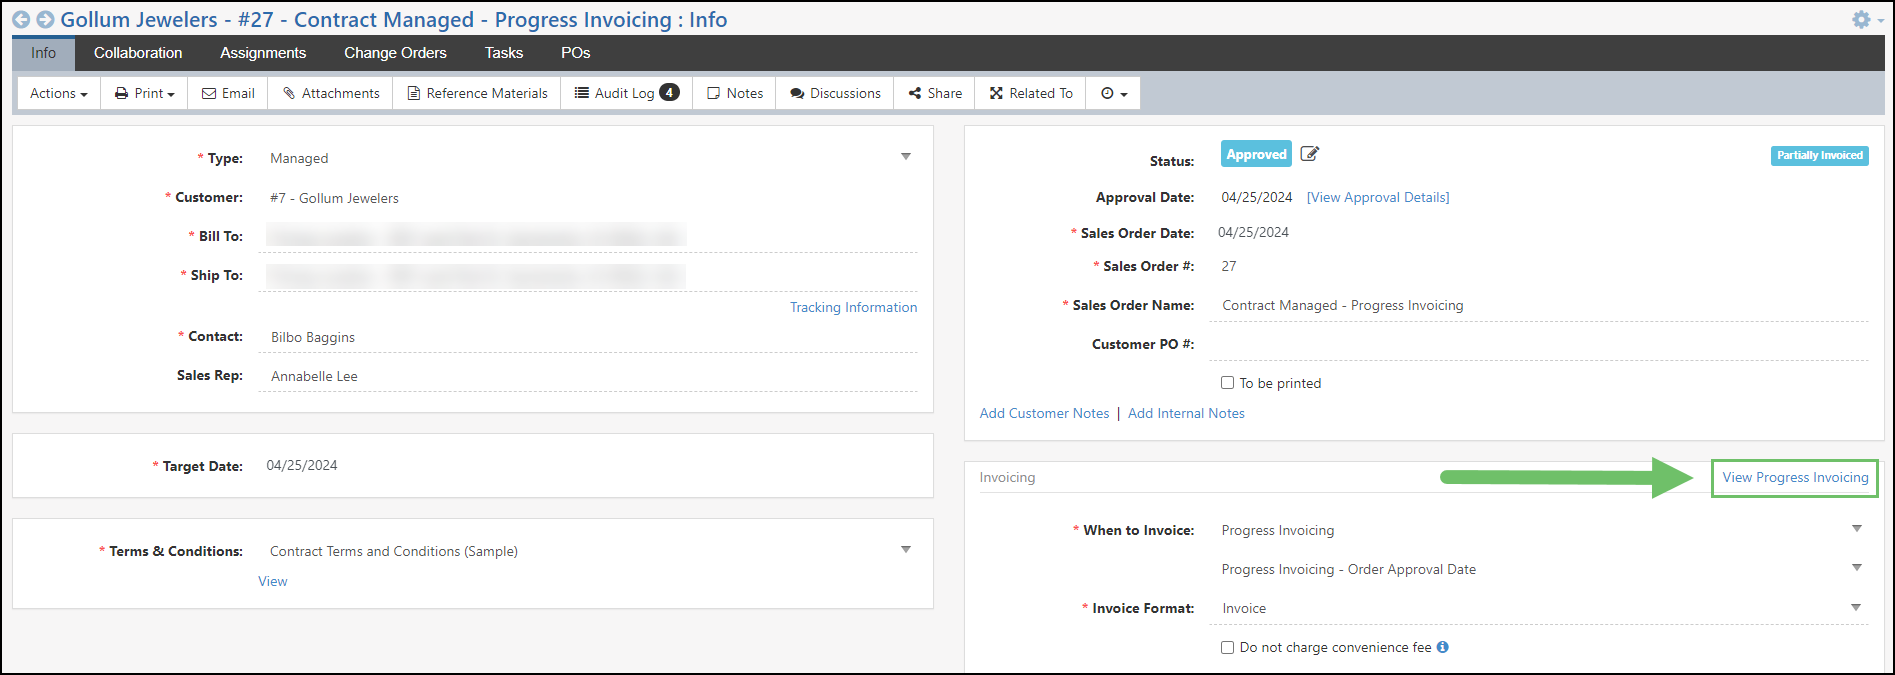
Example of Viewing the Progress Invoicing Schedule on a Created Sales Order
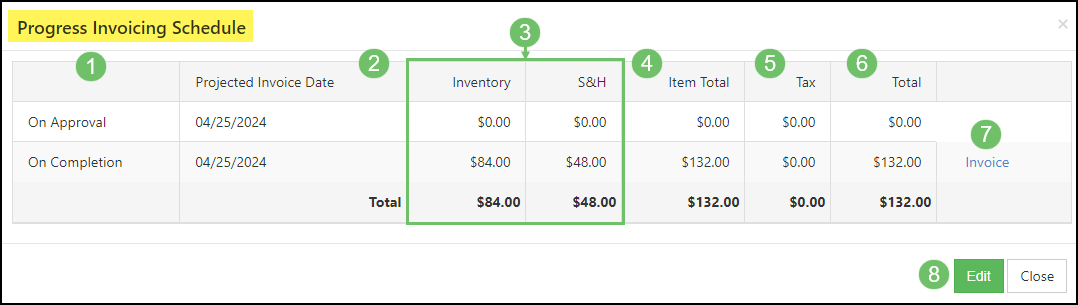
Example of the Progress Invoicing Schedule Window on a Sales Order
The Progress Invoicing Window will display the following information:
- When to Invoice: This column will display when the Invoice is set to be created such as On Approval, On Completion or the completed percent of the timeline of the Sales Order.
- Projected Invoice Date: This column will display the date the Invoice is expected to be generated or the date it was generated based on the schedule.
- Item Types: Each item type that is included within the Sales Order will be listed with the amount that is set to be invoiced at the set timeline. The total will be listed at the bottom in order to see an overall total per item type.
- Item Total: This column will show the total that is set to be invoiced per the projected Invoice date listed for the items.
- Tax: This column will list the total amount of tax that is set to be generated on the Invoice based on the projected Invoice date.
- Total: This column will display a total that includes the total per item and tax per projected Invoice date listed.
- Invoice: If an Invoice has not been generated yet based on the timelines set, you can choose to Invoice sooner than the schedule has been set by clicking the “Invoice” option.
- Edit: To edit upcoming invoices that are to be generated, select the “Edit” button.
-
Manual Invoicing for Recurring Sales Orders
We’ve added the ability for users to manually create Invoices for Recurring Sales Orders that are not set with automatic invoicing. For access to this option, your User Role must include the “Sales Orders – Edit Billing Method ” permission.
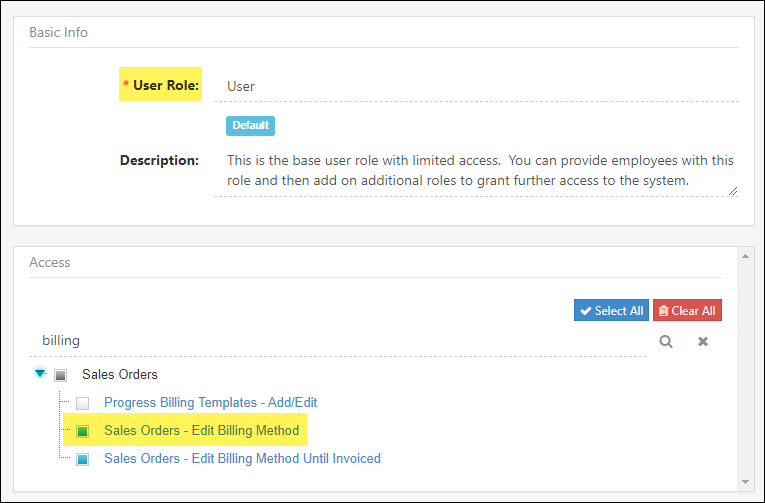
Example of Permission Required to Access the Manual Invoicing for Recurring Sales Orders Option
Settings for this new feature will be configured at the Sales Order Type level. From the Sales Order Type Info page, you can create a new type to use this option. After turning on Contract Management, you can set the Invoicing Type to Recurring. The When to Invoice setting defaults to Automated, but this is where you can change it to Manual Invoicing.
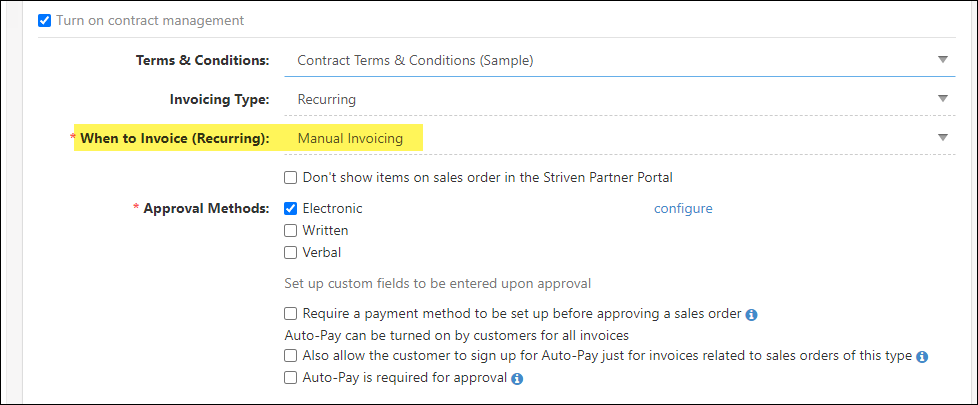
Example of the When To Invoice (Recurring) Setting on a Sales Order Type Setting Page
Then when creating a new Recurring Sales Order with the Manual Invoicing option, it will default to manually invoice the Order.
- Note: Any Change Orders related to the original Sales Order will have the same invoicing setting and this setting cannot be changed on Change Orders.
If Manual Invoicing is selected, the lead time for Invoice creation will no longer be displayed on the Sales Order. Upon approval or thereafter, there will be no Invoices generated automatically for Manual Invoicing Recurring Sales Orders.
Once a Recurring Sales Order with Manual Invoicing is created, you can create Invoices related to the Sales Order from the Actions menu. This will copy all the Line Items from the Sales Order to the Invoice.
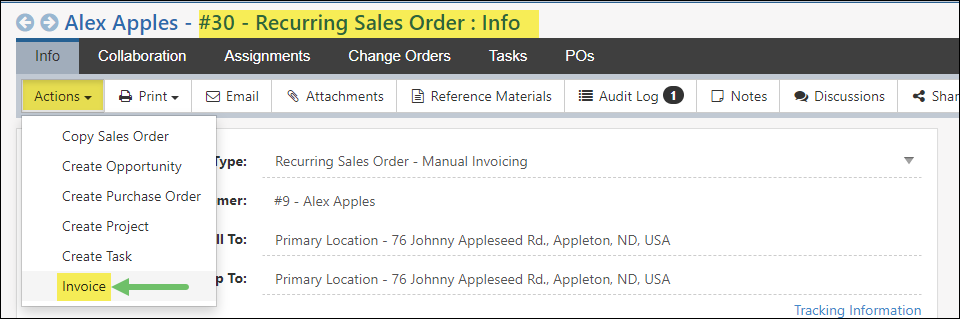
Example of Invoice Option on a Recurring Sales Order Set for Manual Invoicing
During Invoice creation through the API, Sales Orders that are Recurring and set to Manual Invoicing can also be selected.
- Note: All existing Sales Order Types and Recurring Sales Order Types have been updated to show Automated Invoicing as the default, but can be changed to Manual Invoicing if desired.
-
Sales Order Tabs
Once a Sales Order has been created, additional tabs will be available relating to the Order. This allows you to keep an all-in-one place while working on your Sales Order. Quickly seeing the related Tasks or Assignments allow you to easily navigate from one part of the process to the other while completing or creating Customer’s Sales Orders.
- Collaboration: Displays any documentation that has been uploaded for the Sales Order. Content groups and folders can be created to allow for an organized repository for all of your Sales Order’s documentation. Additional tabs for collaboration include related feedback such as Surveys, Quizzes, Assessments, and Forms. To learn more about collaboration, review our Surveying & Feedback Guide.
- Assignments: Lists any Assignments that have been given to the Sales Order along with the Assignment Category. This allows you to designate specific work that each Employee will be in charge of when it comes to the Sales Order. To learn more about how Assignments can be set up and used in Striven, review our Assignments Guide.
- Tasks: Any to-dos that are needed for the Sales Order can all be done using the Tasks tab within a Sales Order. This will prefilter information on the Task, such as the Order number and Customer name, for convenience. To learn more about how Tasks can be used in Striven, review our Task Management Guide.
- POs: A list of all related Purchase Orders can be housed within its own separate tab. This allows you to quickly and easily purchase Items or services that are needed for your Customer’s Sales Order. To learn more about how Purchase Orders can be set up and used in Striven, review our Purchase Orders Guide.
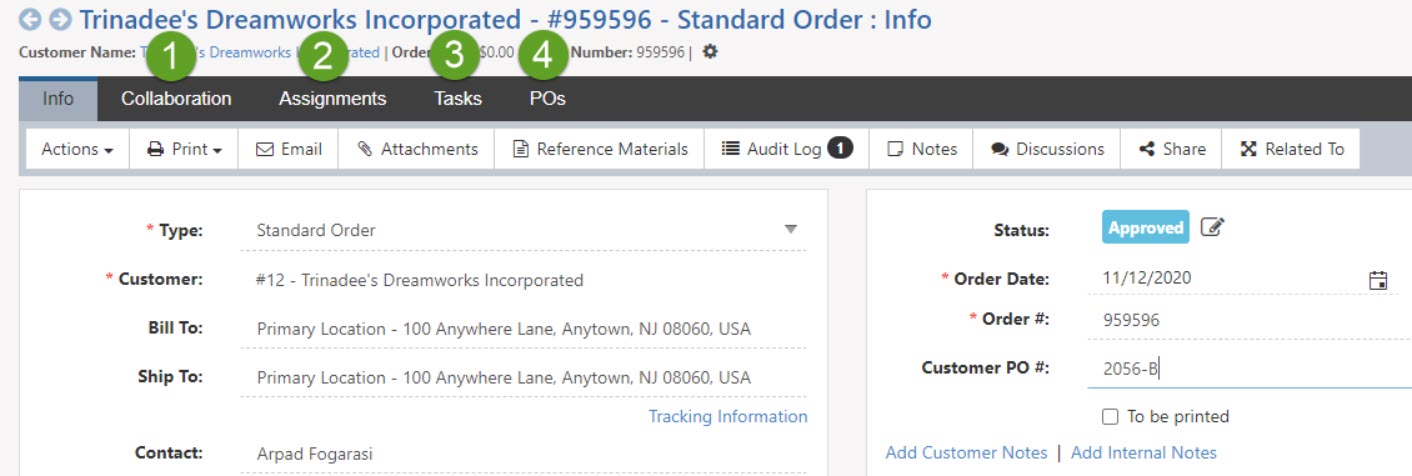
Example of Sales Order Tabs
-
Recap
With this guide, we’ve discussed how to create and manage Sales Orders, Sales Order Types, Sales Order Custom Fields, and more to ensure your Striven system is best suited to your Company’s sales needs. We’ve also explored Terms & Conditions, Payment Terms, and Sales Order printable formats in Striven.
FAQs
-
How do I create Invoices in Striven?
Invoices can be created from the Sales Orders’ Action menu, but they can also be created on their own as well under the Customers menu. To learn more about Invoicing, please reference our Accounts Receivable Guide.