
Customers
Customer Asset Management
Support Guide
-
Overview
Customer Assets can be anything that you service for the Customer, ranging from passwords to equipment. Customer Assets can be managed several ways in Striven, including the Customer Assets List or the Customer Asset Dashboard. When using Customer Assets, you can perform Tasks for the specific Asset and track Task history for the Asset as well. This guide will explore how Striven can help you set up and manage Customer Assets.
Read this guide if you are trying to:
✔ Create and manage Customer Assets in Striven.
✔ Configure Customer Asset Types and a Customer Asset Dashboard.
✔ Import Customer Assets into Striven.
-
Customer Assets List
The Customer Assets List displays all Customer Assets that have been entered into Striven. Here you can filter to view Assets for specific Customers, and you can also add Customer Assets on the list as needed. The Customer Assets List contains three columns, including Customer, Type, and Status. The Customer column shows the Asset name and which Customer it’s associated with. The Type column lists what Asset Type the Customer Asset is. The Status column shows Customer Asset’s status, which includes pending, in service, and retired. To add Assets from the list, simply click the Add button to create a new Customer Asset. Below is a screenshot displaying the Add Customer Asset page and a description of what can be configured there.
To view the Customer Assets List, use the following steps below:
Customers → Assets → List
- Type: The Asset Type. Customer Asset Types can be configured to show more information than others. Asset Types are discussed further below in the next section.
- Name: The name of the Customer Asset being added.
- Customer/Vendor: The Customer/Vendor the Asset will be associated with.
- Location: The Customer/Vendor Location at which the Asset is located.
- Status: The Asset status, which includes the following:
- Pending: Notes the Asset is not currently ready for Company usage.
- In Service: Notes the Asset is currently available for use.
- Retired: Notes the Asset is no longer in service.
- Unsupported: Notes your Company does not support or perform work on the Asset.
- Purchased Price: The price the Asset was purchased for.
- Custom Fields: Custom Fields can be added for Asset Types to capture and track information that is not available by default. To learn more about additional fields that can be configured in Striven, please review the Custom Fields Guide.
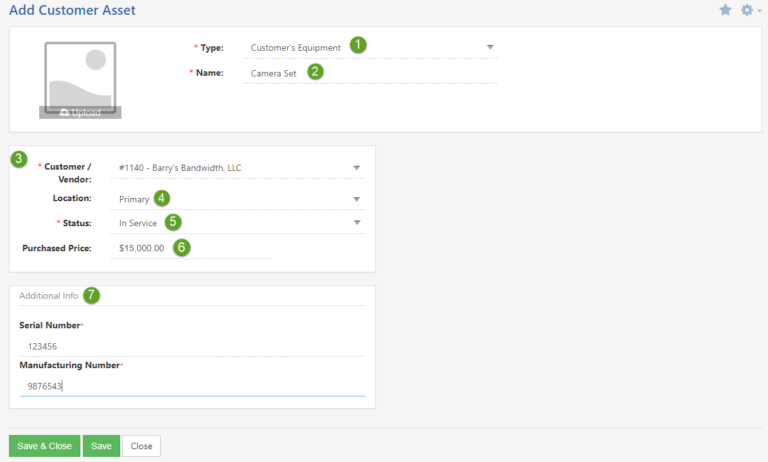
Example of Adding a Customer Asset

-
Customer Asset Types
Customer Asset Types will allow you to capture more information that is not available without a Type associated. With Customer Asset Types, you can enter and require an expiration date, purchased date, the Asset’s present value, or make the Asset Type visible on the Portal. Below is a screenshot displaying how a Customer Asset Type appears.
To view or add Customer Asset Types, use the following path:
Company → Settings → Customers/Vendors → Assets → Types
- Customer Asset Type Name: The name should be descriptive of the type of Asset being created.
- Default Status: Customer Assets of this type will automatically select the status you have stated as the default here.
- Asset Options: There are four check boxes here which allow certain information to be tracked with Customer Assets of this type. Once an option is toggled on, a second option will appear to make the field required or not. Trackable information is described below:
- Has Expiration Date: Check this box to include an expiration date for Assets of this type. Once checked, the ability to make this field required is an option as well.
- Has Date Purchased: Check this box if you wish to include the date purchased for Assets of this type. This field may also be made required once selected.
- Has Present Value: Select this option to include a field which will note the present value of the Customer Asset. Again, this will also have the ability to be made a required field.
- Visible on Portal: Checking this box will make this Customer Asset Type visible on the Portal. This will allow customers to View, Edit, or Create Assets of this type through the Portal.
- Actions: There are three actions available here:
- Save & Close: Saves the Asset Type and brings you back to the Asset Types List page.
- Save: Saves the Asset Type and keeps the current page open for further editing.
- Close: Cancels any changes made, does not save the Asset Type, and brings you back to the Asset Type List page.
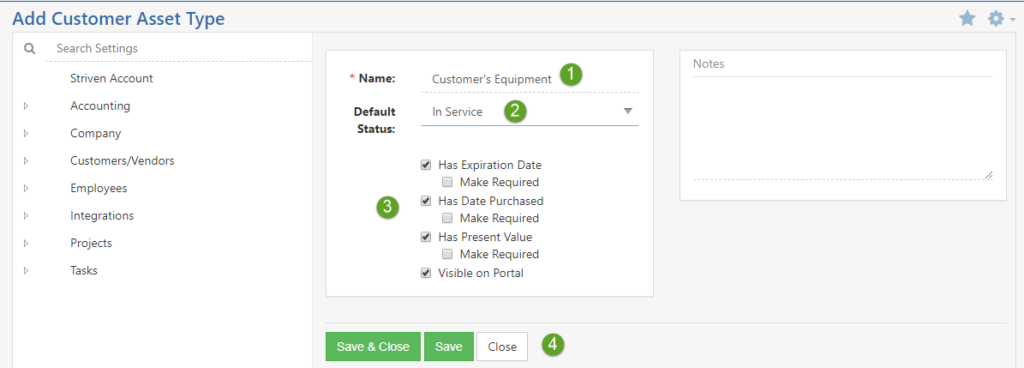
Example of Adding a Customer Asset Type
-
Customer Asset Types Grid Fields
As described in the section above, when configuring Asset Types, you can add Grid Fields to be tracked on the Customer Assets Dashboard. The Grid Fields tab becomes available on a Customer Asset Type after it has been saved. By clicking the Grid Fields section header when viewing the details of an Asset Type, you can add, rearrange, or remove Asset Type Grid Fields. Below is a screenshot illustrating how the Grid Fields section of an Asset Type appears and a list describing what can be accomplished there:
- Grid Fields: Populates the section to begin creating Grid Fields for the selected Customer Asset Type.
- Delete: Allows you to choose to hide the Grid Field from the Asset Type. Deleted Grid Fields can still be included in the future if desired.
- Rearrange: Allows you to rearrange the Grid Fields to suit your needs.
- Custom Fields: Helps to differentiate pre-existing fields and Custom Fields that have been added by a user of your Striven system.
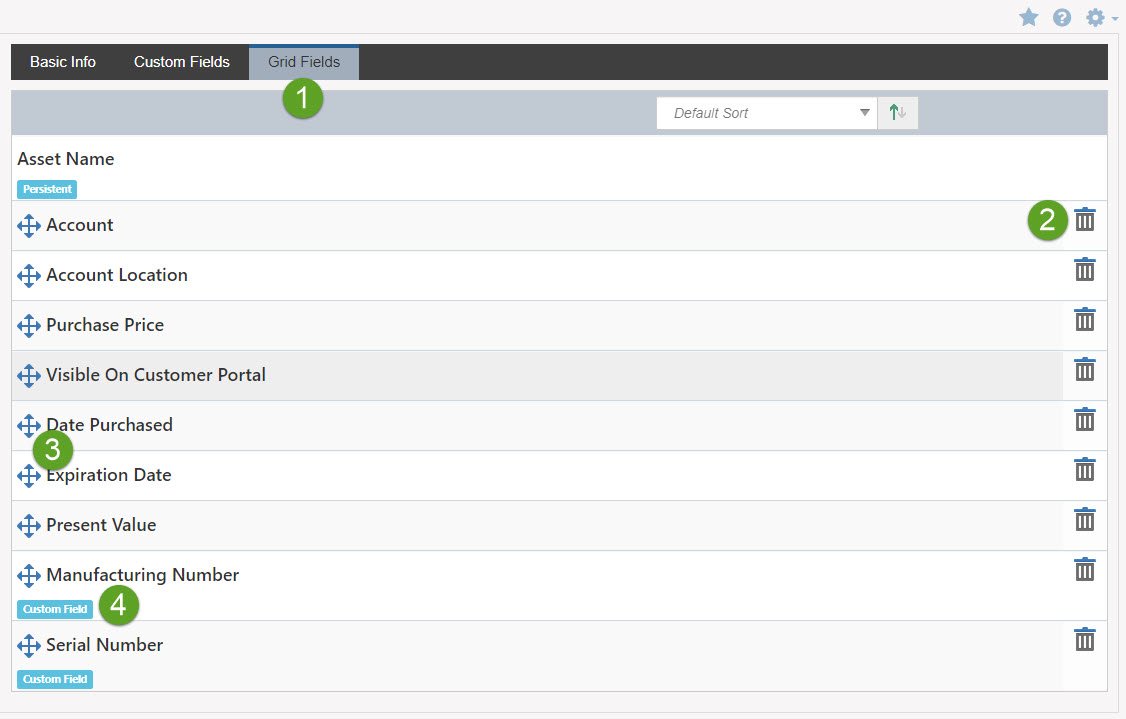
Example of Grid Fields on Customer Asset Types
-
Customer Assets Dashboard
The Customer Assets Dashboard lists all Customer Assets while being able to view individual Asset details, all on the same page. Customers are displayed in an expandable list on the left-hand side of the page. By expanding the Customer Assets, you can see they are separated by Categories to better organize a Customer’s list of Assets. After clicking on the name of the Asset, the Customer Asset info will populate on the right-hand side of the page. The Asset info will allow you to view Asset information, create Tasks related to the Asset, and view documents in the Asset’s Hub. Below is a screenshot illustrating how the Customer Asset Dashboard appears and a list describing what can be configured there.
To view the Customer Asset Dashboard, use the following steps below:
Customers → Assets → Dashboard
- Add Assets: Allows you to add a Customer Asset into your Striven system.
- Import Assets: Allows you to import Customer Assets en masse, as needed. The section below will help provide more information about how to accomplish this as well.
- Create Labels: Downloads a list of Customer Assets. This feature allows you to print labels for physical equipment that is being tracked as a Customer Asset.
- Customer Name: The Customer name the Asset is related to.
- Asset Category: The Category the Asset is assigned to. To View, Edit, or Create Categories, review the section above.
- Asset Name: The name of the Asset and will populate the info page on the right-hand side of the page once selected.
- Asset Actions: Actions located here have multiple functions, which are listed below:
- Save: Saves the changes made to the Asset information.
- Copy: Creates a copy of the Asset and its information into a new Asset.
- Audit Log: Displays changes made to the Asset.
- Open in New Window: Opens the Asset info page in a new Striven window in your browser.
- Asset Hub: Allows you to store and view content related to the individual Asset.
- Asset Tasks: Allows you to create and manage Tasks related to the individual Asset.
- Purchased Price: Allows you to enter the price of the item when it was purchased.
- Custom Fields: Any Custom Fields that have been added to the Asset Type will appear in this area of the Customer Asset for you to easily manage information.
- Associated Contacts: Allows you to associate a Customer Contact to the Customer Asset. This will reflect who should be contacted when performing an inspection or maintenance on the Customer Asset.
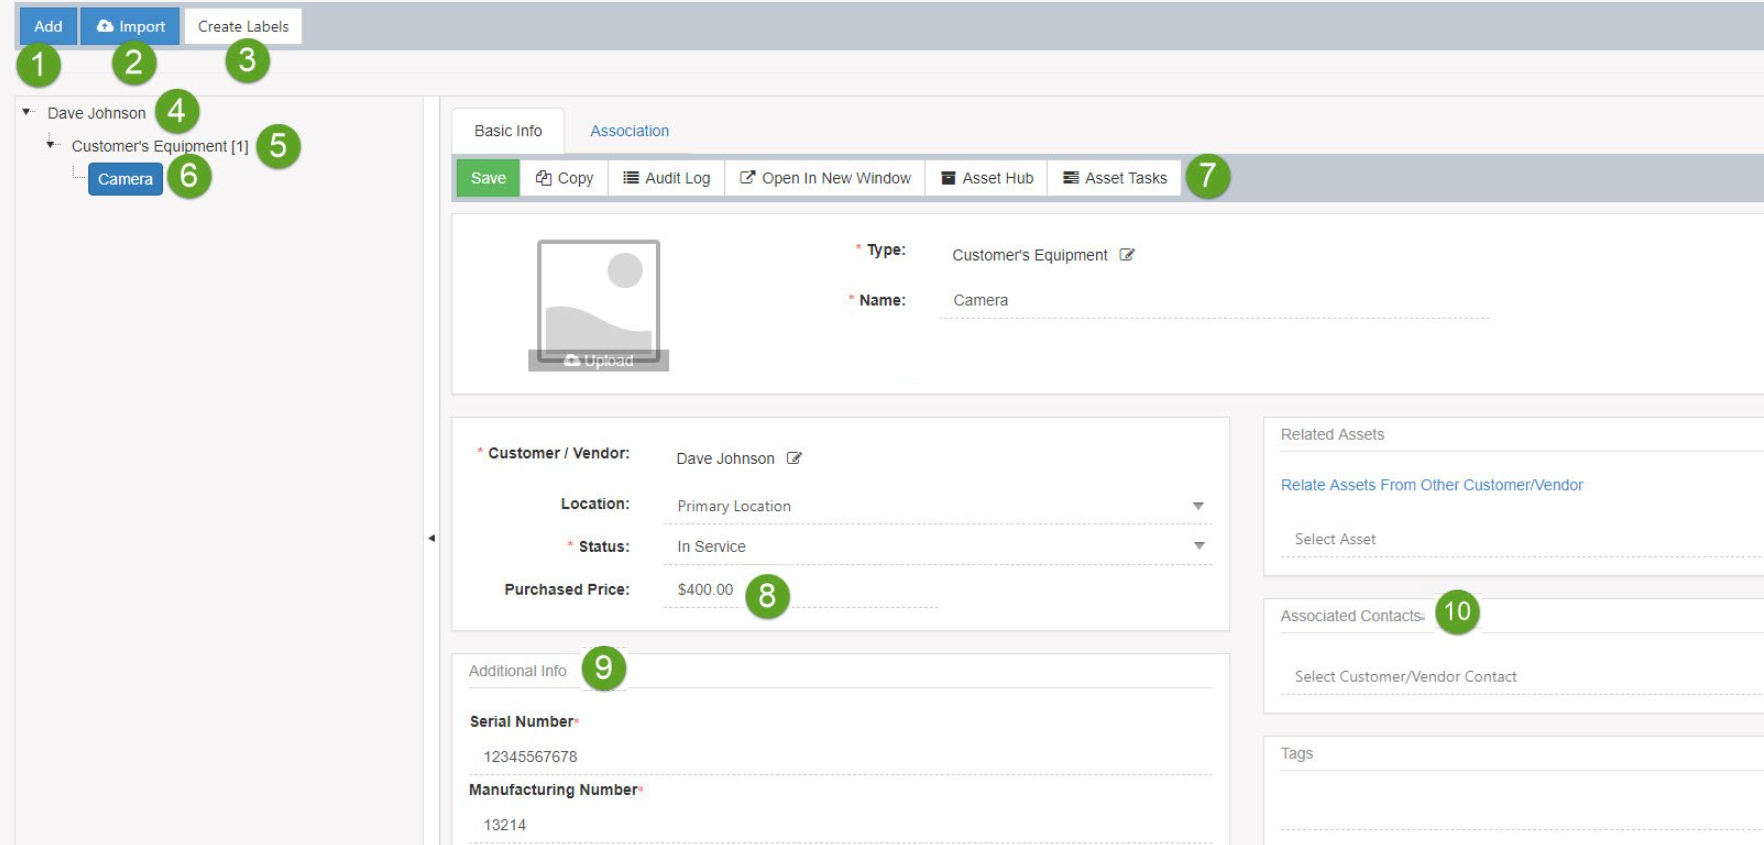
Example of a Customer Assets Dashboard
- Note: Below is a screenshot illustrating how you can view Customer Assets using Grid Fields on the Customer Asset Dashboard, along with a description of what can be accomplished there:
- Customer Asset Type: By clicking the Asset Type underneath the Customer, the Asset Type Grid Fields will appear for you to manage Customer Asset information on one page.
- Add Customer Asset: By clicking the Add or Add Asset buttons, you can create a new Customer Asset associated with the Customer.
- Grid Fields: The table shown here displays the Grid Fields, which have been enabled at the Asset Type level.
- View Customer Asset: By clicking the expand icon, the Customer Asset page will populate for you to easily manage the Asset information in a new window.
- Visible on Portal: Notes that the Customer Asset is visible on the Customer Portal. If this is not shown, the Customer Asset is not visible on the Portal.
- Copy Customer Asset: Allows you to copy the Customer Asset information. This will create a new Asset using the same information from the previous Asset.
- Edit Customer Asset: Populates the Customer Asset information so that you can edit the Customer Asset information easily.
- Deactivate Customer Asset: Allows you to deactivate the Customer Asset. Inactive Customer Assets can be viewed by choosing Inactive from the Status field and click Search. The inactive Customer Assets can be marked as active again, if desired.
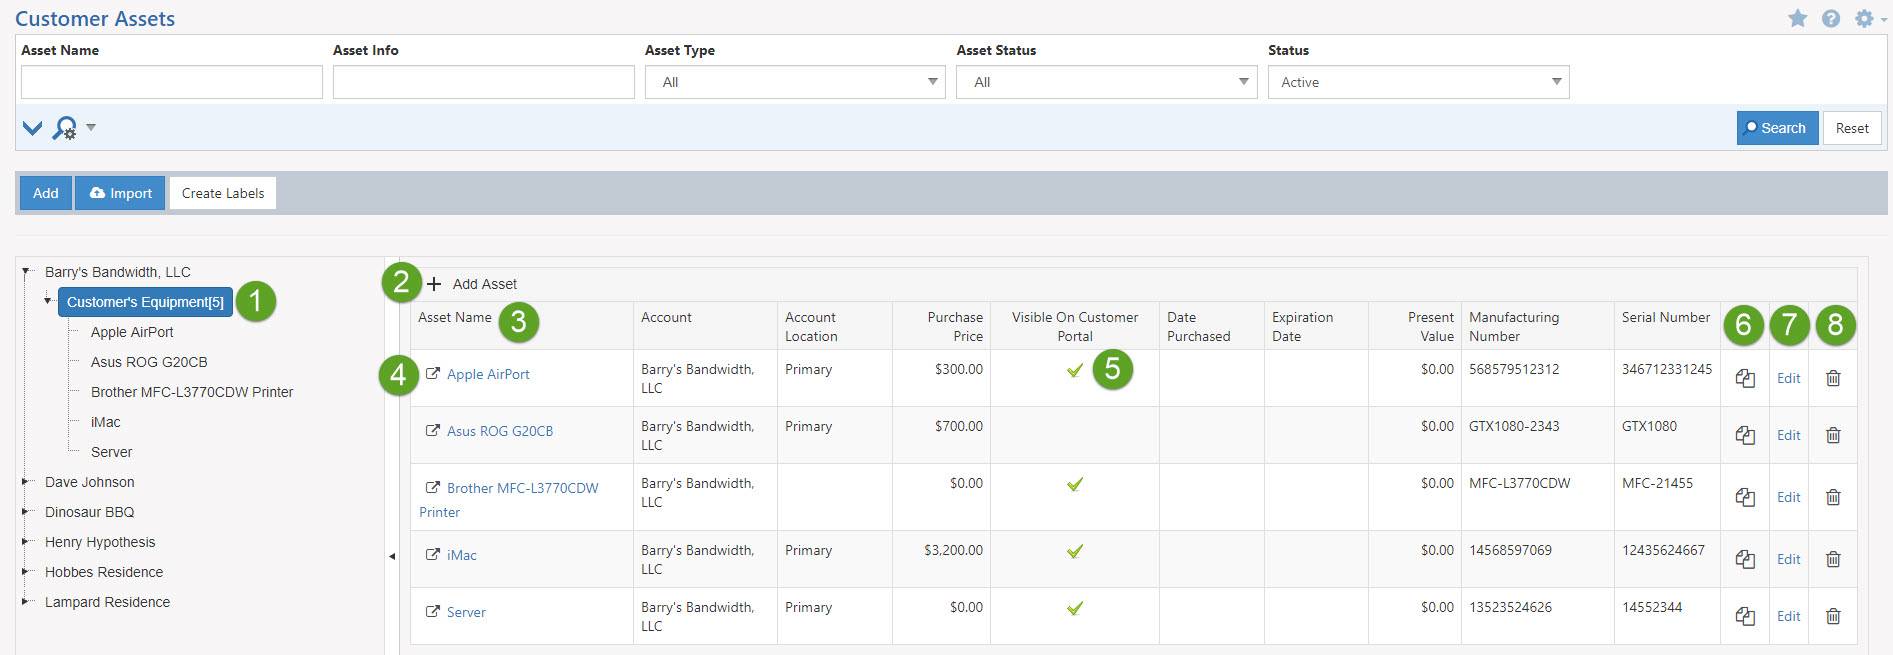
Example of Customer Assets Dashboard Grid Field View
-
Importing Customer Assets
Customer Assets can be brought into Striven en masse by utilizing Striven’s Customer Assets Import. This can be done for large and small databases to bring in multiple Assets at once. When on the Customer Assets List, you can click the Import button, which will populate the Customer Assets Import page. Once on the page, there are two icons which will help you when importing data into Striven. The Download Sample File provides a spreadsheet with pre-filled column headers (listed on the mapping) to assist with entering data. The Mapping icon will initiate a popup detailing what goes into the import spreadsheet to help guide you with importing data into Striven. For more information on importing, please reference our Import Management Guide. Below is a screenshot displaying how the Customer Asset Import page appears.
- Generate Sample File: Provides a spreadsheet with pre-filled column headers (listed on the mapping) to assist with entering data.
- Get Existing Data: Provides the options to Create a New Report or Choose an Existing Report in order to export Customer Asset information existing in the system to make updates.
- Import History: Directs you to the Import Progress page where you can search for previous Import Files. These files can be exported for editing or updating if needed.
- Select: Allows you to select an Import File from your computer to upload to Striven. File extensions allowed are .txt or .csv.
- Update Matching Data: Check this box only if you want your import to update existing Customer Asset information in your Striven system. The Asset ID will be required in the mapping in order for this function to work.
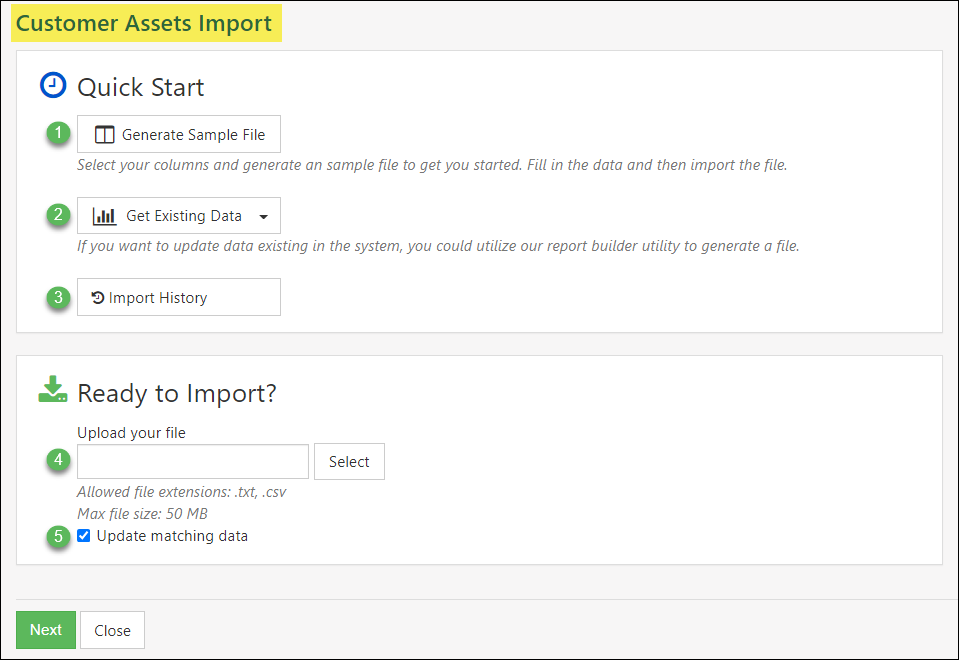
Example of Customer Assets Import Page
-
Recap
With this guide, we’ve explained how to add and manage Customer Assets in Striven. We’ve covered creating Asset Types, Asset Type Grid Fields, and how to configure your Customer Assets Dashboard. Lastly, we reviewed the steps for importing Customer Assets into your Striven system.
FAQs
-
How do you add Customer Assets to Tasks? I can’t seem to find it.
Associating Customer Assets to Tasks can be accomplished by editing and using Task Types. There is a checkbox available for Task Types titled Include Customer Assets which will allow you to add Assets after associating a Customer on a Task of that type. To learn more information about Task Types, please reference our Task Management Guide.